Saturday, 26 December 2020

SSW 65003 Exterior Post Boxcar

 Back in September of this year, I posted about modeling an exterior post auto parts boxcar that I'd been working on, but wasn't finished at that time. Hopefully this link to my September post will work if you wish to have a quick look at that.

https://jssxrailway.blogspot.com/2020/09/more-8-door-boxcar-progress.html

I've finally just finished up this 86 footer a week ago, so here it is.

An Athearn car, this one has sort of been 20 years in the making for me. This, along with two similar Southern Pacific cars, were inspired by an article written by Mike Budde and published in September 2000 in Railway Modeler magazine.

Here's a few looks at the completed boxcar...

From what I've read, the SSW had 30 of these 86 footers.  Modifications include adding the exterior posts, remnants of the roofwalks that were removed from these cars, and I replaced the stirrup steps with wire ones.


My original plan for the "COTTON BELT" lettering was to paint over a Microscale decal set, but that wasn't really working out too well for me, so Sean Steele had these done for me.  All of the other decals, including the grey stripes, were from Microscale sets. The stripes, as expected, were far and away the most difficult and time consuming part of the project.

This is most of the paper backing from the decals that I cut. From past experience I knew I wouldn't be able to get the grey stripes to settle down over all those ribs and posts correctly in one piece, so I cut them into short pieces.  Lots of short pieces.

Here's SSW 65003 coupled with my pair of similar Southern Pacific cars that I've modeled previously.

Having the 3 cars coupled together like this is something I've wanted to see on my layout for quite a long time. Finally done!


Saturday, 19 December 2020

BRAR Rolling Stock

 A few of Luc's custom painted and weathered rolling stock to show this week.  Lets start off with this triple threat of modern Trinity high cube freight cars, lettered for Luc's Brownville and Ashland.  I had these on the workbench for a few days to do some light touch-ups to some of the paint that had worn off or been chipped during shipping.

We'll begin with this view of the three Trinity cars coupled together on Industrial Boulevard along the JSSX...There's HLCX leaser number 5556 getting set to hook onto the 3 very sharp looking boxcars and drag them back around to the JSSX freight yard.  Note the large custom BA with the nifty pine tree graphic on the right-hand sides of the boxcars.

A closer look at the 3 individual cars is below...

The yellow reflective stripes stand out nicely along the lower sills of these modern boxcars.

Having the fresh graffiti on them certainly supports the modern theme that Luc is portraying with his rolling stock.

I wonder why the graffiti artist "X'd out" his work on this one.  Maybe he decided he's not such a fan of graffiti after all?

And then there's this RBOX fifty footer that I think Luc purchased through ebay.  One coupler pocket was broken off, and the wheels didn't turn very well.  The reason that the car didn't roll well appears to have been one coupler box rubbing on an axle. That's been fixed, and both couplers are replaced with Kadee number 58's, and the trucks/wheel sets have been changed out with those from a donor car as well.

The boxcar features ghosted Railbox graphics, lots of graffiti, remnants of some notices or seals by the door, and modern FRA reflective stripes.

The finish on the car was pretty shiny, so that's been flattened down too. 

And this view of the opposite side of RBOX 31235.  This side features stencil style lettering and numbers at the reporting marks.  A nice extra touch.

Saturday, 12 December 2020

A Soo Line Colormark Car

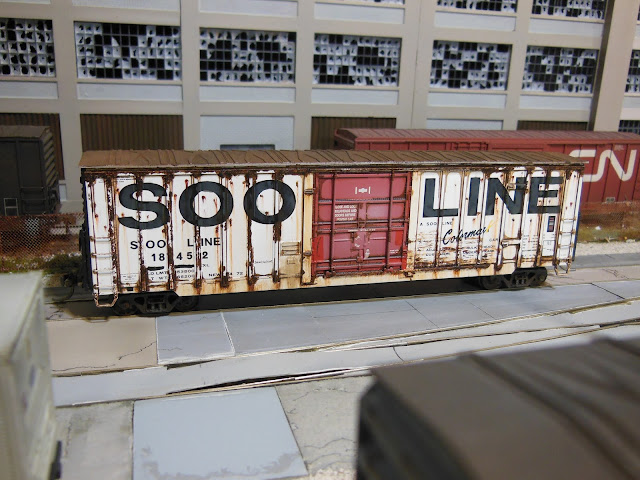
 Have you ever seen one of those white Soo Line boxcars?  The kind with the large black herald lettering and the bright red door? The ones that always seem to be rusted and blistered beyond belief. Well, about five or six years ago, I bought myself a Fox Valley Models Soo Line boxcar at the train show in Ancaster, Ontario with the intention of weathering it and of course using it on the layout.

 And then I tucked it away out of sight...on purpose. The idea of weathering the white paint became intimidating to me. Then, earlier this year, Jamie Barron brought the same car (different number) for me to weather.  And I procrastinated doing the weathering on it too.  Well, the wait is finally over for these two.

Here's the "before" picture of my boxcar...These Fox Valley boxcars are super sharp looking straight out of the box, although I think that the stirrup steps seem a little large.  I like where it says "A Soo Line Colormark Car" to the right of the door.  It was apparently some kind of coding system for the car's use.


So, here's Jamie's after it's become weather-beaten...

And the other side as well. I sure hope he likes it.

This next one is mine...the same one from the picture at the top of this post.

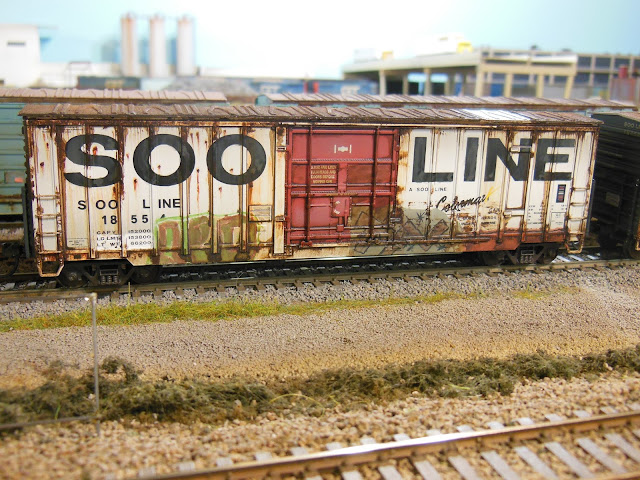
And the other side as well...
I practiced a little bit of weather-beaten graffiti on it also.

And here are the two boxcars together in the JSSX yard...
As I said to Luc a few days ago, I think a string of several of these would look real sharp in a train.  I think I'll start looking for a few more for myself.

Saturday, 5 December 2020

RBOX 31916

A bit of a milestone today, as this is post Number 200 for the JSSX Railway blog.  And not only that, I'm writing it on a new laptop since my old one crashed so mercilessly last month.

I received an Intermountain Pullman-Standard 5277 cubic foot RailBox boxcar last week from a friend. He didn't want it, and wrote that I could do whatever I wanted with it.

Challenge accepted...
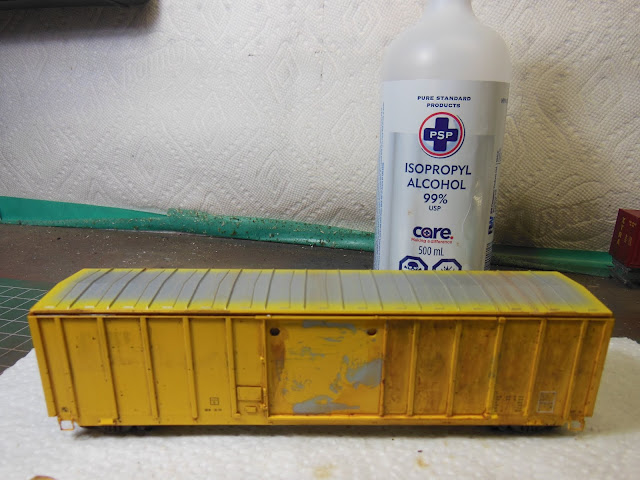
The boxcar as it was when I received it, doors off, and the wire grab irons were removed too.  They had been included in a small bag in the packaging.

99% alcohol and a Q-Tip made quick work of cleaning up the sides of the boxcar.

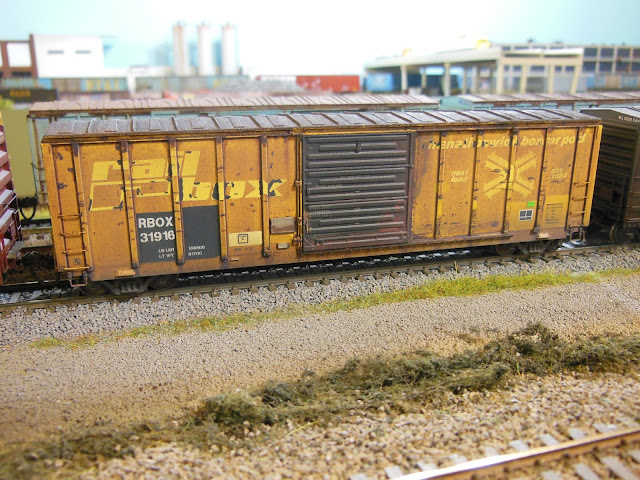
From here I'll jump straight to photos of the finished boxcar

I darkened down the shiny yellow with some thinned brown craft paint.  I really like the way the roof turned out.  That was done by brushing on 2 coats of Vallejo Rust Texture, and then going over that with AK Interactive Dark Steel powder, followed by Rust powder.

Rust along the various seams is AK Interactive Railroad Wash.  Great stuff, just a light touch of it and it flows right along a seam just as I wanted it to.

The RailBox graphics and the numbers are all from PDC Decals RBOX Ghost Lettering Set 4.  These are top-notch decals, but they are very thin and handling them can be tricky. The black parts of the graphics are my handiwork, as I used a fine-tipped brush to paint on some Flat Black to represent areas of the graphics that have not yet peeled away due to age and weathering.

Now, about that graffiti...I only put that on one side of the car, and I wanted it to look like it had been there for a long time. The graffiti to the left of the door is a decal from some set or other.  

Once that was all settled down into place and dry, I cut some masking tape and masked the basic outline of the graffiti on the right hand side. I airbrushed that area with some grey craft paint and then carefully removed the tape. I used some pink and beige paint to colour it in a bit.  The entire graffiti area was then faded out with grimy black, as was most of the rest of the car.

Found in the freight yard, this is the other side of the boxcar.  The black patches are black decal trim film, and the numbers and data are from that same PDC decal set I mentioned earlier.


Saturday, 28 November 2020

More B36-7

Here we have Brian Smiths B36-7 again, in this view it`s sitting out on the JSSX shop track. You can tell that it`s been finished it up because the green tape is removed from the windows. For me, that`s the final step in the process.

Luc saw this locomotive here yesterday, and had a good idea for it as well.  He suggested putting CSXT lettering beneath the numbers on the cab, as that was what was on the prototype at one time.  A real good idea, but if I did that, I would likely only be putting that lettering on the engineer`s side. And I would then put a strike-through line through the letters to help show it doesn`t belong to CSXT any more.   So it would appear something like this: CSXT

But, the problem with all that right now is that I don`t have any white letter `X`s remaining on my decal sheets. Microscale only puts 3 `X`s on a lettering sheet, and those tend to get used up pretty quick around here.

Anyway, here are a few looks at the engine as it is...

BSTX stencil font lettering at the bottom of the battery box door.

This side has the BSTX located on the cab, directly below the numbers.
A bit shadowy here, but I have darkened in the grilles at the rear of the locomotive by using thinned black oil paint.  Rust streaks are burnt umber.

A look from behind the locomotive. Some rusting can be seen here at the bottom edge of the hood. That rust continues basically around nearly the entire locomotive.  The deck plates are stained from rust as well (dark AK Interactive wash was used to do that).

And changing gears somewhat, I`ve weathered this BNSF boxcar a bit for Jamie Barron. Trying my hand at HO scale graffiti, this is hand painted.
The tagger has covered part of the reporting number, so they have been patched over using microscale stenciled decal numbers.

Saturday, 21 November 2020

Any Guesses?

 Any guesses what's underneath the tape and paper towel?

Fading down the yellow sill stripe is the first step as I began the weathering of Brian Smith's B36-7, made by Rapido.

Here's how the Rapido model looked when it was taken out of the box.
A extremely nice model, and it runs very well too, as I "had to" take it out for a spin around the layout.  Brian wants it to be pretty heavily weathered, and re-lettered for his leasing company "BSTX".

There's that sill stripe after the yellow has been faded down.  And I've blanked out the "Seaboard System" lettering as well.  I sprayed weathered black over black trim film and cut it out that to the shape to place over the lettering.  I haven't yet decided on which letter font to use for this BSTX leaser, but I think a stencil font would be a good choice.

I thought I'd paint over one door on the engineer side, so I masked it off and sprayed it with the weathered black as well.

This is about as far along as I've gotten with Brian's locomotive so far.  There's still the roof weathering to go, the lettering to do, flat/dull coat sealing to do as well. I should have more on this for next time.

And for anyone interested in weathering locomotives, you might find this YouTube video helpful. Shot from a drone at the NRE facility in Silvis, Illinois, this was just recently posted onto YouTube on Nov. 8, 2020.  I stumbled across it this week.  It's 14 minutes long.  Sorry about the advertisements, but there's really not much I can do about that. https://www.youtube.com/watch?v=mh0342ngV7o 


Saturday, 14 November 2020

Patched RailGons

 A few weeks ago, Jamie brought another group of freight cars over for me to weather.  I thought I`d show the pair of Railgons that he left with me. These are, I believe, older Roundhouse models.

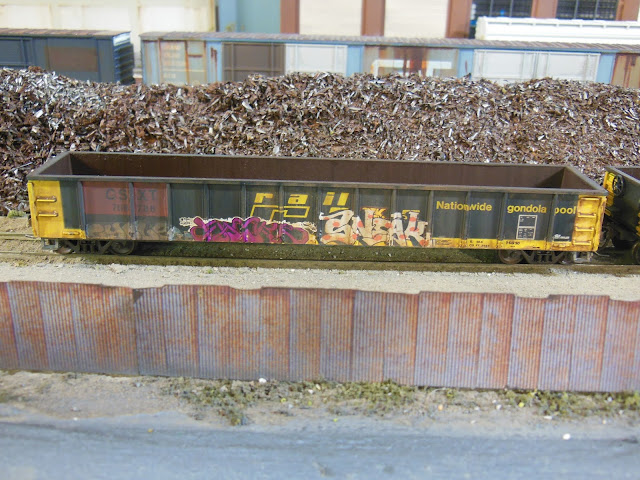
I started off by brush painting the original black insides of the gons with 3 coats of Vallejo`s Rust Texture. I tried to make sure to use vertical strokes on the inside walls, and then painted the floor of the gondolas with long brush strokes, doing my best to not leave brush marks. With that all dry, I feathered in light layers of different shades of brown so as to not leave the entire interiors all one colour.

I thought I`d show Jamie`s two cars being spotted into the scrap metal recycler on my layout.

I cut out a few graffiti decals and put them on just one side of each car. After the decals were applied I went over the car sides with a few thinned coats of Espresso (dark brown) craft paint, again sticking to vertical strokes only.  Doing this flattened down the colours of the graffiti, and does wonders to age the shiny black original paint.

As I was working on the gondolas, it occurred to me that maybe I should change the reporting marks as well in order to represent gondolas that have been sold and patched to a new owner.  I made a quick phone call to Jamie, and he suggested patching both cars to CSXT reporting marks.


Looking closely, you can see the vertical lines left by my paint brush on the inside wall of the gondola. I was careful to do this on purpose, to try to simulate vertical rust streaking. Although hardly visible, it looks a great deal more prototypical than if any visible brush marks had been horizontal.


In other news, I met up with George Dutka (of the White River Division blog), Don Janes, and Luc Sabourin at the Sarnia train station platform last Monday.  George had the idea and set it up. Peter Mumby and Brian Smith weren't able to make it, understandable as it is about a 60 mile drive for them and George as well.  The four of us all had a great visit though, and we each brought some along models to share too. I didn't take any pictures, but George did, and he posted some of them to his blog, so please click on the link below to see that post.

Saturday, 7 November 2020

BRAR 10009

Here's a look at a really nice weathered 50 foot boxcar that belongs to Luc Sabourin. I'm sorry, I forget who he said did the weathering for him, but that weathering artist did a super job on it.

I was asked to simply patch over the boxcar reporting marks and number for Luc's Brownville and Ashland Railway.  Luc wants his models to be very prototypical, and was quite specific about how he wanted the patching done, and even provided the decals for me to use.

I really should have taken a picture before I did the patching. This boxcar gets even a little bit better looking in the next photo.

After the patching was done, Luc also asked me to update the boxcar a little bit more, by adding the FRA reflective yellow stripes from Smokebox Graphics.  He even very helpfully provided a photo of another prototypical boxcar that he liked to show me exactly where he wanted the stripes to go. 
If you look closely enough, you can see above the trucks a small red decal that I applied at Luc's request.  That decal denotes something to do with inspection of the wheels/trucks.  Sorry for the blurry photo here...my fault...but what a great looking model !


Saturday, 31 October 2020

Loading dock

 First up this week, before I get to the loading dock part, is the news that Dave, of the Consolidated Motive Power Services blog, has renamed his blog and his railroad to now be the River Basin Railroad. You'll now find the link to the new site listed in my "Blogs I Like" column over on the right-hand side of the page.  Dave's a great modeler, and chimes in here with a comment pretty regularly.

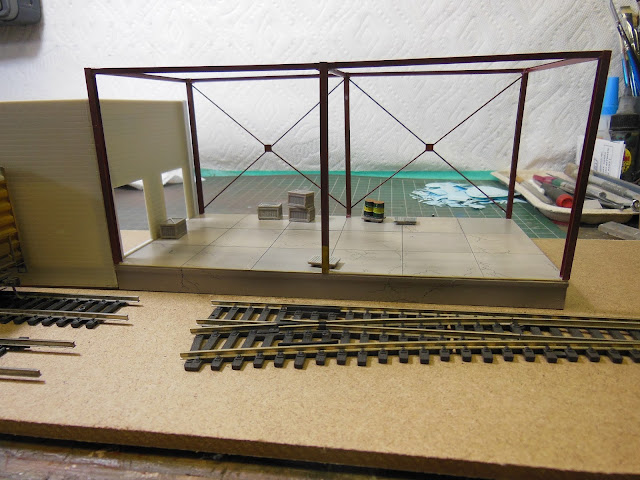
I thought I'd like to have an open-air loading dock as part of my new industrial building, so I've scratched on together from odds and ends that I had on hand.  Those items being some Evergreen styrene H-column, I-beam, a couple of unused loading docks from previous Walther kits that I used as the base, and a piece of .040 styrene sheet.

Here it is on the workbench, pre-assembly...The "concrete" pad measures 30' x 60'.


I used the back of an Xacto knife to scribe the grid marks into the styrene sheet.  The pad was sprayed with ModelFlex Concrete Gray.  Some of the squares were masked off and sprayed with light coats of Craftsmart Gray just to add a bit of variety to the colour. Once everything had dried, I coloured in the scribed cracks on the pad using a .005 diameter black pen. If you look closely, you can kind of see dark shadowy areas I sprayed to represent marks left by forklift tires that lead from the front edge of the dock to where the entrance doors to the main building will be.

Above is the nearly done loading dock, with the steel frame painted in primer red, and a few crates pallets, and barrels added.  The bottom 4 feet of that front column has been painted safety yellow so a fork lift driver is less likely to bang into it.

 Out in the real 1:1 world, d
own at the Sarnia "C-yard" 2 Sundays ago was this tagged, rusty and patched 3-bay covered hopper. The randomness of the graffiti and rust colours nearly camouflage the freight car as it's behind the tall brown grass in the foreground.This one even still has it's old ACI tag.

And phjoto taken the following day, this bulkhead flatcar of aluminum ingots was sitting in "A-yard".
This might make for an in interesting modeling project one day.  The orange coloured straps are also quite appropriate for the season.


Monday, 26 October 2020

Late Posting This Week

I'm quite late posting this week, 'cuz I ran into computer trouble last Monday.  The hard drive failed on my laptop, so it's been out of service since then. My computer guy said something about the "boot config", and is rebuilding the drive.  Or at least trying to.  I didn't think I'd be posting anything at all this week.  But I'm using my adoring wife Linda's computer now, although it's kind of not the same and I haven't been able to sign in to my email yet.

Anyway, here's what I think is a real nice picture of modelers George Dutka and Don Janes on the platform at the Sarnia station last Monday, the 19th.

George arranged for us to meet up down there.  Have a look at the models these two brought along.

That's Don's RS-10 in the foreground, and George's Alco and FOS models behind.


I took a trip out to the local Lowes to get a piece of MDF to mount the structures for the bakery building kitbash on.  I bought material that's 1/4" thick this time, reasoning that it should be less flexible than the thinner product that I've used before.  This should make things just a little more secure as I move the models to and from the workbench to the layout.  I've cut a piece of the MDF to 8" wide and 48" long for this industry.

As in the past, the idea is to assemble this model as a sort of module that will be able to be easily lifted out for cleaning or upgrading or whatever, and could even be replaced with another different industry on another piece.

I wanted to try to have this industry with 2 spur tracks running along the front of it, so I'm going to try that idea out.  Here's a look at things as they currently sit, just roughed in on the layout. Next step will of course be to connect the tracks to the GTW line.

You can see the 1/4" MDF, which I think should match up in height nicely with some cork roadbed leading up to it. The silo and transfer building, an open-air loading dock area that I've scratched from materials I had on hand, and the (as yet roofless) main building.  I'll post more photos of the open dock next time.

I'm a little unsure whether I like this or not, as it looks like there might be a little too much trackage in one area.  That's the JSSX line on the left, the GTW in the middle, and then the new spur(s) on the right.  I'm going to try it out this way first though.


Saturday, 17 October 2020

A New Industry for the Layout

 Got started just recently on a new industry for the layout. It's intended to go along the GTW line, to fill in an area that's been under utilized.  In fact, hardly ever seen any real use at all.

I'll be kit bashing this one from the Walther's Magic Pan Bakery kit, and it's going to take me quite some time to finish it up.  I chose this kit for a project because the main building has "concrete block" walls for the main building, rather than the typical brick walls that so many of my other structure kits seem to have.

This is the kit as pictured on the box. Inside the box, there's an office, the main plant building, four silos, and a transfer building, plus details such as stairways, a ladder, and piping to assemble, so it should be fun..


I'm intending to use most of the kit of course, but not all of it, as I can't really see a use for the office part of the structure right now. I will reconfigure everything else as best I can to fit the space that I have available.

As I have come to expect with the Walther's kits, the instructions are a bit cryptic, as the diagram for the silo assemblies are blurred together.  And the silos aren't round after they're put together either.  I ran into the same problem a couple of years ago with their silos on another model.  Those things aside, I've been enjoying putting this one together so far.

I've been painting and weathering most of the pieces before assembly, and I've changed the orientation of the building so that the stairway will be more visible.  Doing so meant making small changes to some of the piping as well.

Lots to do yet, but here are a couple of photos from the workbench of what I've managed to accomplish so far.  I think it's looking pretty good...
Hard to tell in this view, but I've modelled the top door open.  I've shortened the vertical piping by about half an inch because, as Luc pointed out to me, the pipes would have been obstructing access through the bottom doorway. That's because if following the instructions, the wall with the stairway is supposed to be facing the silos.


Top-down view above the silos.  The 4 grey sections of piping still need to be painted, and I have some spare roof details here that I can put on the top of the transfer building.

Set roughly into place on the layout, the rest of the industry will be on the left-hand side of the transfer building.