Friday 31 May 2024

Mississippian Railway Boxcar

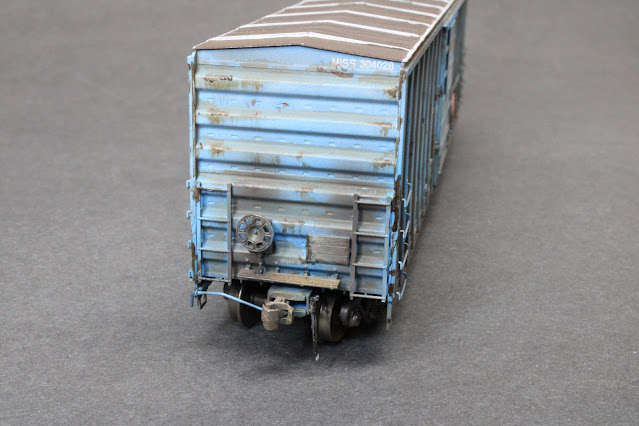
When I retrieved this boxcar from my storage cabinet this past week, it had been away from the layout for quite a while.  As it ran around the railroad, I was thinking to myself that I had done a good job weathering this one...

But, then I got thinking why not make just a couple of small improvements to the boxcar.

So, I clipped off the trip pin from the Kadee #58 couplers, added a pair High Tech Industries rubber air hoses, and then cut and bent a couple of pieces of brass (late edit here by me, it's brass, not bronze as I originally posted) wire to make and add coupler levers.
A look at the new coupler lever and the air hose

I painted the coupler levers with Rock Island Blue that I had on hand, and then went over them again with a bit of thinned primer grey.  It's worked out to be a pretty close match to the boxcar colour.  A quick dab of grey to highlight the glad-hand at the end of the air hose.

After those little modifications, I got a bit more ambitious, and went ahead and painted on the sealant at the roof seams.
I prefer to use a grey colour, primer grey actually, to simulate the roof sealant, as opposed to white which is used by some modelers.  I think the boxcar looks just a little better now.

Brian Smith sent along this idea for a "blue flag" that is used on railroads to signal to not move a freight car or locomotive.  This is used in place of an actual blue flag.


The transfer/loading facility on JSSX looks like a good place to try a blue cone

Happy Modeling Everybody !

Friday 24 May 2024

GATX Boxcar

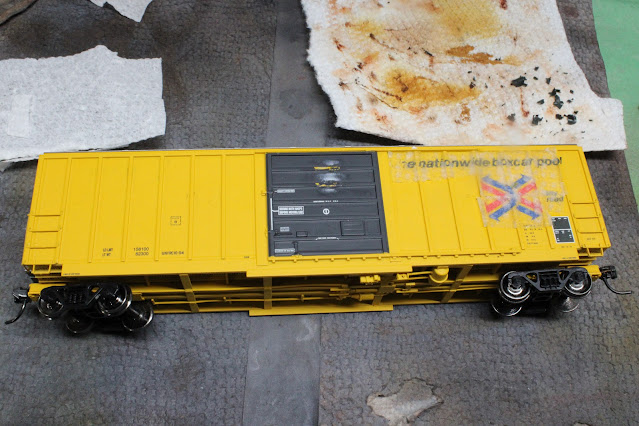
Been working on this GATX boxcar for Luc and Radisson.  Finally got 'er finished up, so I thought I'd show it here.  The goal is to somewhat replicate the appearance of this prototype boxcar, albeit with reporting marks for Radisson's ACRR and no graffiti.

The model started out as an ExactRail RBOX car

Here it is before removing the logos and lettering

Paper towel soaked with Solvaset on the right-hand end of the boxcar softens up the original markings for removal after about 30 minutes. Then, some rubbing with a damp Q-Tip and a damp toothpick will remove the markings. I've already removed the logo on the left-hand end.

All the markings are off now, as well as the placard on the door.  It was brass, and popped off quite easily with just a little pressure from a small screwdriver.

First colour of the re-paint
I had covered the boxcar with a grey primer before spraying with the Mission Models Red Oxide that Luc provided.

Sorry I forgot to take a picture with the upper portion of the boxcar masked in order to be able paint the lower area with the darker brown Mission Models.
With the paint done, next step was clear gloss coat before decals.

A few years ago, I made the switch from Testors gloss and flat products to the Tamiya clear gloss (TS-13) and flat (TS-80), and I haven't looked back.  I find that the Tamiya seems to have a finer spray, and unlike the Testors I've never seen any "orange peel" effect when I've used it.

Here's a look at the paint products used to finish off this boxcar:
Mission Models paints 013 and 015, and the Tamiya TS-13 Clear (gloss) and TS-80 Flat Clear.  The decal set we used for this car was SmokeBox Graphics 5887.

And so I'll close out with a couple of nice views of ACRR 5500 as it looks on my own Tri-State Paper spur.
I should also mention that I've added angled stirrup steps #212 from Yarmouth Model Works

A nice, clean looking boxcar.  I'm really pleased with the way this one has turned out.

Have a great week everybody

Friday 17 May 2024

Highway Overpass Part 3

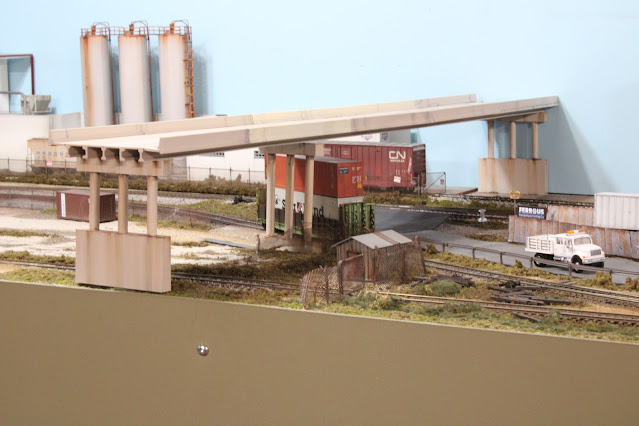
So back to the overpass project now after a few days away from it.  I shortened up the pier heights by about 3/4" so that, at least to my eyes, the whole thing doesn't look quite so spindly or fragile now.

I don't have any double stack container cars, but I have a few old containers, so I stacked two of them together in a gondola to double check the clearance height, because you never know.  Luc thinks I should have an auto rack train. A nice idea, but it's not likely to happen any time soon.

Lots of room between the top of the container and the bottom of the overpass girders.

I also began re-doing the small area underneath the overpass, with an eye to moving the vehicle entrance to the trans-load property over a few inches, but I haven't gotten to that part yet.

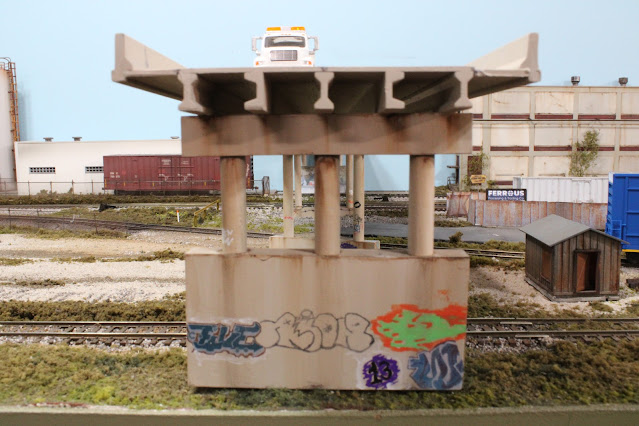
Here's a few looks at the way things sit right now:

Since the layout in general is somewhat modern I've added graffiti to the support piers.  Some of it is hand scribbled, and some is done with decals.

Not much greenery seems to grow beneath an overpass, so I'll be removing that which we see here, and replacing it with gravel.


A view of the new overpass from the other side, and what do you know, there's JSSX 813 about to rumble underneath it.

I also still have to put gravel/ballast at the bottom of the piers to fill in the small gaps

As part of 813's train, there's that new 60 foot Greenbrier boxcar.

And by the way, one of those stupid plastic couplers on that brand new $65 (plus shipping, plus tax) model boxcar, from Aurora Miniatures broke almost right away, 'cuz those couplers suck.  I've since replaced both couplers on that car with Kadee #158's.  THEY won't break.

A look at some of the vehicular traffic on the overpass
It's a pretty busy area of the city, so I should probably try to get a couple more vehicles to use here.  I don't have any passenger vehicles, so maybe I'll try to pick up two or three of those.

Have a good week everyone.

Friday 10 May 2024

Another Exterior Post SP Boxcar

I've added the "Search This Blog" feature at the top of the blog's sidebar.  So if you wanted to find some previous posting about something here, you can just type a few key words into the box and it should come up.  I tried it out as I was writing this, and it worked.  I got the idea while reading George Dutka's White River Division blog this past Monday, so, Thanks George.

I got away from the overpass project a bit this week, and finished up another 86 foot boxcar that I'd started quite a long time ago.  It's another of the exterior post SP boxcars like I've posted in the past, making a total of four of them that I've done.  I had put this one away, basically forgotten about it for what turned out to be many months, and just got it back out of the cupboard to try to finish it up.

Here's a few looks at this newest effort, SP 615202.

As I've noted on the previous cars, I was guided by an article in an old RailModel Journal magazine for this build and paint project.  The grey strip decals are the most difficult as they have to lie down over vertical and horizontal raised details on the doors.  I do them in small pieces at a time.

Had to buy 2 sets of the Microscale decals in order to have enough of the door stencils.  Also, the word "Hydra" is not on the decal sheet, so some cutting and trimming is required for that, including the letter "D" which I made from a "C" and an "I".

Here's a view of all four of the boxcars coupled together:
That's the newest car on the right.

I think they look really sharp all coupled together.

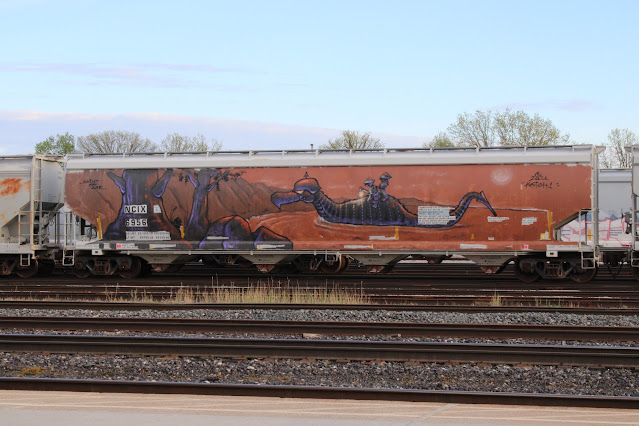
In the 1:1 scale world, this covered hopper had been hanging around the Sarnia's C-Yard for at least a week before I finally took these pictures of it.


Interesting that the artists worked around all of the markings on the car

That's it for now.  Thanks for looking, and have a good week everybody.


Friday 3 May 2024

Highway Overpass Part 2

Picking up sort of where I left off last week, the overpass has been coming along quite nicely so far.  Here, I've masked most of the roadway and the concrete guardrails, leaving scale 6 gaps only where the roadway's lines will be.

The lines at the right side of each lane are sprayed yellow using the airbrush, and the double solid line down the centre is white. Each of the lines are about 6 inches wide.
Tape removed, and the lines look pretty good.  I then brush painted about a dozen or so spots to look to represent potholes that have been filled with asphalt. Rather than use a true black colour for this, I instead used SP Dark Gray to try to give an older appearance to the "asphalt".

I've weathered the overpass support piers, so here's a look at one of those
I used Brown Panel Line, plus Burnt Umber and Ivory Black to grime things up a bit. I have to say though that the support assemblies seem a bit spindly to me.

And here's the overpass bridge set roughly into place on the layout.  Remember, I said roughly.
I think that as it sits at the moment, the overpass is quite a bit too tall.  I don't actually have any double stack cars, but I put two containers on a flatcar just to see how things might look.  The bottom of the bridge girders are about an actual inch and a half above the top of the containers.

About the same view as the one above.  I have another set of columns to add to the middle area.  But I really think it's too tall, so I'll have to shorten down 12 columns, probably by about an inch or so. 

One more look for now.
This view from the other side of the overpass, shows a bit of the surrounding area as well.

And in other news, I had recently ordered and just this week have received a new piece of rolling stock. It's an Aurora Models 60 foot high cube Greenbrier boxcar.  And boy, is it nice! Here it is, right out of the box, sitting on the spur that leads into the Tri-State Paper facility on my Grand Trunk.
Note that the reporting marks are high up on the sides of the car.  I guess this is to try to prevent taggers from painting over the reporting marks.  Makes me wonder though if taggers wouldn't just climb on those horizontal ribs to do their work.

There are a couple of little details that Chuck has pointed out to me, such as none of the door closer handles are vertical, nor do they have the white paint at the tips. He also points out that the coupler bars are yellow on the prototype cars, with white paint where the worker would place their hand, as well as that new freight cars have a light coloured non-slip coatings on the stirrup steps. Those should all be quick and simple fixes to the model.