Saturday 31 August 2019

Loading Dock Bridge Plates, + Weathering of a DT&I Gondola

At the end of last week's entry, I mentioned that I thought some bridge plates on the loading dock would make a nice added detail.  Where I used to work, we just called 'em dock plates.

Anyway, checking the scrap box, I found some .010 styrene sheet and a couple of pieces of .030  round rod that I figured would be good enough.  I could have used square styrene strip, but I found the round stuff first.

I cut the styrene sheet into 4' x 6' plates, and then with the back of an Xacto knife I quite gently scored along one long side, about 16 or 18 inches from the edge. I cut the styrene rod into 4 foot lengths and glued one piece down each side of each plate. Once the glue had set up, I gently bent the plate at the score line to a slight angle, being careful not to actually snap the piece. Then another piece of the round bar was glued to the underside of the plate at the bend.

 A piece of wire from a twist-tie was cut to length to simulate a cable that a fork lift could use to pick up the plate.  Scale size chain would have been nice to use for that, but I simply don't have any.
A half-dozen dock plates, ready for paint.  The round rod at the sides are to help keep a lift truck from running off the edge.  As I say, the square styrene rod bar would have been better, but I found the round stuff first and I doubt if anyone could tell it's round if I didn't tell them.  Another thing that would have been nice to use is diamond-pattern tread plate, but I don't have any of that either.
 6 dock plates all painted and weathered and ready for use.

Here's one of the dock plates tucked into a corner of the loading dock for whenever the next rail car arrives.

This dock plate sits ready at the end of the loading dock whenever the next truck or trailer makes a stop here.

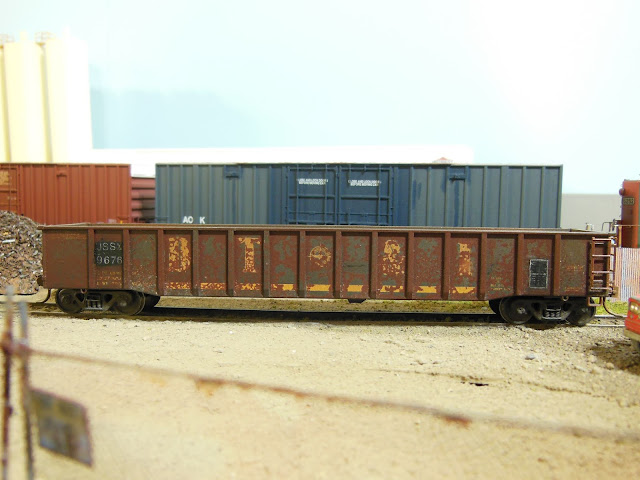
Over to the local scrap dealer now...This DT&I gondola actually belongs to another modeler, who has asked me to weather it for him. I've had the same one (same model and exact same number) for a couple of years.  The one I have was given to me by friend Brian Smith, because he knew I have a few other DT&I cars, and I was just starting to pull together my scrap metal yard at about that time.
At the time, I figured that such a shiny new gondola would look a bit out of place running into a scrap metal yard, so I had to weather it up a bit.

I started by spraying the model with grimy black to flatten the gloss right down. Then, the grimy black was removed from the lettering and stripes with some Micro-Sol and a dampened wooden toothpick.  Next, I faded the yellow lettering and striping with a small brush and 3 or 4 layers of some thinned soft yellow craft paint. All of that was then sealed with a layer of DullCote.

Next up was to spray the car sides with chipping fluid from AK Interactive.  After that had dried (it took just a few minutes), I sprayed the car with ModelFlex Dark Tuscan Oxide.  Once that colour had dried, a damp brush was then worked over each of the panels to chip some of that colour away, revealing the grimy black underneath. The result is a randomly rusty, grimy patchwork of two colours to give the impression of a gondola that's seen long-term hard service.

I patched and re-lettered the reporting marks to JSSX ownership using Microscale flat black trim film and an alphabet decal set.  Final step was to spray with DullCote to seal up the whole thing.
Here's the model, the one Brian had gifted me, at the scrap yard after I've weathered and patched it over to ownership by JSSX Railway.


And the loaded gondola is ready for pick up from the scrap yard by the GTW. The metal busheling that I used for the scrap load was also given to me by Brian.

Saturday 24 August 2019

Another Industry Upgrade

I've turned my JSSX attention in recent times to upgrading a particular area that's been sorely lacking in it's level of completion.  The track has been operable, so trains have been able to run there, but no track ballasting or ground cover had been done and the buildings/structures had been just sort of "roughed in" - and I mean really rough - for quite a long time now.

You may recall my re-construction of the big, long backdrop factory that I had worked on in June and July.  Well, this combination of structures sit in front of that factory and are served by the shortline JSSX.

I originally scratch-built this warehouse several years ago, but it's gone through a couple of changes since then.  I actually shortened it's length by a few inches so it will fit this space a bit better. Up to three freight cars could be spotted here, but one or two at a time has been more the norm.

That small red brick structure is something I picked up at a show for a couple of dollars, but it only had 2 walls...and a roof with a big hole in it. I patched over the hole with a piece of styrene from the scrap box.  I also added a steel-sided wall to the open end and even put a concrete block wall across the back.
The three separate pieces are shown here just sitting loose on the layout. The concrete loading dock is also something that I scratch-built from styrene.  It gives a bit of flexibility to the complex, as it could be a spot for an extra boxcar or a flat car, and I feel it adds a bit more interest to the scene.  I'll also be able to spot a trailer or delivery truck at the end of the dock.

So now I've attached all 3 of the structures to a single piece of MDF, 8 inches wide and 36 inches long. I moved everything over to the workbench to do all this. Once the buildings were epoxied into place, I glued ground cover all along the edges of the MDF to try to hide the edge once it's all set into place on the layout.  With all that done, I can pick up the whole thing as a unit and move it all over to it's place on the layout.

Here's the view of the building with a few other small improvements that I've added.
Added details include the roll-up door on the end of the warehouse, an entry door to the brick building, a chimney and vents on the roof, an oil drum, and tire tracks - likely from a lift truck - on the loading dock. There's a pair of rubber bumpers on the end of the dock to protect the concrete from trailers hitting against it. And you can see a large exhaust fan in place just beyond the rail car.


A detail shot of the loading dock and brick building.  I drew the cracks in the concrete with a .005 black ink pen I bought at an art supply store.  A light pass or two of grime from the airbrush should help to age the concrete.

While I try to figure out what to do to the warehouse roof, next up will be to work on the ballast and ground cover at the rail spur that leads to this business. And I've only just now thought of trying to make a couple of lift truck bridge plates to have laying on the loading dock.

Saturday 17 August 2019

Weathered Grand Trunk Boxcar(s)

On my layout, the Grand Trunk Western interchanges with my JSSX shortline.  So, when I checked in on Matthieu Lachance's "Hedley Junction" blog a couple of weeks ago, I was quite interested to see an entry about his weathering of GTW boxcars.

Matthieu wrote some observations he'd made regarding the real world weathering patterns on the GT NSC 50' boxcars, and how he'd gone about trying to replicate them when weathering his models. He mentioned that he had used white and beige colours to fade the original GT blue. Matthieu also noted that the GT cars tend to develop light rusty areas in the upper regions of the panels.

Here's the link to the Hedley Junction blog:
http://hedley-junction.blogspot.com/2019/08/weathering-atlas-gtw-nsc-boxcars.html

In the past, I've found that fading with white can be tricky.  Just a little too much white and the model can easily take on a "frosty" tone, and that's not what we ever want. The only paint close to a beige that I have on hand is ModelFlex Concrete Grey.

And I could also use a little practice with the Burnt Sienna PanPastels that I've got, so I thought I could use that for the light rusty areas..

I thought I'd give all this a try on a Scale Trains boxcar that I'd weathered before, but I was never really satisfied with the faded blue that I'd achieved. It hadn't turned "frosty" as I referred to above, but just didn't look right to me. The blue was still too bright.

So, I loaded a little bit of Concrete Grey into the airbrush, double-checked that the spray was set for a fine mist, and away I went.

Here's how it turned out.
I think the fading of the blue turned out really well. On this side, to get a little bit of colour variation, I deliberately sprayed less of the "beige" on just one door. And if you look closely at the panels about midway up the GT logo, you can see the subtle rusty areas that I did with the PanPastel.  The streaking rust from the door tracks and panel seams, as well as the darker grimy areas were  there from my previous weathering job.

The other side of the Evans boxcar from Scale Trains. I like this car and would like to get a couple more. This is from Scale Trains "Operator Series", so the detail is about on par with freight cars from the old Athearn Blue Box or Roundhouse line. That's okay with me though, because at least the detail parts don't break off and disappear just because you've actually run the freight car on your layout.  One thing that does bother me about this car though is the incorrect location of the tack board, which should be on the first panel to the left of the doors

And here's a look at a Roundhouse car that I've coincidentally just finished weathering for another modeler.  The spacing and location of the lettering on the left side of the door is wildly incorrect, but at least the tack board is in the proper location.  The 2 panels to the right of the door area patch painted and there are several patches on the door also.  I faded the paint on this one by airbrushing with light coats of the same Concrete Grey that I mentioned above.  And again, the rusty upper areas of the panels were brushed on with the Burnt Sienna Pan Pastel.

I have 3 of the Atlas NSC boxcars in the GTW scheme as well, but I'll save posting those for another time.

Saturday 10 August 2019

Leaser of the Month and a Little Ground Cover

Another locomotive from my fleet of leasers, is this Helm Leasing Dash-8 39 B.  I bought this (used) several years ago at Doug's Trains in London, Ontario.  I don't know who patched it over to HLCX, but it appears to have been originally painted for BC Rail.The light weathering, which appears to have all been done with an airbrush, caught my eye at the time. 

The locomotive suffered a near disastrous fall to the floor when I was moving my storage cabinet.  The door to the cabinet flung open unexpectedly and down it went, suffering some pretty significant damage.  Sean Steele fixed 'er up again though for me, putting the drive back together and replacing broken handrails. He even added the ditchlight jewels.
HLCX 3901 is seen here idling on JSSX tracks that run parallel to a local roadway.  The rails on this track uneven, something I did on purpose by placing styrene shims below the ties on one side when I laid the track. 

Helm Leasing 3901 awaiting it's next assignment outside of the JSSX locomotive shop.


I got a bit of scenicking done this week.  In front of my recently re-built industrial building I replaced about 5 feet or so of code 100 track with code 83.  With that much done, I ballasted the track and sprinkled the area with scenic material.
Each of these sets of tracks have different colours of ballast because they belong to two different railroads.  I'd like to scenic the brown coloured area in the foreground soon, but first I have some work in mind for the red brick structure and the light coloured building on the right.
And a somewhat similar view of the way the way the ground in this area looked a couple of weeks ago. 

Saturday 3 August 2019

JSSX 815 Lighting Upgrade and a YouTube Video of the JSSX

I've shown my JSSX #815 here in the past, but I'd like to take another look at it because I've got it back home this week after having it away getting ditch lights and led's installed.  The model is from the Atlas "Master Series", so working ditch lights were not included as part of the original package. I had the lights and a new decoder installed by Scottie Rosenbury from Pete's Trains in London, Ontario.  Scott did a real nice job on them, and since it's my favourite locomotive, I'm really happy to have it back.


With it's new ditch lights turned on, GP38 815 is getting ready to do some switching over on South Industrial Blvd.


The loco was stopped in the street for a minute, so I quickly ran across and got a shot of it from the other side.
 This is the Randy Davis photo that I modeled my JSSX 815 from, although I choseto leave off the large numbers at the rear of the long hood.


Last week another one of my models that I featured had ditch lights and led's added by Ron Creasor.  When Ron delivered that locomotive to me, he brought along his camera and shot some video of the JSSX.  He's posted it to his YouTube channel, so I thought I'd provide the link for that.   https://www.youtube.com/watch?v=eaqev_EUJH8

The video runs over 8 minutes in length, and it's a bit shaky sometimes as the camera is hand-held, but you'll see most of the layout.

And to wrap things up for this week, when I wasn't running 815, I weathered this Illinois Central boxcar for another modeller. I found one photo online of a prototype car from the same number series, so I used that as a reference for the model.
As the door is slightly open, I guess I'd better break that white seal.