Friday 25 November 2022

CN 7104 SWeep

On a couple of recent posts over at George Dutka's White River Division blog (link at the sidebar), Peter Mumby has contributed features including the CN SWeep type engines.  I've got one in HO scale here that sees occasional time out on the layout, so building on Peter's posts, I'm going to feature my model of 7104 this week.

I kitbashed this model many years ago from an Athearn SW 1200 and an Athearn GP9 (or 7), and some Juneco parts that I found somewhere or other.

The model never really ran very well though, always stalling and jerking as it ran.  Never mattered how much I cleaned the wheels. I even swapped out the motor from another SW1200 to see if that might help, but it didn't really do much. One day I took it in to Pete's Trains in London and asked them to try to clean it up, convert it to DCC and add ditch lights, all of which they did.  Truth is though, that it still never really ran properly even after that.

The front end of 7104 on the programming track as the SWeep sits outside of the JSSX maintenance building.

DCC circuit board (not sure of the manufacturer, but maybe TCS) and the jumble of wires for the ditch lights installed by Scotty at Pete's Trains in London, Ont.

One day I was looking through the Athearn web site, and just by chance happened to see their locomotive wheel sets listed as replacement parts. My thoughts flashed immediately to the SWeep and I wondered if maybe new wheels would help it run better so I ordered a set.
The wheel sets come in a package of 6, but of course I only needed 4.

I'm no locomotive technician by any means, but I did manage to replace the wheel sets in the SWeep, and WOW, what a difference!  7104 runs like a charm now.

I've often thought of blanking out the CN logos, and re-lettering it for the JSSX.  Maybe one day...

In this side view 7104 is showing some wear and tear, with a few paint scrapes and cylinders damaged or missing altogether from the trucks.  I really should try to find new parts and add them.

The end view of the cab.  I've always thought that the five vertical windows make a cool feature on this model

Side view taken underneath the Gratiot Avenue overpass on the JSSX line

A view with the ditch lights activated

My 7104 coming around the bend as it returns to the yard

And finally for this week, this image of CSX at Fairport, NY after the big snowstorm last week.

Brrrrrrr...

Friday 18 November 2022

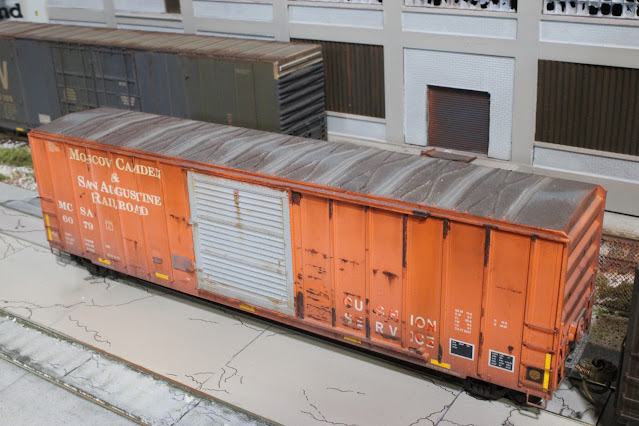
MCSA Boxcar 6079

This week I thought I'd feature this Athearn FMC boxcar that I've had for a few years,  Moscow, Camden and San Augustine is an almost 7 mile long line running from Camden to Moscow, Texas where it interchanges with Union Pacific.  It's owned by Georgia-Pacific, so hauls plywood and other lumber-type products.

I didn't know any of that when I bought the boxcar.  Truth is, I just thought the orange colour would stand out a little bit on the layout, and I liked the name. Very few pictures of these particular cars on my usual internet reference sites, so I had to "wing it" for the weathering.

Have a look at MCSA 6079...

I scuffed up the door with some rust and added some dust. Some boxcar red on the lower 3rd of the door. And a few scratches on the panels and ribs.

Roof view

For the other side, the door is repainted in Primer Gray.

Roof view from the other side.  Also, as I try to modernize things just a little bit, I recently added the reflective stripes.

Changing gears now to different item, below is a link to video of the very nice looking layout of the Tri-State Model Railroaders in Mineral Bluff, Georgia.  This was posted to YouTube by Thomas Klimoski.

https://www.youtube.com/watch?v=8rGqwmWAmxQ

Friday 11 November 2022

Roberts Printing Finished Up

As promised last week, here's the finished-up Roberts Printing building from Walthers.  And as I've said before, I really enjoy putting this kit together.  There is actually one more thing that I should do to this structure. I can see through the windows right through the building from one end to the other, so I think I'll cut up some cardboard for the interior to block out that possibility.  But that can be done later.  For now, this is it...

The main entrance/front side of the building. I find the ends and back to be much more interesting.

The rail dock door is inside the "tunnel".  High Cube cars are too tall to fit under there.

I painted the truck dock doors with Brick Red craft paint, and then added a few drops of Tamiya's brown and black panel line liquids.

The back of the building.  To add a bit more interest, I fashioned the rusty pipe between the 2nd and 3rd floors from some of the kit's parts sprues.  4 of the windows are closed in with pieces from a cement block sheet that I keep on hand.

The end with the fire escape.  It's a bit tricky to put together, and probably not the safest thing around as Walthers hasn't included railings for the inside of the walkways.
To blank out some of the windows, I used Mylar that was offered and sent to me by Mark Thorp.  I cut it into little bits to fit the individual windows and then used just the tiniest dab I could of canopy glue to hold it in place.

And the lights are on SD40 5931 thanks to Sean...

Two weeks ago, I wrote on here that I was wishing that the headlights on SD40 5931 in the header photo had been turned on when I took the picture.  Well, on this past Monday, friend Sean Steele sent me an email with that photo attached, but headlights and ditch lights activated.  Much better ! The header photo is replaced now, and just to save the trouble of scrolling back up to it, here's the picture below.

I'm leaving this as the header photo for the rest of this month

Saturday 5 November 2022

Walthers Roberts Printing Kit (the roof)

Continuing on with the Roberts Printing building that I showed last week, work has been proceeding nicely on the building.

The roof is made up of 2 pieces of flat styrene are moulded in a sort of not really black but more of a dark grey colour, with a little bit of texture.  There are 6 or 7 roof vents to assemble, plus an elevated water tank to put together also included.

That said, the roof was going to be a little more plain looking than I think it should be, so I used a black Sharpie pen to draw tar lines on it 4 feet apart.  I did 4 feet apart because I don't know how wide a roll of roofing really is, and it seemed like a reasonable guess. I then masked off different areas of the roof and sprayed them with either Grimy Black or Flat Black to create some colour variations.

With the tar lines drawn on, I then used a toothpick to run some white glue over each one.  The black line can still be seen, but the white glue dries clear, so it provides just a little relief to the flat roof pieces.

because
It took a couple of hours or so to draw the lines with the Sharpie, mask and paint the roof and then spread the white glue over the tar lines. You can see some of the colour differences and the white glue here before it's dried.

Above are the roof sections, vent details, an air conditioning unit (from another kit), and the water tank.  Ignore the colour of the water tank. I couldn't find one of the 4 pieces for the wall of tank, so I wrapped plain .020 styrene around it and then brushed a quick (and quite unattractive) coat of orangey rust over it. as sort of a primer.

I painted over the orange rust, because it looked ridiculous, with Vallejo Rust Texture, and then sprayed some vertical light brown streaks as highlights.
Closeup view of the water tank as I test-fitted the roof onto the building. It fit into place perfectly.  Won't even need to use any glue at all. In the background is the kit's box cover, where you can see how the water tank was supposed to look.

Here's a look at the roof as it's all finished up now.  While I had the light brown for the water tank loaded up in the airbrush, I sprayed some along the roof as well to add a bit more colour variation.

I'll have the building assembled and finished for next time.