Friday 30 June 2023

AnnArbor Boxcar 10012

While I've been mainly in "weathering mode" for the last couple of weeks, I also found time to run a few freights around the layout as well.

Here comes GTW 6252, pulling the auto parts train.  I actually had 16 of the 86 foot boxcars in this train, which was kind of impressive ...at least to me.  The two TBOX cars in the background to the right were part of the South Industrial job over on the JSSX.

 As 6252 passed by me, the 3rd boxcar caught my attention.  It's the AnnArbor boxcar that I had painted and decaled a couple of years ago or so.  One of my goals here has been to have all of my freight cars (and everything else) on the layout weathered, and this one happened to stand out to me because it wasn't.

I promptly removed AA10012 from the layout and put it over onto the workbench, adding it to the weathering lineup.  Actually, it was more like I moved it straight to the front of the line.

This car started out as an undecorated Athearn model, but of course Tangent now has an AnnArbor 86 foot boxcar released, which is truly great looking model. I'm pretty sure I'm just going to keep this one though.

Here's a few looks at the results of the weathering:

Mostly just some simple vertical rust and grime streaks, done with Burnt Umber with just a bit of Ivory Black mixed in.

And the other side:

A few scratches and then light passes of Roof Brown through the airbrush were added along the bottom sill and the top of the sides as well.  In this photo the boxcar is passing through the GTW yard and on it's way to the parts plant. So that's one more freight car that's weathered.

Meanwhile in 1:1 world news, Cando Rail announced this past Tuesday that they have completed their expansion at their Sarnia rail car storage facility.  This link has the story, plus there's a stop-action aerial video of the Cando expansion as it progressed.

https://sarnianewstoday.ca/news/2023/06/27/sarnia-rail-terminal-expansion-complete

Friday 23 June 2023

State of Maine Boxcars

I had the pleasure this week of doing some weathering on a pair of 40 foot boxcars belonging to Don Janes.  Although they are well out of the closer-to-modern era that I model on my own layout, I've always thought that these red, white and blue cars are real eyecatchers.

Don provided me with another similar car that had already been weathered to use as an example of the kind of look he wanted for the project.  I don't know who had done the weatherng on the example, but they did very nice work.

The weathering process I used was pretty much the same for both of these boxcars, first using my airbrush to fade the paint.  That was followed by adding rusty and grimy streaks of artist acrylics vertically down the sides of the boxcars.  With that done and after allowing sufficient time for the paints to dry well (a couple of days), I went back to the airbrush to add an overall light coating of grime to the boxcars.

Here are a few views of BAR 2256
On this car, the rust down the rivets is done using thinned Burnt Umber acrylic.

And the other side

A small double scratch to the left of the door.

 Below is the 2nd boxcar, NH 45031

The rust streaks on this boxcar are done using Burnt Sienna, so they have a bit more of an orangish colour than on the other one

 
Another view of NH 45031

And below is a look at Don's three State of Maine boxcars all together.  The 3rd one down is the one that Don brought as a sample
I think the three of them all look great together

And just in case you've read all the way to the bottom of the blog, I'm attaching this link to another website that I found hadn't seen before.  Primarily for modelers of steel mills (obviously by the name of the site), https://steelmillmodelerssupply.com/ , but some items might also make out of the ordinary gondola or flat car loads.

Friday 16 June 2023

A Touch of Grey

A couple of weeks ago I showed my new HOKX (Occidental Chemical) 17360 gallon tank car (and that would be a U.S. gallon by the way), as it looked when it came out of the box.  I don't honestly know if Occidental hauls oil products or not. I wanted the grey tank car because it would be different but still blend in nicely among the plain old black ones I already had. That's kind of the thing about freelancing the railroad...you can do what you like.  Though it's also a bit lazy, in a way.

I looked through a lot of photos of these tank cars on the internet, and they didn't appear to have suffered very much from the elements yet.  That in mind, I did some very light and simple weathering on this model.

I first removed the Chlorine lettering by using a bit of Micro-Sol, which didn't take long.  The prototype photo I sort of used for reference showed what looked to be grey spray paint overtop of what was probably a bit of graffiti.  I kind of emulated that idea through the use of some NYC Gray trim film from Microscale.  

Have a couple of looks at that before the car comes off the workbench

The painted out areas are at the right-hand end on this side.  The trim film colour is just a few shades away from the colour of the tank car, so a somewhat subtle difference. Instead of being sort of freeform like the prototype photo showed, my painted out areas are more geometric in shape.

The other side of the tank car:

Painted out or patched areas at the left-hand end on this side.  I painted the wheels and trucks with BeautyTone Camo brown spray paint from the local Home Hardware store.

And now out on the shortline for the first run

I added one small black graffiti scribble.  It's an N-scale decal actually.  I thought of using a .3mm black ink sketching pen, but wasn't sure about being able to pull that off on the curved surface and with the safety bar in the way.

Sorry for the engine being a little out of focus in the photo below. 
There's the grey tank car, 3rd car down from the engine, being switched into the local oil supplier.  It fits in nicely, I think.

Friday 9 June 2023

Tri-State Paper !

So, I've decided that my paper recycler warehouse will be known, at least to me, as Tri-State Paper.  The layout is sort of set in the upper midwest (in my mind anyway), so the name might kind of infer Michigan, Ohio, and Illinois.  Or something like that.

As for the building itself, I've added numbers beside the loading dock doors.  I cut black decal film to 8"x8", which would be half the dimensions of a single concrete block (8" x 16"). Then I laid white 8" numbers from a Microscale decal set on top of the black.

A closeup of Door Number 1.  I guess I could have trimmed that black decal film a little better as it looks to be just a bit too short.

Moving on to Door Number 2, here's a view showing inside the loading dock.

Inside the doorway, we can see some stacked bales of shredded paper. I think there should maybe be a few pieces of shredded paper laying loose on the loading dock floor, and also on the ground below the doors.

The walls of the building are made up of 11 panels of concrete block from two of the Walther's Magic Pan Bakery kits.  (I also have a number of wall panels left over, so hopefully I can find a use for them sometime as well.) The wall panels leave seams visible at the top of panels where they join each other. This, and my solution to the problem, can be seen in the photo below. 

I didn't like the look of having the seams between so many wall sections, so my solution to that is to attach Evergreen Styrene strips to the top of the wall to cover them.  I painted the strips to match the painted brick colour, and glued them in place, also covering the tops of the styrene strip pilasters.

Ballast, dirt, and ground cover along the tracks and foreground  have been added to the scene as well.

Here's the building right after being set into place on the layout.
It took me only a couple of minutes to move the whole building module over from the workbench and get the rail joiners connected to the industry's spur .  So Tri-State Paper is now open and ready for business !

A pair of fifty foot boxcars at Doors 1 and 2 and a 60 foot high-cube boxcar down at Door 5 are the first to be spotted at Tri-State's loading dock.  And to boot there comes a GTW auto-parts train to switch the auto-parts plant next door !

Just a few things still remain to do on this scene, one being to add some ground cover in the area between the main line track and the edge of the MDF, which is too visible right now and needs some camouflaging. Chain link fencing along the foreground "property line" would be good too, but I just don't have any wire to build fencing with right now.

I'm really happy with the way this industry module has turned out.

Friday 2 June 2023

New Tank Car for the Layout

Featured up at the top of the blog for the month of June is SSW 65003, one of my 86 foot long, 8 door auto parts boxcars, modified by me to have exterior ribs, which makes it a fairly distinctive model.  The boxcar started out as an undecorated Athearn model that I've picked up somewhere along the way.  The car has been modified with styrene strip, painted, and decaled with Microscale decal sets, plus the custom "Cotton Belt" decals done by my friend Sean. Also added were Details West coupler boxes.  I like this one so much that so far I've not been able to bring myself to add any weathering.

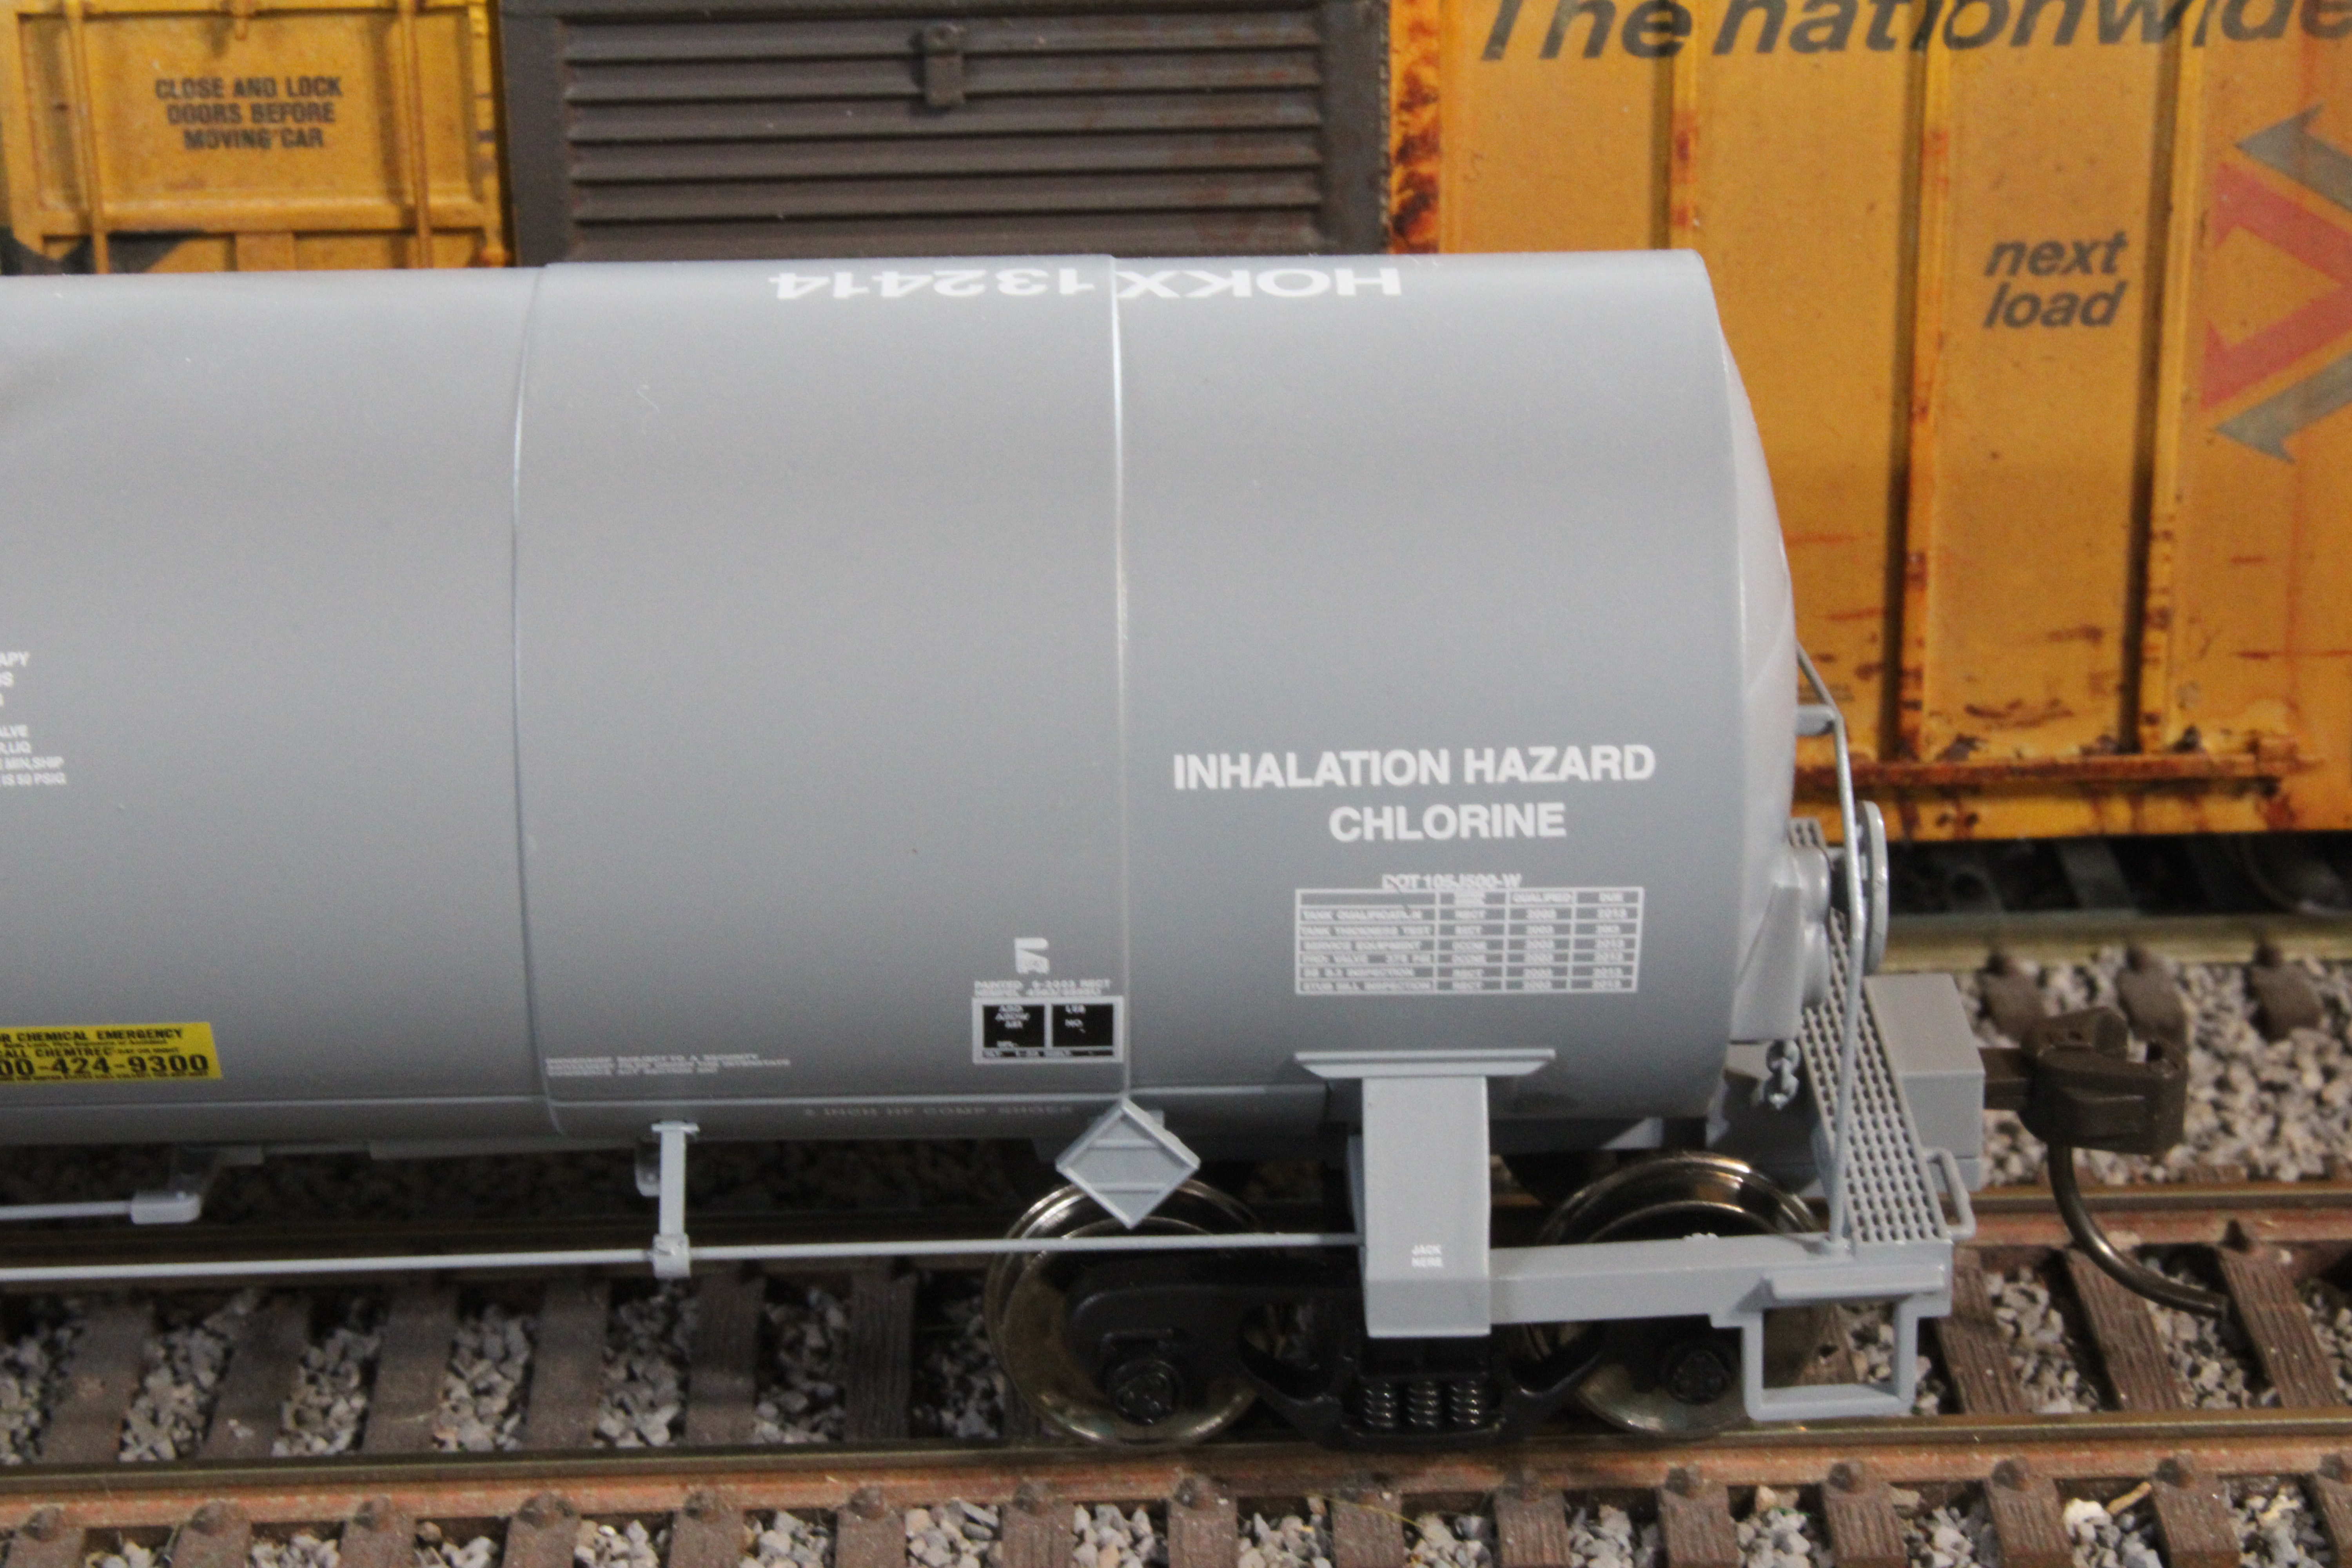
Below, I picked up this Atlas 17360 gallon tank car just recently.  I already have a few other tank cars of this type in black paint, and really like them. I wanted to get one of the grey ones mostly to add a bit of variety. These cars are a nice size for the layout here, as it is not really big, and siding and spur space is kind of limited.

The problem for me is that each of the models originally have, or had, lettering on them to indicate that they are used in chlorine service. I removed and/or decaled over that lettering easily enough, and am likely to do the same with this one so it can then run to my small oil facility. 

I think some light weathering will be in order for this tank car as well

Some Micro Sol and a cotton swab has worked well for me before when removing lettering such as this from the Atlas models


I think adding some weathering along the lines of this prototype would be a good look for the model. This prototype photo is one number off from my model.

I'll have more on here about my model tank car soon.

Don Janes and George Dutka were here back on the 15th of May for a nice visit.  It was great to see these guys, and it was really validating for me to hear them say really nice things about the buildings and freight cars that make up my layout.  While I don't model the same eras or areas of the country as they do, they both seemed to look long and hard at the weathering on my freight cars and buildings.

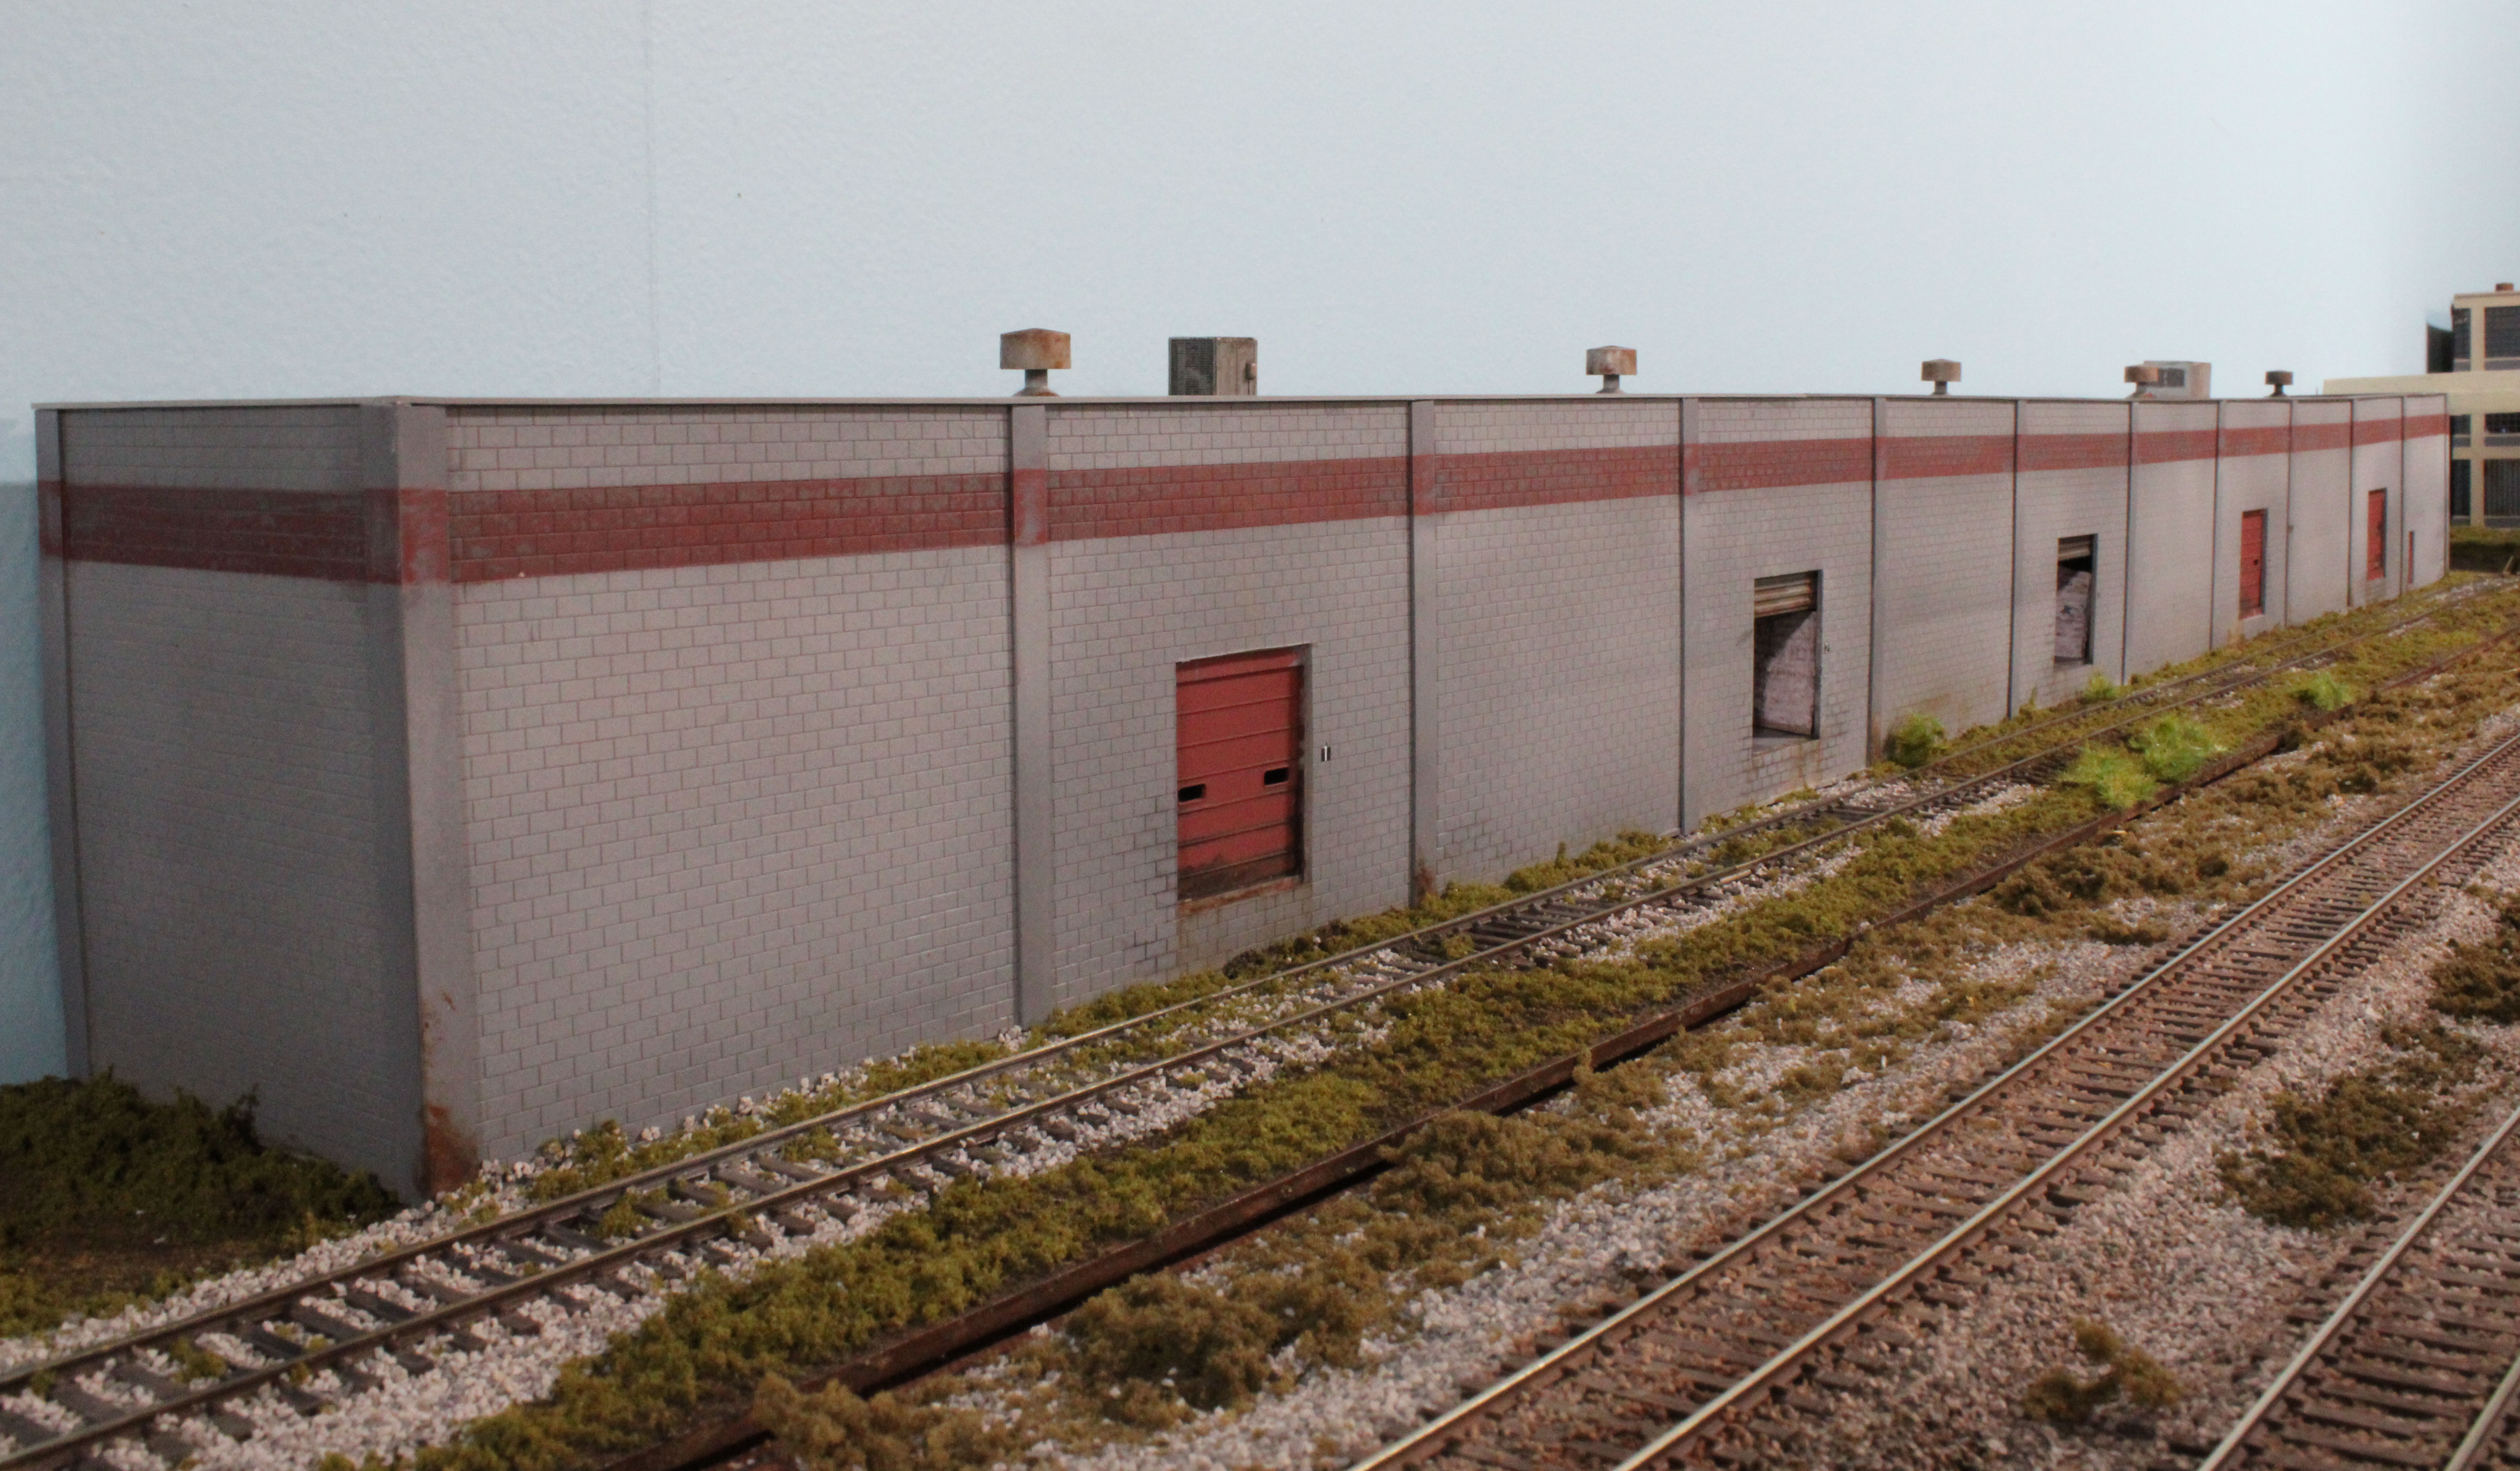
Don commented in particular about the size of the industrial buildings I've put together, most of which approach 4 feet in length.  He also remarked to me that he hadn't often seen the large auto-parts boxcars in use before, and and remarked about them fitting in so well here on the layout.  Thanks for visiting Guys !

George brought me a copy of his book, Model Railroading with George Dutka.  So here's my shameless plug for George's book...

This book is truly superb, one of the very best modelling books I've seen.  It's full of modelling ideas, tips, and the photos are outstanding.  I couldn't even begin to imagine the amount of time George must have spent putting it all together.  Thanks for the book George !