Sunday 25 February 2018

JSSX 508 Lighting Upgrade

I'm sorry if this is a little bit redundant to start with, but the first picture I posted when I began the blog in September 2017 was this one of JSSX #508 just edging out of the shortline's engine shed. This particular engine has been a favourite of mine for a couple of reasons, but mostly just because I like the look of it. It's a GP38-2, which is an engine model that I've always thought suits the smallish size of my railroad well. It was originally a Florida East Coast engine, but in my layout's world it's been purchased used from them by the JSSX. 


Here we can see 508 running beneath the sanding tower in front of the JSSX engine shed, again back in September. There's SW 1200 switcher #1317 sitting on the track beside it.  Notice that the headlight on 508 is turned on.


Now, here's the 508 today back in the same spot again.  It had been listed as "out-of-service" for a couple of months while the shop crew worked on improving the lighting.  The shop crew, by the way, is Ron Creasor, who did a great job installing the new LED lights and ditch lights.  The management (me) at JSSX is pretty happy to have this locomotive back in service. Management (me again) has also begun looking into getting some lighting work done on 1317 as well.

Wednesday 21 February 2018

Track Plan for the Layout Extension

A couple of weeks ago, I received in the comments section a request from Matt for a look at the track plan for the extension of the railway.  I didn't have one at the time, but this morning I sketched it out and well, it's only hand drawn, but here goes anyway:


Monday 19 February 2018

Layout Extension #8

Last week, I posted this same picture of the derelict factory, with a "raw" wall that I thought I should use to make the factory a little bigger.

Well, that's what I worked on for a couple of days this week. Just finished it up this afternoon.  This picture shows the building as it was, as seen from "across the street".  That track in the foreground is actually a siding that runs in front of a warehouse. I've removed the warehouse so that I could get the picture.  Sorry about the Schneider trailer blocking the view a bit.

This is the factory with the "raw" wall just sitting in place:


And with the finished section added. Also, notice the building and commercial property has been listed for sale through a local realtor. (No, I'm not really selling the model.) The black and red sign at the right-hand end of the building is a copy of the signs my Dad used for his business when I was a kid. It scales out at 5' x 9'.  I tried 4' x 8', but it kind of looked a bit too small to me. If you're really sharp-eyed, you can barely see the small real estate sign posted on the corner of the fence, just beyond the yellow fire hydrant.  That sign scales to just about the size of the ones you might see when you're driving down the street in your neighborhood.

Here it appears that a pretty beat up GP38 is moving in to pick up a gondola that's been spotted temporarily in the siding. I really think that adding this extra wall section adds a lot to my abandoned factory model.  Actually increases the length by something like 42 percent. So that's what I got  accomplished this week.


Tuesday 13 February 2018

Layout Extension #7

When you walk into my train room, the layout extension that I've spent so much time working on over the past three or so months is on your immediate right.  This picture shows basically what you see to your right as you enter.  What I want to showcase today is the building on the right hand side of this picture. It might be in for re-painting soon, but I'll explain that later on.


This building is made up of various walls that I had left over from Walthers "Roberts Printing Company" kits.  The picture on the kit's box has the brick areas painted red, and I think that's the way all of the models of that kit I've seen built have been painted. But I didn't want that. Not at all.

What I wanted to go after was sort of more like the apperance of this building in Detroit, Michigan. This was GM's Fisher Body Plant at one-time.  I have no idea what goes on in there now. You can see it to the north of I-94 as you drive through Detroit. I explored the areaa little bit in September 2011 with my friend Luc Sabourin (he drove) and I took this photo.

Now obviously, even allowing for selective compression and modellers license, the Walthers building isn't the same as this one, but the structural style isn't too far off.

So what I wanted to do was have my factory modeled as having been served by rail, but closed down and derelict, with the spur track still in place. I had the idea of bricking and boarding up the lower windows, and having the upper windows smashed and broken as though vandalized. Oh, and graffiti too. The rail spur would just be abandoned.

Then my friend said to me that a railroad would quite possibly still use that spur themselves, to temporarily stash a few cars if their intended spots at another location nearby were unavailable. When the proper spot opened up, the railroad then would lift and move the cars to where they were supposed to go.

Bingo!  This idea would allow me to drop pretty nearly any type of freight car, almost any time I wanted. The spur will hold one car under the building, and two or maybe three more outside the building. That spur though is also used as pullback for the industry next door.  It's not my ideal track arrangement, but it does add to the switching job, and I've got a vague idea to expand further sometime in the future - maybe - and the track arrangement can be changed then.

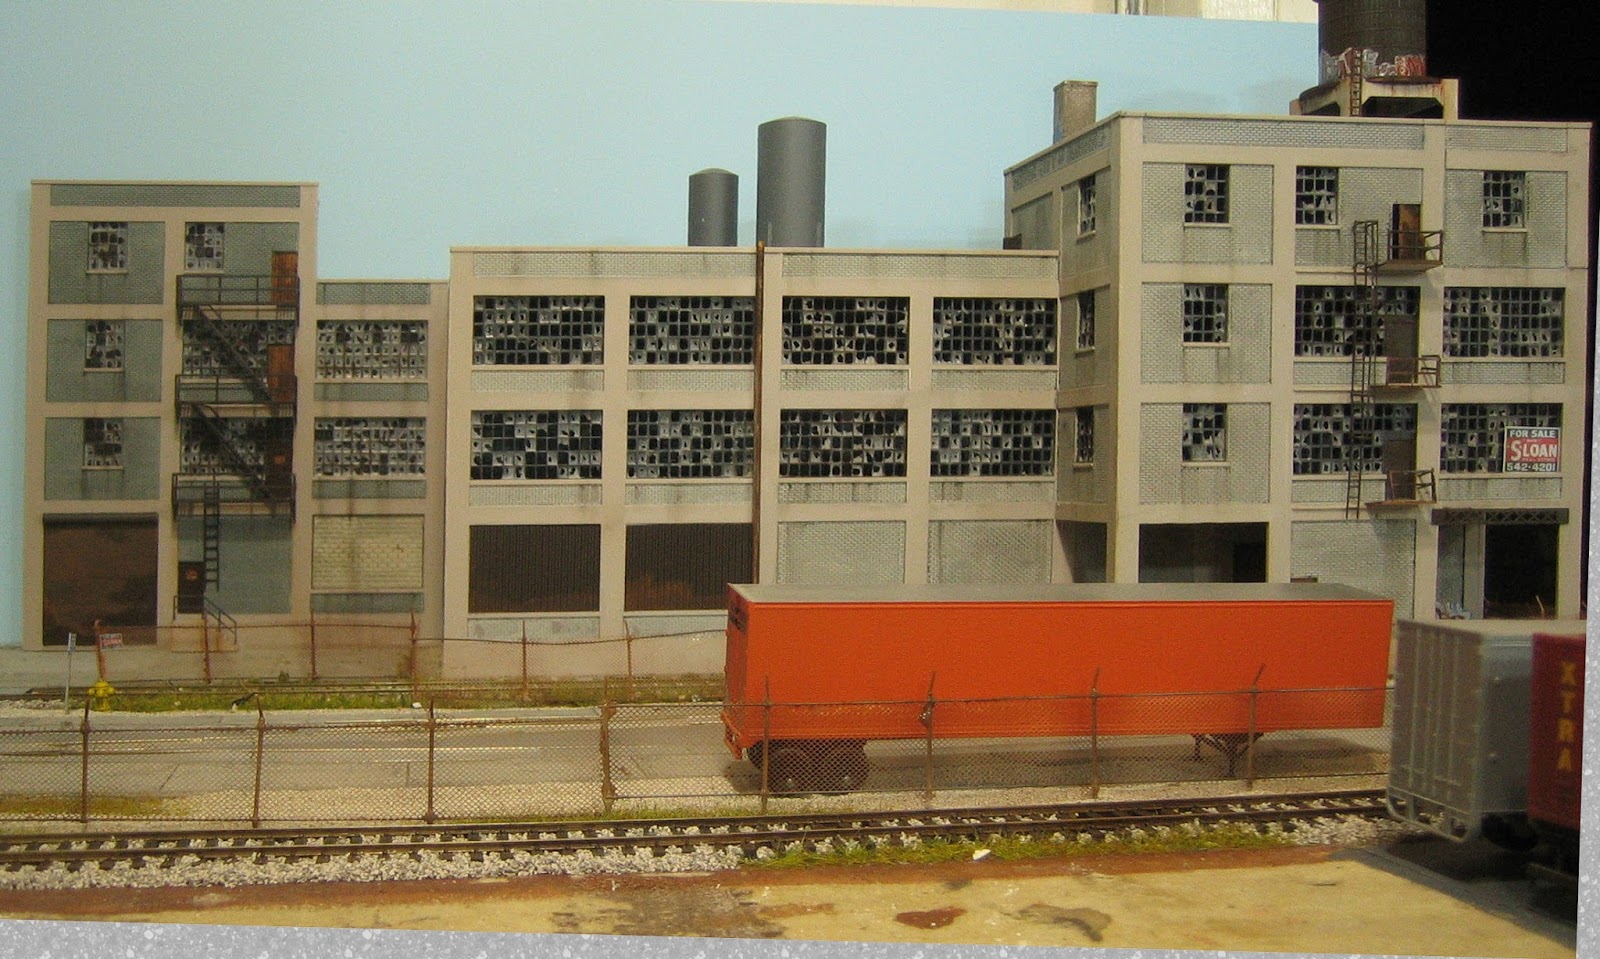
Here's the street-side view of my abandoned building. As I wrote earlier, I cobbled together the structure from leftover parts, and it actually came out one wall section (left hand end) longer than the original kit.


The photo below is actually supposed to be the front of the building, which I've ended up putting flush against the backdrop, so it is unseen on the layout.  If I had been smarter I would have used this wall on the other side too, making the building even longer.  At the time though, I wasn't sure of the final location. I had thoughts of putting this side of the building at the front edge of the layout rather than against the backdrop.

It's kind of a shame that all these broken out windows go unseen.  Oh well, I'm not going to take it apart now.

Speaking of the windows, here's the story on them. Doing the math, 1172 of them that can be seen have been smashed out or broken by those pesky vandals.  That does not count the 840 that are on the unseen side, as in the above photo, nor does it count any that have been boarded over or bricked up.

To make and then break the windows, I used ordinary white glue. I poured a small amount of glue into a puddle in a little plastic container and just let it sit there for a while until it began to thicken and solidify.  Then I took an old, flat artist paint brush and brushed the thickened glue over the window frames, teasing it with the brush until it covered over just about all of the little individual frames. Doing just a few of the window frames each day, all this took a little time, but by the end, I was getting pretty good at it.

I let the glued-over windows sit overnight so that the glue would dry completely and turn hard.  I actually thought that the white glue would dry more clear than it did, but it became fairly opaque.  I tried using Micro Clear for this too, thinking that it should dry more clear, which it did, but it remained too soft to break the way I wanted it to in the next step.  Once the white glue was dried hard, I simply took an old Xacto knife and used the tip of it to break through the glue. This gave me the final look of broken and dirty glass that I wanted.

On the workbench, but here is a view of the other end of the derelict building.


I've recently stumbled across another wall section for this building, so I think I'm going to add it on to the left end, up against the backdrop.  This will help make the structure appear to be a little bit larger.  I'll do the windows the same way, and put in a roll-up door at ground level on the left end. I'll try some black paper behind the windows to block out the blue of the backdrop.


Painting the brick sections in the new piece could be a problem though. I don't think I have any more paint the same colour as I had used before, and even worse, I'm not sure which exact colour it was. If that's the case, I'll re-do the bricks on the whole thing because I want it all to match well. Oh, and that MC5 graffiti along the trackside of the building, for those that might not know, is the name and logo of one of the great Detroit rock bands from the 60's and early 70's.  I'll add more in the future.

Saturday 10 February 2018

Here in Sarnia, Ontario, looking north, this line leads to the local Cargill grain elevator.  You can see the elevator in the distance, maybe a mile or so beyond those aggregate piles.  The St.Clair river is just out of view on the left side of the picture. This used to be a small freight yard that served CN car ferries, until the new St.Clair Tunnel was built in 1995. Following that, the car ferries were shut down and the yard became redundant. This picture was taken in September 2017.

Here is basically the same view, while about 10 inches of "partly cloudy" falls over 3 of the past 4 days.

Wednesday 7 February 2018

Layout Extension #6

I had an Atlas track switch in place for running off the main track and into the spur to the abandoned factory.  This spur actually acts as a switchback to another industry that actively receives pellet hoppers and boxcars.

I didn't really much care for the Atlas switch, as most of my others are Peco and in general I find the Pecos to be more reliable.  I like the spring action of them compared to the looseness of the Atlas.  And since this one was to be buried in "concrete", I didn't want any unnecessary headaches afterward.

I found a Peco switch at the train show in Paris, Ontario a couple of weeks ago, so I bought it and got ready to replace the Atlas one.  Easier said than done.  For me anyway.

For starters, the Peco switch turned out to have a broken solder connection to one of the jumper wires beneath the insulated frog.  I'm not that good with soldering, and I try to avoid it if I can. But I pretty much had to take a crack at it this time, because returning the switch to the dealer for replacement could take a while since he's a good 60 miles away. Replacing the Atlas switch had been holding up progress on my street project, and I was wanting to get things going again.

I just had to cut out two ties from the switch in order to fit my old soldering iron into the small space where the jumper wire had to connect to the bottom of the rail. I surprised myself when it only took me two tries to get the wire soldered into place successfully.

The next problem to overcome was the fact that the two brands of switches are not the same length and angle, so some cutting and splicing of track was going to have to be done.  That bit of trackwork took a couple of hours. I'm used to doing that though, so I didn't mind too much.

All in all, just to get the new switch repaired, installed, and track re-worked was about 3 hours, maybe a little more. Could have been worse I suppose.  After that I set about cutting .020 styrene inserts to serve as the roadway pavement that the switch is to be set into.

Here's the new Peco switch, with the 2 ties cut out at the frog.  With this much finally accomplished, I could proceed further with extending the street pavement.

The switch with the white styrene inserts in place, and the surrounding area. The pink areas are wet DAP spackling, which will turn white when it's dry. The spackling was so thick, that I let it dry for two days before sanding it smooth.

The spackling is dry and sanded, and brush painted grey with acrylic craft paint.  I scored the expansion lines into it with the back of an Xacto knife.

Here, the inserts have been spray painted grey using Tremclad Primer. The spackling street concrete has been given a couple of coats of india ink and alcohol, which darkened the expansion cracks.  The concrete in between the double tracks is .040 styrene cut and press fitted into place.

Saturday 3 February 2018

I have just a single shot looking at the 2 yards today.  GTW GP38-2's idling on the right,along with a DT&I GP38-2 in the middle, and over in the JSSX yard SW1200 #1317 is busy doing some switching.  And, there's the new JSSX maintenance truck on the roadway at the far left.  

I know that DT&I locomotive in that paint scheme doesn't quite fit in with some of the newer freight cars on the railroad, but I like it, so it's likely to stay that way for the foreseeable future.  There's actually another one just like it switching over at my layout extension.