Saturday 27 July 2019

Leaser Locomotives at the JSSX

At the top of the blog, in the header portion, I mention that the JSSX occasionally see leased locomotives on it's rails as well as their usual GP38's. And last Sunday there was a thread at Trainorders.com https://www.trainorders.com/discussion/read.php?3,4833009  about modelled Rent-A-Wrecks.  Trainorders is a pay-site, but you might be able to see thumbnail size photos if you click the link.  Anyway, with all that said, I thought I'd feature a couple of my leasers this week, so let's have a look at some of my "rent-a-wrecks" from Larry's Truck and Electric...
Here is former Cotton Belt SD45T-2, now LTEX 9293, stopped on South Industrial Blvd. As part of my weathering I covered over some of the original white Cotton Belt lettering with red decals from a red Microscale set to give the appearance that some of the lettering had peeled or worn away. I had the lights changed over to led's by Ron Creasor, but I'd really like to have ditch lights added as well, especially with the engine appearing on street trackage. Those great looking LTEX decals were given to me by Sean Steele.


The following two locomotives look great, but I think both really should get at least some some weathering added to them as well. 


Here is LTEX 3415, a former UP "snoot nose" SD40-2, rounding the curve behind the JSSX Locomotive Maintenance building on it's way to the yard. Despite being originally built as an SD40-2, at some point the prototype of this engine was re-designated an SD38-2. Sean Steele painted and lettered this one for me, working from a photo I'd found at http://www.rrpicturearchives.net/locoPicture.aspx?id=22614
The ditch lights and led's on the model were added for me by Ron Creasor.


This is LTEX 8935, an SD40-2, also painted and lettered for me by Sean Steele. I'll have to get led's added some time.  I think that some grime streaking and probably at least a little rust is called for on this unit.


And as long as we're on the subject of LTEX leasers, for those interested, below is a link to a short youtube overhead drone video of the yard at Larry's Truck and Electric.  Some good images of locomotive roofs, something we don't always get to see.

https://www.youtube.com/watch?v=-Gba-HSslX4

There are other videos of Larry's Truck and Electric on Youtube as well.


Saturday 20 July 2019

Factory completed !

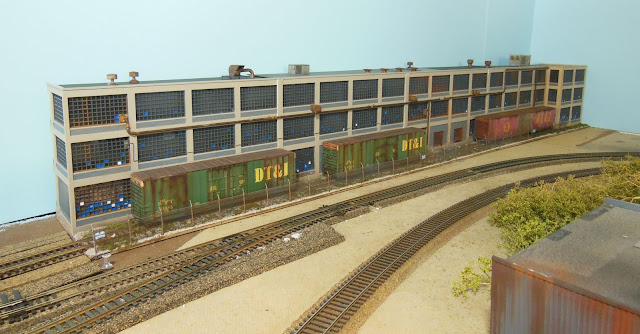
Well, this is the way things looked for this industrial building about 6 weeks ago. It hadn't always looked this way of course, but with some "questionable" original kitbash type construction, plus one thing leading to another, this building basically went ahead ans re-kitted itself quite some time ago. I can only imagine what anyone visiting must have thought when they saw it.

I had never heard that term "re-kitted itself" until quite recently on another forum.  I chuckled to myself as I thought how it certainly applied to this structure.
This was the scene back on May 28th, maybe 3 weeks or so before I actually got started on re-building this major layout industry, which is served by the Grand Trunk.

I don't know how much time I spent on this reconstruction project, but a couple of hours here and there and it all adds up to quite a bit I'm sure. So, to re-cap what's went on as far as the re-build goes...

All of the failed glue joints (several of 'em) have been cleaned up and re-glued and the corners are reinforced.  I re-built a balsa frame for the back of the building and epoxied the base of the entire structure to a 6" x 48" piece of MDF.  The building is just under 50 inches in length though, so I had to add on a small piece of the MDF base at the right-hand end.

I re-built the roof with styrene, and added about a dozen or so details from the Walthers kit.  Across the front facade, I put a few vents, added on some piping, some of which came from a kit and some are just made from scrap sprue material of the same diameter.  All of that has been painted to appear to be rusty.  There's also some conduit made from steel wire and some from styrene rod.

I decided early on in this project that I'd like to blank out a bunch of the individual window panes to simulate fiberglass panes. To do this I cut up blue and white trim film and laid that over random panes. That sure took a while, but I like the appearance it gives.

The spur track is code 83 now, ballasted, with weeds growing, and there's a fair bit of litter scattered along it as well.  And I made and added about 44 inches of chain link fencing to run along the property line as well. I also printed "No Trespassing" signs and put them on the fence.

So, all that said, here it is...


Still on the workbench in this view, but the re-build is finally finished up.  That is unless I decide to add lighting or something in the future.

I successfully transferred the structure, intact, from my workbench back to it's place on the layout. I'd expect that the GT should be along anytime now to spot some cars at this valuable customer.

And just like that, 6210 magically appears, right on cue.


And here is the building, back in business with two 60 foot and one 86 foot boxcar spotted

I've got my sights set on cleaning up the area in the foreground next.  But, the first step for that will be to get a replacement switch for the one we see here. I guess that will have to be my priority on my next trip to the local hobby store, 60 miles away.  In the meantime though, I've got lots of other projects to look after.


Saturday 13 July 2019

Industrial Plant Re-build Continues

So my time this week has been spent working away at my industrial plant re-build, adding rooftop details, some piping, that sort of thing.  I put together the Walthers Rooftop Details kit and painted and weathered the parts before I started adding a few of them to the building.
The details kit, very simple to assemble, but no, you don't get the building pictured on the box with it.

I used orangish-rust coloured craft paint and Vallejo Rust Texture, along with Vallejo's black wash to weather the vents.

All 37 pieces from the Walthers Rooftop Details kit, after assembly and rusting and weathering. I haven't put all of them onto my industry, as it would be ridiculously crowded on the roof if I did, but I did use quite a few pieces on it.  The extras can go on other structures.

Here's the industry still sitting on my workbench.  I've added some vents and exterior rusty piping running below the 3rd storey windows.  Difficult to see in this view, but there are several vents on the roof as well. I've also randomly blanked out many of the windows with blue and white fibreglass inserts (decal trim film actually).

I've placed a couple of 60 foot high cubes and an SD38 onto the spur to give me a better idea of the way things might look once I get this re-build finished up.

Saturday 6 July 2019

The JSSX Engine Shed Just Got a Little Bit Safer

3 weeks ago, I showed some photos taken around the Goderich & Exeter Locomotive Maintenance building up in Goderich, Ontario.  I had noticed then the safety striping at the sides of the large roll-up door and thought maybe I'd try to do something similar on the JSSX maintenance shop as well.

Good friend Chuck - a talented modeler - volunteered to send me an assortment of red and white striping decals that he had to spare. They arrived in the mail last Friday. So here's how the locomotive doorway is looking now at the JSSX shop
The safety stripes are a small and subtle detail of course, the kind of thing that might not even be noticed, but I thought it was kind of a neat idea for the layout.  My thanks to Chuck for the decals, and also thanks again to Ian Cryer whose photos of the GEXR maintenance building gave me this simple idea.

That's an SD40 leaser from NREX beginning to roll out of the JSSX shop.  I started the safety stripes at about 4 or 5 feet off the ground and they run up to almost the top of the door.  I spaced just a few of the stripes a bit randomly.


And speaking of the GEXR, I dug out these old photos that I took in Goderich in about 1993 of 3 of the original GEXR GP9s. At the time, I believe that the railway was owned by Railtex.  I've always thought of this cream and emerald green colour scheme as one of my favourites.
GEXR 180, 179 and 177 are working the Sifto Salt mine in Goderich in about 1993. And there's my old '86 Chevy Blazer at the side of the road too.  That was a great little truck. I always liked the old-style square headlights it had.
GEXR 180 along with 177 and 179.  Hard to see, but 180 has the Shakespearean character name "Falstaff" painted below the cab. Another was "Titania", But I don't remember the names on the others.