Sunday 28 January 2018

JSSX 815

I had booked a table for myself at the Woodstock, Ontario train show last spring, and successfully sold off quite a number of things that I had deemed to be surplus.  I was fortunate enough to sell off several older DC powered Athearn Blue-box engines that day. They had remained unsold at previous shows, and I had told myself before the show that I wasn't going to buy any more engines. I already had enough of them for the layout anyway, and didn't need any more.  

Well, that "plan" didn' quite work out, as there was a fellow named Rick just a couple of tables down, and among other things, he had a few engines out for sale as well.  He had two undecorated Atlas GP38's, new in the box, but unused.  I bought one, but forced myself not to buy the second one.  I had a rough idea what I would do with one, but not two.

The JSSX is small, and well suited for four axle engines.  Since I like to think that my fictional shortline has limited finances, it often leases older used power, and what JSSX owns itself is pretty well the same type of thing. I'd have to turn this GP38 into something that would fit right in with this theme.

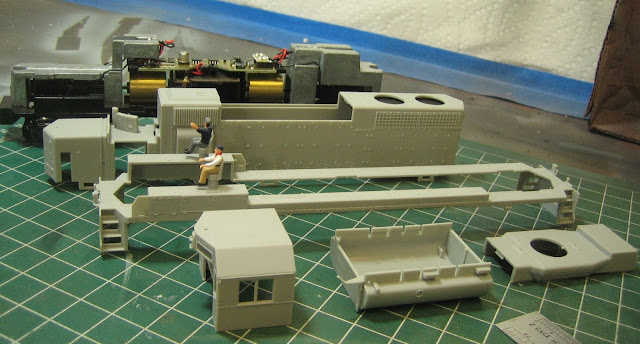
Here's the GP 38 sitting on the workbench, the way it looked when I took it out of the box just about 12 days ago:


And broken down into it's basic components for painting:


From rrpicturearchives.net, this photo is one that got my attention and I used this as the inspiration for my project.  I didn't do any of the engine's modifications to the model, just used it to go by:  This photo of SQVR 345 is by Randy Davis.  The prototype locomotive is apparently working for a living in Shelbyville, Tenessee.


I initially sprayed my model with Modelflex reefer grey, to which I had added just a few drops of blue. I thought my eyes were kind of picking up just a hint of blue to the grey body colour. The sill and walkways were sprayed with Modelflex weathered black.  I chose to leave off the large numbers at the back end of the locomotive.  I don't think I'll put any numbers on the sides at all (claiming modellers license here). As for the exhaust stack coverings, I'll have to try to make them out of some brass sheet or something at some time in the future. That is, whenever I have some suitable material.

Here, the model sits outside the JSSX engine shed. The basic painting is completed, and my shortline's lettering applied beneath the cab windows in place of the SQVR letters:

Below, the first layer of rust weathering has been applied.  It was far easier to do the rust streaking with the handrails not yet installed.


Here we go with the model about as complete as it's going to get, at least for now. In addition to the rust spots and streaking, I've added in plenty of grime streaking as well. I've chosen to put on the front plow that came with the model, although the prototype doesn't have this style. 

The handrails were painted with Modelflex RBOX yellow first, which was way too bright, so I went over-top of that with some pale yellow acrylic craft paint.  The grilles and screens received multiple coats of Vallejo black wash to darken them in so they would stand out nicely against the grey body.

I think that the white dashed side sill markers really set the whole thing off:


I like the rust ring around the fan:


All in all, this was done over the course of about 12 days work here, start to finish.  I really like the grey and black scheme.  The dark drabness of it fits in well with the mood I'm trying to evoke on the JSSX.

I'll add on those exhaust covers or spark arrestors (whichever they're called) sometime, and it needs a radio antenna too. I want to see if I can get a pale yellow paint pen to colour the edges of the steps as well. Ditch lights would be good too.  And now that I think of it, I kind of wish I had that 2nd GP 38 that Rick was selling.


Saturday 20 January 2018

Chain Link Fence Again

Some months back I was showing some chain link fence made by Plastruct that I had put on the layout. The Plastruct fence seems a bit over-scale, and I mentioned back then that I also had some chain link made by Walthers, but hadn't used it yet.

The Walthers kit says on the box that it will make 80 inches of fence.  I envisioned that there would be a roll of fence material about 80 inches long, plus a bunch of fence posts, etc. I thought this would be just great because one of the sections of fencing I'd like to put on the layout would be something like 56 inches in length.

But, what you get in the Walthers kit is more like a sheet of mesh for the fencing, which you must then cut to the correct height to match the height of the posts.  I found this to be a lot easier said than done, as the mesh tended to stretch as my fresh Xacto blade ran over it. This stretching made the cut uneven, so I had to try again. My second try had a much better result, although I wouldn't call it perfect by any means.

Also in the box, you get several pieces of steel wire, probably about .020" diameter, and about 8 inches long for use as the top and bottom chords of the fence.  The wire pieces are to be glued together end to end and then cut at whatever overall length you find appropriate, and then glued to the fence posts. I felt like I was fighting through this project the whole time. I guess that's why we call it modeling.  The top and bottom chords came out nowhere near straight, and the mesh isn't quite straight either.

I'm glad that my fence installation is going in an area of town that is pretty run down. I painted the finished fence with a couple colours of rust, and it actually fits in to the overall scene quite well despite the troubles I had putting it together.

Here's the Walters kit, and what it includes.  There's a 2nd sprue of fence posts that I somehow missed including in the 2nd picture.  You have to look closely at the top of the 2nd picture to see the fence mesh that's supplied. Also shown is the steel wire top and bottom fence rails.

Here is my first of the Walthers fencing installed on the layout. It fits in well in the derelect area of the layout. I still have more fencing to build and install.


I do like the gauge of the mesh much better than the Plastruct product, and the fence posts are much nicer looking too. I'm going to try to find some music wire to use for the top and bottom chords of the fence, as I feel that might be a lot easier to keep straight than the short pieces that come with Walthers kit.

Sunday 14 January 2018

Layout Extension #005

Just a little bit of further progress to report along the extension today. Over on the right hand side of the street, I've added the gravel shoulder and static grass. The CN boxcar is blocking the view in these pictures, but I've put in ballast along the siding track that runs into/under the industrial building as well.  Progress is progress.


Thursday 11 January 2018

Weathering Wednesday #10-B (It's Thursday)

So while I was posting to the blog yesterday, I was noticing that the silver window frames on the B&O caboose looked a bit shinier than I thought they should.  So, here's a similar shot of the caboose after I've gone over the frames with a couple of thin washes of black acrylic to dull them down a bit. This only took a couple of minutes, and the difference is pretty subtle, but it's there.

Wednesday 10 January 2018

Weathering Wednesday #10

Here we have an Athearn caboose, decorated as B&O C-3934.  This one is pretty fresh-off-the-bench, as I just finished 'er up on Monday.  It's owned by Brian Smith, and his only instruction to me was to weather the hell out of it, so...

You can also see photos of Brian's layout over at www.whiteriverdivision.blogspot.ca  A link to this terrific blog is in the side column at the right hand side of this page.


Actually, now that I get looking at these photos, I think that the window frames are a bit too clean and shiny.  I'll go back at them and dull them down a bit.

Saturday 6 January 2018

Layout Extension #004

Viewed from the end of the layout extension, the photos show the two tracks as set into "concrete" for a distance of about 48 inches or so, so far anyway.  I've used a couple of different greys to colour the concrete sections, and followed them with a dark wash or two over some of the sections to try to represent replacement or repaired sections.

Also, the warehouse track on the left has been ballasted now. I've put a wide gravel shoulder area between the roadway and the warehouse. I intend to have a transport trailer or two "temporarily dropped" in that space.  There's some static grass growing along that area now too.  I think my next effort will be to similarly finish the track spur and the open space on the other side of the road where you see it as just painted brown now.


Wednesday 3 January 2018

Weathering Wednesday #009


Today I only have just this one picture of these intermodal containers.  I know that the weathering is pretty light on these, in fact barely discernable for the most part, but not everything needs to be done with a heavy hand.  Sometime less can be a good thing.  Actually, almost every panel line is lightly highlighted with dark streaks of grime, plus the more noticeable exhaust soot at the front ends.