Saturday 29 May 2021

Norfolk and Western Boxcar (Pt 1)

Not a lot going on for the JSSX recently, but I have re-painted and now lettering this boxcar.  Another 86 footer (hey, I like them) to eventually be switched in and out over at the parts plant, this one is coming along well.

A simple solid black paint job, I took a chance and used Modelflex Flat Black because I want the finished model's appearance to be as flat as I can possibly get it. As a test, I put a small decal on the flat finish, and the test failed badly as the clear centre of the decal "silvered", or appeared shiny. Can't have that! I kind of figured that might happen though, but wanted to try.  I peeled the test decal off with some masking tape, and then gloss coated the boxcar.

More on the car in future, but for now, have a look at the boxcar in it's unfinished state...

I couldn't find the correct decals, so my friend Sean made them for me.

I decided to change the boxcar number from the first photo. NW 860180 matches the number of the car in the internet photo that I'm using as my example.

It really shouldn't be on the layout yet as it's unfinished, but this is what this 86 foot boxcar looks like at the moment.  I still have to finish the lettering on the ends, apply flat finish, and then weathering.

This is primarily a model railroad blog of course, but every once in a while I like to toss a little variety into the post, such as this ship photo.  The 650 foot long Algoma Innovator is just about 4 years old now, but appears to be beginning to show some wear as it enters the St.Clair River from Lake Huron on Sunday, May 23/21.

Algoma Innovator southbound from Lake Huron into the St.Clair River.

The Innovator is a bit different from other lake freighters in that it has it's conveyor boom mounted forward, allowing it greater flexibility (reach) in ports.
Algoma Innovator is about to pass beneath the Blue Water Bridges on May 23/21.  Linda Stamos took the photo


Saturday 22 May 2021

Roof Details Kit

 Trying to follow up somewhat on the Roof Details kit from the last week's blog post...

Most of the vents in this photo look to be brand new, but there's a couple of other colours layered underneath that nice silver coloured paint.

My first step was to spray the detail parts with ModelFlex Rail Brown, and once dry, I sealed overtop of that with DullCote.  I should probably point out here that ModelFlex Paints are acrylic (which is water soluble), and the DullCote is a lacquer (not water soluble).

The DullCote was followed up by a layer of Chipping Fluid, which is a clear acrylic.  When that dried, I sprayed overtop of that with ModelFlex Rust, followed with another layer of Chipping Fluid.  Then, I sprayed a top coat of Vallejo Dull Aluminum (I know that aluminum wouldn't rust, but I don't have a steel coloured paint, so please grant me a little modeler's license here).

So that's six layers of paint altogether, which I let dry until the next day.

The next step was to somewhat vigorously rub the parts with a water dampened brush.  The water reacts with the acrylic chipping fluid that lies underneath the acrylics.  Some of the acrylic aluminum and rust colours scrubs away, leaving 2 colours of rust to show through.
The finished effect of the 2 colours of rust coming through the silver metal can be seen in this photo.

A little closer view of the rusty vents.


In this view, GTW 6210 is dropping a couple of cars into the MidWest Plastics plant. Meanwhile up on the building's roof, the plant's exhaust vents are largely ignored as they suffer the longterm rusting effects of weather.


Not that I mind very much, but I always find it a bit surprising to come across one of my own photos while doing an internet search for reference photos for a project.  That's just what happened last Sunday evening though.
I had posted this photo to the blog back in 2017, and happened across it while doing a Bing search last Sunday.

And lastl but not least, Brian Smith sent this photo from Ingersoll, Ontario this week, of nature's pretty nasty weathering work on a USLX covered hopper.  I think that ExactRail made or perhaps still makes a model of this type (Magor) of covered hopper, although I'm not as sure that they made it with the USLX (General Electric Rail Services) reporting marks.

I cropped some of the sky out of Brian's photo. It wouldn't be too much work to change the lettering on the freight car.  The rust could be a good challenge to try to replicate, but I don't think I would even try to pull off that animal graffiti. The spare rail in the foreground is a real nice touch to Brian's photo.

Saturday 15 May 2021

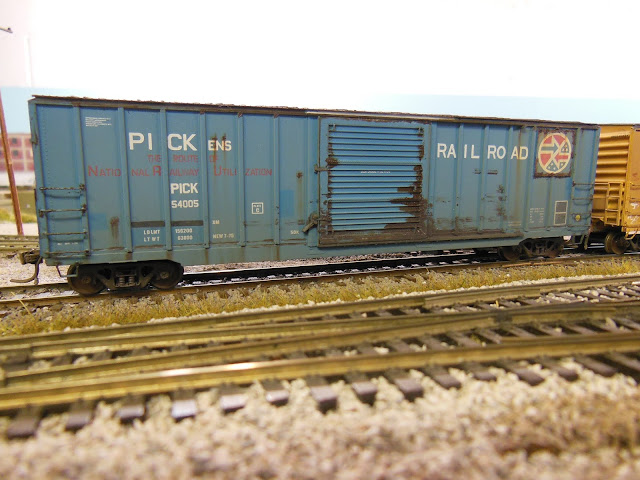
PICKens Boxcar

 Just recently spent time over two or three days working on the weathering of this Pickens Railroad boxcar of Jamie's.

So first up, let's have just a quick look at the boxcar in it's original appearance.  I like that red lettering beneath the PICKens graphic.  It's a very nice looking boxcar as is.  We'll see if I can fix that...Thinking about it now, I believe that I have a somewhat similar looking Branchline Models boxcar in my storage cupboard.  If I'd been smart, I would have weathered that one at the same time as I worked on this one.  Oh well.

 I faded the original blue with Modelflex Concrete Gray, and sealed that in with a quick spray of Dullcote. For my money, the fade on this turned out just about right.  Much lighter, and quite flat too, like a lot of road dust has accumulated.  I found a photo online of a boxcar that had scratches and rust that I thought would be appropriate and tried to somewhat emulate that by hand brushing with burnt umber and burnt sienna acrylics.
Just 2 or 3 small light paint patches appear a bit closer to the original blue. Done by applying small bits of masking tape after a couple of passes with airbrush. Then, once the mask is applied, some more fading was done to the overall car.  Masking after some of the fading gave the patched areas the appearance of paint some fading as well.

A view of the boxcar showing the roof, and the sealant along the door track.  I tend to use grey for this, as it appears a little less stark than white does.

Below is a look at the other side of Jamie's boxcar.
The CAPY stencil is blanked out as well, adding just a bit of modernization to the boxcar.

After adding some roof vents to the small commercial block Addams Avenue, which I posted a couple of weeks ago, I now have another copy of the Roof Details kit to put together.  This  should help make some of the railroad's industrial customers look a little more industrial.
I've assembled this kit before, but need it again to improve the appearance of some of the industry rooftops around the layout.

This is what you get with with the Roof Details kit, costing about $9.  Air conditioning/makeup equipment on the left, fans and vents on the right.  I'll try to get these parts finished up and added very soon.

Saturday 8 May 2021

Pallets

I'll get to the pallets in a minute, but first there's this...
Back on April 24, I posted this photo (above) taken by Brian Smith.  Brian has now also sent me a more close-up view (below) of the graffiti art, so I thought I should post it as well.

I know I won't be trying to copy this in HO scale.

Speaking of HO scale, a recent project I thought I'd give a try involved my Northwest Short Line Chopper. Gotta remember to be careful when using the chopper though, because that blade is sharp (don't ask me how I found that out).

I don't really have a whole lot of "detail parts" on my layout, but I tried my hand at making a few wood pallets out of styrene strips (probably have to be a model builder for that to make sense). I did buy a small package of pallets one time. I don't remember who made them, but I looked up some other ones online this week, and for a package of 8, they were going to cost $9, plus tax.

Anyway, this idea worked out reasonably well, so I thought I'd share.

When I worked in a factory shipping office some years ago, one of the duties was to make sure we always had plenty of pallets available for the plant. We would order basically 3 sizes but the most commonly used were 3' x 4' with no bottom boards We generally referred to these as "disposable pallets", and with good reason, as it seemed that they'd just about fall apart if you looked at them wrong.

I made up a dozen of the 3x4 pallets, and few 4x4 ones. Here's everything I used to make them. Evergreen Styrene Strip #113 (.015 x .060), NWSL Chopper, Tamiya Ultra Thin (it flows really nicely and dries or cures quickly so that was helpful), Xacto knife, and Tweezers. 

It was easy, but fiddly and did take some patience. I chopped a bunch of the styrene strip to 3 foot lengths, figuring on using 6 per pallet.  I also cut some styrene to 4 foot lengths, using 3 as stringers on each of the 3x4 pallets, or 4 stringers on the 4x4 pallets.In the photo above, you can see some of the 3 foot strips on the left-hand side of the chopper, and some 4 foot stringers on the right-hand side.

A bit closer view of the 12 3x4 pallets on the left, the 4x4 pallets on the right, and at the bottom is one of the store-bought pallets that I sort of used as an example.  I cut a few of the pallet boards shorter (yes, I did it on purpose) to model them as being broken, just as I remember the real ones.

Once I had them all put together, I painted my pallets with "Barn Wood" craft paint, which is a sort of grey/beige colour.  I followed that up with a dark grey wash just to dirty them up a bit.  Hard to see, unless you really look closely, but I also then used a Burnt Umber ink pen to add nail-head marks to the boards where they would be nailed to the stringers.

Below are a few  photos of my finished pallets scattered around some of the loading docks and spurs around the layout...


My best guess is that I spent about 2 hours, and maybe 3 dollars worth of styrene making these 16 pallets.

Saturday 1 May 2021

GTW Working the Auto Parts Spur

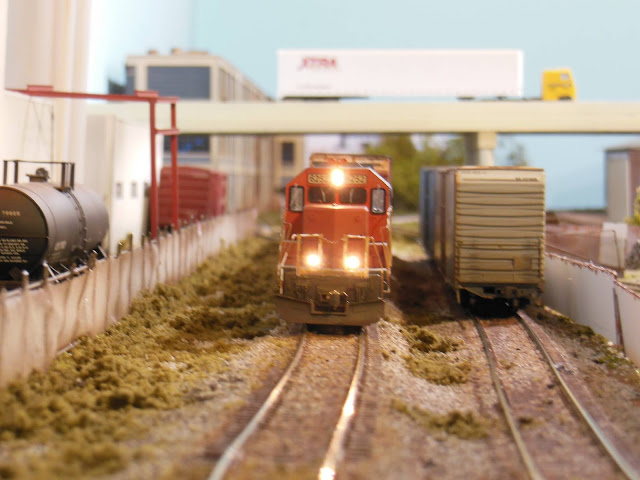
 Thought I'd show a few looks at the GTW doing some switching of auto parts cars at the local parts factory. I've been trying to figure out if I could make the building any longer, but there's only so much real estate, isn't there.  The spur can hold 3 of the oversized cars, but it sort of looks overcrowded when I do that, so I usually only spot two in there.

Some of these views are taken from beneath the highway overpass.

The locomotive has coupled onto a pair of 86 foot boxcars, and is beginning to pull out of the factory spur.

Empties in, loads out.  The crew has backed their locomotive into the spur to pick up loaded boxcars.

The factory itself is a kitbash of the Armstrong Motors model from Walthers, x 4.  It's a little over 49 inches in total length, for the moment anyway, until such time as I can figure out how to enable the facility to hold more of my 86 footers.  


6252 is an SD38, which is regularly assigned to this particular switching job.

I don't get to see this view very often myself.  I honestly thought that the tracks were a little straighter than what it shows here.

A view down the GTW line, in between the metal recycler yard to the right, and the Midwest Plastics plant on the left.

A bit more of an overhead view of what is frequently a very busy GTW line. 

Shoving the empty cars into the parts plant spur.

On it's way into the parts spur, I know I have shown this boxcar previously here on the blog.  I was very pleased with the way my weathering effort turned out, even more so when Dave Lehlbach from Tangent Scale Models saw photos that I had posted onto Trainorders.com, and asked me to send photos to Tangent for display on their own website.

Job complete for the day.