Friday 26 May 2023

It's to be a Paper Recycler

I got the roof on the paper recycler building this week.  The roof is made up of two pieces of that foam board that they have at the local Michaels store.  I used the black stuff, and masked off a few area so that I could fade/change the colour just to break it up a bit. I used 2 part epoxy to attach the foam board to the plastic building.

Here's a photo taken outside with the roof now in place. It's outside because I was about to spray some clear lacquer on the MDF base.  The green tape on the wall and rails is in an effort to keep the lacquer off those areas in particular.

The last time I used MDF to mount a building like this, it warped when I used diluted white glue to set ballast and scenery in place.  I'm hoping maybe a coat of lacquer will prevent the moisture from being absorbed into the MDF.  We'll have to wait to see how this works out.

Back at the bench a fresh kit of rooftop details is waiting, a few of which I'll use on this building.

Walthers roof vent type details on the left, air exchange units on the right.

Four vents, and one air exchange unit, assembled, painted, and weathered.  I painted them all with Vallejo's Dull Aluminum, and then weathered them with the Burnt Sienna and Burnt Umber artist paints.  That's a piece of makeup sponge in the foreground that I used to apply the two weathering colours.

So here is the whole industry module on the workbench as it is at the moment.  I already had a couple of those rooftop details in my parts bin, so I added them to the roof as well. The actual building itself is pretty much complete now.  I'm trying to decide whether to add door numbers to it or not. Maybe white numbers on a black background.

I'm hoping to be able to get some ballast and ground cover down on this in the coming week.  

And I'd like to have a name for the place too.  No prizes or anything being awarded, because I've got a couple of ideas for names for the business, but I'm willing to listen to suggestions. The idea was to have this place be a paper recycler so that I could spot different types and sizes of boxcars at it.  I've found online some photos of bales of recycled paper that I hope to be able to print and slip inside those two open doors.

Friday 19 May 2023

New Industry Build (Part 2)

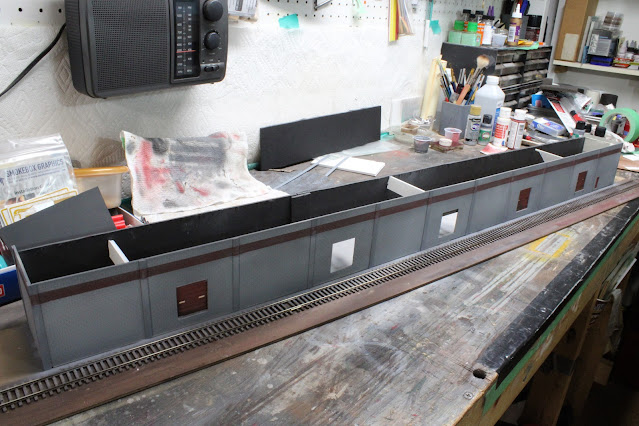
I thought I'd be a little bit further along on this new industry that I'm kind of kit-bashing. I did make some progress this week though.

Here are a few photos of the building as things moved along...

All masked up in order to put a red stripe along the upper portion of the block walls.  With the tape in place, I first sprayed that exposed area with Tamiya Clear Flat to seal it.  With that dried well, a layer of AK Interactive's "Worn Effects" chipping fluid followed.  Using the chipping fluid will allow me to remove some of the coloured layer to come, which will (hopefully) give a bit of a weather-worn effect to the stripe.


Once the chipping fluid had dried well, I sprayed the stripe with CraftSmart Brick Red. Then I went over that with a damp, stiff brush removing some of the red that I'd just sprayed on.

Here it is after the masking tape is removed:

I cut and painted some .030" styrene strip as pilasters, and added them in order to the cover the seams between the kit's concrete block panels.  There's a rear wall that's been added too, and an interior floor that will be somewhat visible where I've decided to have two of the loading doors remain open. The doors that are closed have been painted the same Brick Red as the building's stripe.


A few weeks ago I made mention that the iconic Pere Marquette rail bridge in Port Huron, Michigan was about to be taken down and removed. The local Sarnia Journal printed this photo of what little remains. This view is looking north.

Photo by McKenna Golat of Port Huron Times Herald.

I actually intended to include this photo by Brian Smith in the blog last week, but failed to do so. Anyway, Brian did some railfanning at North Conway yard in Pittsburgh a couple of weeks ago, and sent me this view of NS gondola 211147 featuring some MECRO graffiti.

Notice the slightly differing rust tones in the interiors of each of the 3 gondolas in Brian's photo


Friday 12 May 2023

New Industry Build Project

This industrial building kitbash which, being honest, I never really cared for, is finally being replaced with something that sees considerably more business. I've been wanting to get to this project for quite a while.

I am moving the Midwest Plastics industry into this location, at least to try it out in this spot.  This is part of the idea of having interchangeable industry "modules" for the layout.

Once moved, trains will then enter the spur at Midwest Plastics from the right-hand end, instead of from the left as has been the case 'til now. It's not at all difficult for me to swap the industries around, as the building, the track, and the scenery are all mounted on a single piece of MDF. Switching the industries around can be done in only about 5 minutes.

And this new industry will go in the spot where Midwest has been located. It is a kitbash of concrete block wall sections from two Walther's bakery kits.
This new industry is intended to be a paper recycler business.  With five rail doors, I'm quite sure it will have the potential to become a pretty busy customer on the GTW line.  More switching, more fun.

I gave up trying to match the paint colour of the previously used wall sections, so I've painted the entire length of the building in grey. 
This new structure and track is mounted on a piece of MDF fibreboard too, which I've made to the same dimensions as the piece of MDF that the Midwest Plastics "industrial module" is mounted on.  The track is located in the same place on both of those sections of MDF too, so I just have to slide the rail joiners back, and then lift out the entire module.

I'll have more to come next time on this new industry project.

Elsewhere, I enjoyed Lance Mindheim's blog from this past Wednesday (May10th). The general link to Lance's blog is always on the sidebar here, but in case you missed that particular one from Lance's blog, here's a direct link:

Friday 5 May 2023

Some GTW Equipment

At the top of the blog, for May will be a view of GTW 5931 an SD40-2, built by EMD.  This one still features the CN North America paint scheme used the 1990's, which I really like.  I know others think the map looks like the paint is peeling, but I just don't see it that way.

In keeping with the GTW, here's a few looks at some more of the other GTW equipment that spend time out on the layout fairly often:

Auto-parts boxcar that I've painted, decaled, and weathered

Another auto-parts boxcar that I weathered several years ago, when I was starting out weathering.  Doing what I could to follow the rusting/weathering pattern of a prototype, albeit with a different car number, this was one of my first attempts at weathering. The photo was taken on our deck railing so I could see how the finished model looked in actual sunlight.  I remember posting this one on a weathering website way back when, and got criticized for posting a picture taken on a deck railing.

You might remember this re-painting and weathering project from a year or two ago

Former Rock Island boxcar patched and weathered

A sister boxcar to the one above, this photo made it into RMC in August 2021

GP40-2 6416 was painted as a former DT&I locomotive.  I sold this one off a year ago as I hadn't been using it very much at all