I ran across this photo online a while ago and thought I've got the perfect car to try to model this. Compare this photo to the finished car photo at the end of the post and let me know what you think.
So, here's my nice clean starting point. It's an Athearn Ready to Roll gondola that I had picked up at the Woodstock train show back last fall. I think I had paid $15 for it.
Work begins on this nice, clean gondola
I first cut strips of .005" (that's really thin) styrene in widths matching the panels on the gondola. I then created bulges by laying the strips down on the street in front of my house and rolling an old wallpaper roller back and forth over them to emboss the subtle irregularities of the pavement. The strips were then cut to length to match the height of the panels.
It was quite a simple matter to glue my styrene parts right overtop of the panels, and saved me the step of removing the original factory printing.My best guess for the colouring was to spray the gondola with Roof Brown to try to approximate the proper match for the sides and the yellow decals.
I sealed all that in with clear gloss, and then masked required areas to be able to paint them black
Above is the car, masked and appropriate areas painted black. Remember the Roof Brown and the decals underneath the tape have been sealed in with clear gloss lacquer so the tape won't, or at least shouldn't, pull them off.
Tape is removed and the decals are still in place!
So the next step, and I'm sorry I don't have photos of all this for you, was to spray just a bit more of the Roof Brown to start to flatten everything down. Then I added the grey patches (Microscale Trim Film) for the reporting marks to go on plus a couple of black patches (more Trim Film). Then the reporting marks, lube data, weights data, wheel specs decals, and the yellow reflective stripes. I hand scribbled the little bits of white graffiti using a white Gelly Roll pen.
With that much finally done, I sprayed for a 3rd time the roof brown to really take down and dirty the colours and of those too clean and shiny decals. Also I removed the trucks and masked the wheel treads and sprayed the wheels and trucks with Camouflage Brown. Then I added rust and black coloured Vallejo pigment powders.
And with all of that done, I added a bit of burnt sienna and burnt umber artist oils to the rivets and beside some of the vertical ribs. A subtle difference, but makes it look better.Now to rust up the interior, I used Rust Effects by Modern Masters.
That's the load I'll be using for this gondola, made by Chooch Enterprises, which is now a part of the Walther's line.
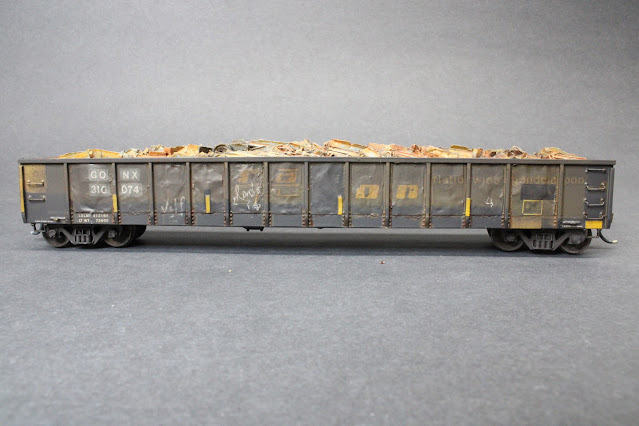
So here is GONX 310074 all finished and loaded up.
In closing, I remember that I said to Brian a few weeks ago that I figured this model would probably take me a month from start to finish, and I think I was pretty close to that. Certainly not putting in 8 hour days working on it, and there were several days where I didn't do any work on it at all. Just a little time here and there and GONX 310074 is now finally finished up and in service.


Are you sure you used .050” styrene ? That’s almost 1/16 thick , maybe .005 “ styrene ?? Beautiful model otherwise
ReplyDeleteYou're right Mike, of course. And I'm fixing that text right now ! Thanks for catching it.
Delete