Friday, 28 June 2024

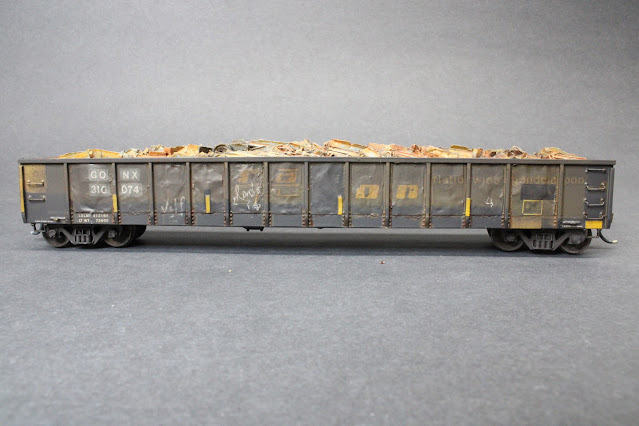
GONX 310074 Model

I ran across this photo online a while ago and thought I've got the perfect car to try to model this.  Compare this photo to the finished car photo at the end of the post and let me know what you think.


So, here's my nice clean starting point.  It's an Athearn Ready to Roll gondola that I had picked up at the Woodstock train show back last fall.  I think I had paid $15 for it.
Work begins on this nice, clean gondola 

I first cut strips of .005" (that's really thin) styrene in widths matching the panels on the gondola.  I then created bulges by laying the strips down on the street in front of my house and rolling an old wallpaper roller back and forth over them to emboss the subtle irregularities of the pavement. The strips were then cut to length to match the height of the panels.
It was quite a simple matter to glue my styrene parts right overtop of the panels, and saved me the step of removing the original factory printing.
 
Primer grey over the entire gondola

Painted the overall gondola black, and referring to the prototype photo with the patching in mind, I only used the decals necessary.  I also had applied clear gloss before applying the decals.

My best guess for the colouring was to spray the gondola with Roof Brown to try to approximate the proper match for the sides and the yellow decals.

I sealed all that in with clear gloss, and then masked required areas to be able to paint them black

Above is the car, masked and appropriate areas painted black.  Remember the Roof Brown and the decals underneath the tape have been sealed in with clear gloss lacquer so the tape won't, or at least shouldn't, pull them off.

Tape is removed and the decals are still in place!

So the next step, and I'm sorry I don't have photos of all this for you, was to spray just a bit more of the Roof Brown to start to flatten everything down. Then I added the grey patches (Microscale Trim Film) for the reporting marks to go on plus a couple of black patches (more Trim Film).  Then the reporting marks, lube data, weights data, wheel specs decals, and the yellow reflective stripes.  I hand scribbled the little bits of white graffiti using a white Gelly Roll pen.

With that much finally done, I sprayed for a 3rd time the roof brown to really take down and dirty the colours and of those too clean and shiny decals.  Also I removed the trucks and masked the wheel treads and sprayed the wheels and trucks with Camouflage Brown. Then I added rust and black coloured Vallejo pigment powders.
And with all of that done, I added a bit of burnt sienna and burnt umber artist oils to the rivets and beside some of the vertical ribs.  A subtle difference, but makes it look better.

Now to rust up the interior, I used Rust Effects by Modern Masters.
That's the load I'll be using for this gondola, made by Chooch Enterprises, which is now a part of the Walther's line.

So here is GONX 310074 all finished and loaded up.

Here's the GONX loaded at the local Ferrous Metals & Trading site and ready for pick up by the GTW.  Those bulges of the .005 styrene show real nicely in this photo.

In closing, I remember that I said to Brian a few weeks ago that I figured this model would probably take me a month from start to finish, and I think I was pretty close to that.  Certainly not putting in 8 hour days working on it, and there were several days where I didn't do any work on it at all.  Just a little time here and there and GONX 310074 is now finally finished up and in service.

Friday, 21 June 2024

Industry Kitbash

Thought I'd try to show what (little) more I've accomplished on the Walther's and Pikestuff kitbash structure that I had shown a view of last week.  It is however still a work in progress.

I said last week that I was wanting to add a foundation around the bottom of the Pikestuff warehouse, so I've got that at least partly done. I made the foundation of .060 styrene, and then laid concrete block patterned styrene sheet available through www.modelbuilderssupply.com  overtop of that. That product is however 1:100 scale, so just a bit small for HO.

I'm trying out an open dock sort of area that might be used for loading or unloading the rail cars. From my parts box I also came up with a couple of silos and a tank that I think I can put to use.

This view looks along the spur 
An airslide hopper spotted in front of the silos, and a 50 foot boxcar can be seen in this view

For this photo, I've reversed the warehouse building

I think I like this orientation a little better, but it does force the covered hopper closer to fouling the adjoining track

A closer view of the covered loading area of the main building
A 50 foot boxcar spotted inside the loading area

Here's a view of what had been in this location before
This grey structure and loading dock are styrene scratch builds from a few years ago.  The small red brick building was a $2 train show find.

A little closer look at that boxcar from the views above when it was in front of the other warehouse
Former Maryland and Pennsylvania boxcar.  If you look really closely at the right-hand end of the car, you can just barely make out the faded old Ma & Pa graphic.

Friday, 14 June 2024

This and That for June

I'm testing out this structure here to see how it works at this location.  I assembled and painted the main structure last year, and have had it sitting on a table away from the layout. The kit is the Walther's Roberts Printing kit.

The small warehouse portion at the left is not actually attached - yet.  An easy to assemble Pikestuff kit, I just put it together recently.  I think this will look a lot better after I can make a foundation around the bottom of that part to raise it's height.   

Below are a pair of 60 foot Norfolk-Western high-cubes that appear to be set out and waiting for their next move

Turns out that their next move was to another layout, as these two boxcars have been sold

Here's a look at the boarded up tower, the scratchbuilt ACME Welding shop, and the closed down and derelict Jimbo's BBQ.  Prototype for the ACME Welding is in London, Ontario

Kind of a sketchy area of the city here

Now, away from the layout and modeling, a couple of times a year I try to post a photo of a Great Lakes freighter, so here's one that I snapped this past Wednesday evening.  This is the American Century, coming into the St.Clair River from Lake Huron and on it's way to St.Clair Michigan with coal for the DTE power plant, and then onward to Monroe Michigan to Ford.

At 1000 feet in length, American Century is one of the very biggest freighters found on the Great Lakes.

And to close out, the Ford family in Detroit has been restoring the former Michigan Central train station in Detroit for several years. The station was re-opened just last week for tours.  Here is a link to a Detroit television news story about the 1 billion dollar (yes, that's billion with a "b") renovation.  The video runs a little over 5 minutes...

https://www.youtube.com/watch?v=i8C-LC_FgLI&t=92s

Happy Modelling Everybody

Friday, 7 June 2024

New Home for BSTX B36-7

Just took delivery today of this Rapido B36-7.   I had this one here two or three years ago to do the patching and weathering for Brian Smith.  I had really liked the way it turned out back then, and last week a picture I had taken of it popped up on my laptop.  I knew Brian was beginning to downsize his collection a bit, and with one thing leading to another, we (perhaps surprisingly) agreed on a price.

And so here is my BSTX 5859...

I had the engine out for a shakedown run this afternoon.  A little hesitation from the motor for a few moments, but likely just a result of perhaps not being run for some time.  The grey patch on the sides is where the BSTX had the "Seaboard System" words painted over, but the distinctive yellow and red graphics remain, illustrating it's heritage.

The GTW line on my layout here is a closed loop, so I'm able to just let engines run for a while.  The B36-7 will transfer over to the JSSX shortline soon.

I'll be keeping the BSTX (Brian Smith Transportation) leaser reporting marks on it.

Note that the reporting marks are stenciled in different places on the two sides of the cab

And in case you've got nothing to do next Sunday, there'll be this:

Have a great week.

And thank you Brian.