I had never heard that term "re-kitted itself" until quite recently on another forum. I chuckled to myself as I thought how it certainly applied to this structure.

This was the scene back on May 28th, maybe 3 weeks or so before I actually got started on re-building this major layout industry, which is served by the Grand Trunk.
I don't know how much time I spent on this reconstruction project, but a couple of hours here and there and it all adds up to quite a bit I'm sure. So, to re-cap what's went on as far as the re-build goes...
All of the failed glue joints (several of 'em) have been cleaned up and re-glued and the corners are reinforced. I re-built a balsa frame for the back of the building and epoxied the base of the entire structure to a 6" x 48" piece of MDF. The building is just under 50 inches in length though, so I had to add on a small piece of the MDF base at the right-hand end.
I re-built the roof with styrene, and added about a dozen or so details from the Walthers kit. Across the front facade, I put a few vents, added on some piping, some of which came from a kit and some are just made from scrap sprue material of the same diameter. All of that has been painted to appear to be rusty. There's also some conduit made from steel wire and some from styrene rod.
I decided early on in this project that I'd like to blank out a bunch of the individual window panes to simulate fiberglass panes. To do this I cut up blue and white trim film and laid that over random panes. That sure took a while, but I like the appearance it gives.
The spur track is code 83 now, ballasted, with weeds growing, and there's a fair bit of litter scattered along it as well. And I made and added about 44 inches of chain link fencing to run along the property line as well. I also printed "No Trespassing" signs and put them on the fence.
So, all that said, here it is...


 And just like that, 6210 magically appears, right on cue.
I've got my sights set on cleaning up the area in the foreground next. But, the first step for that will be to get a replacement switch for the one we see here. I guess that will have to be my priority on my next trip to the local hobby store, 60 miles away. In the meantime though, I've got lots of other projects to look after.
I re-built the roof with styrene, and added about a dozen or so details from the Walthers kit. Across the front facade, I put a few vents, added on some piping, some of which came from a kit and some are just made from scrap sprue material of the same diameter. All of that has been painted to appear to be rusty. There's also some conduit made from steel wire and some from styrene rod.
I decided early on in this project that I'd like to blank out a bunch of the individual window panes to simulate fiberglass panes. To do this I cut up blue and white trim film and laid that over random panes. That sure took a while, but I like the appearance it gives.
The spur track is code 83 now, ballasted, with weeds growing, and there's a fair bit of litter scattered along it as well. And I made and added about 44 inches of chain link fencing to run along the property line as well. I also printed "No Trespassing" signs and put them on the fence.
So, all that said, here it is...

Still on the workbench in this view, but the re-build is finally finished up. That is unless I decide to add lighting or something in the future.

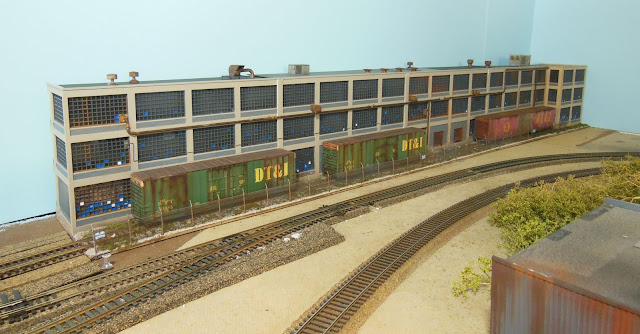
I successfully transferred the structure, intact, from my workbench back to it's place on the layout. I'd expect that the GT should be along anytime now to spot some cars at this valuable customer.


And here is the building, back in business with two 60 foot and one 86 foot boxcar spotted
I've got my sights set on cleaning up the area in the foreground next. But, the first step for that will be to get a replacement switch for the one we see here. I guess that will have to be my priority on my next trip to the local hobby store, 60 miles away. In the meantime though, I've got lots of other projects to look after.
Great job Jim. You did a fantastic job on rebuilding the factory. What did you make the chain link fence frame from?
ReplyDeleteDon - thanks very much. The fence posts are from the Walthers fence kit. I used .025 steel wire for the horizontal chords. It comes in 3 foot lengths so that's kind of convenient and the fence mesh is tulle (veil material). The tulle is the exact same stuff as Walthers includes in their kit, but I have a large amount of it that I was given by a friend that does seamstressing.
ReplyDeleteJim