Saturday, 25 September 2021

This and That this Week

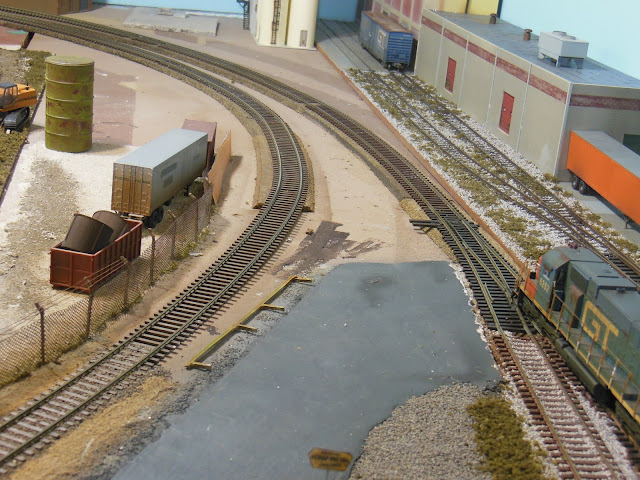
Decided to finally take a bit of a break for a while from doing so much weathering of freight cars, and get started on some long-delayed work on the layout.  I'm going to try to do some scenic type stuff on this area first.

The GTW line is on the right, and the JSSX on the left.  Both need ballasting, and I'll put gravel and some weeds in the sort of triangular area between them.  And a level crossing over the GTW track too where the SD38 is visible.  Plus whatever else I happen to think of as I go along.

Scenery is not my favourite thing to do, and this is as far as I've gotten so far.  Well, at least it's a start anyway.  More to come on this.

Following the big wind and rain storm Wednesday, we had lots of yard clean up to do. The city contractor wouldn't pick up the several bags full of sticks and twigs we had, so I took them down to the local composting site myself on this gloomy and rainy Saturday morning.  On the way back home, I swung by the station, where I took this photo of ICRX covered hopper #123839.

See, I told you it's rainy. I quite like this picture.

Then, for just a little more clarity, I took this next photo too...

Two different coloured patches, a little graffiti, some very subtle rust streaking, and those reflective stripes, shouldn't be too difficult to model.

And one more thing...I took this nifty photo last week of the freighter Cuyahoga as it sailed northbound into Lake Huron, on it's up way to Thessalon, Ontario to pick up a load of stone.


Saturday, 18 September 2021

Soo Line Locomotive

Hey, the blog is four years old this week...I just realized.

I have a few looks at a Soo Line, formerly Milwaukee Road GP38-2 locomotive. The model belongs to Brian Smith, but I've had it here for weathering for some time. It's actually the 2nd time I've weathered this Athearn Genesis model for Brian.  He told me he wanted it to be dirty, as in really dirty.  I wasn't happy with the way it turned out the first time so I asked him to let me have a 2nd crack at it.

I really like the look of this patched-out engine, and think one like it would be well-suited for the JSSX.  I've searched online a few times for one recently, but haven't been able to come up with one so far.

Soo Line simply painted out the Milwaukee Road logo in the orange portion of the long hood with black paint, which Athearn did. They also put the SOO reporting mark on the side of the cab of course.

No pictures of the previous weathering, but the problem was trouble with my old airbrush caused the spray to not be "fine" enough.  The spray from the airbrush was too coarse, leaving small specks on the model, rather than the fine mist that it should have been. I carefully removed all of that, and sprayed it again with much better results this time.

There's also some rust that has developed on the cab roof and at a couple of spots at the top of the long hood as well. Oh, and I don't have that troublesome old airbrush any more.

Headlights are on as the locomotive begins to leave the JSSX maintenance track

Okay, so I cheated a bit and used the 5-finger turntable to show the Engineer's side as the locomotive left the JSSX yard with 2 boxcars in tow.

And one more thing...This link below is to a photo on page 64/65 in the September issue of Model Railroader, showing an extremely well done maintenance shop.  The building, the locomotive, and just look at the asphalt ! The layout belongs to Rick Sutton, who also took the photo.  I hope we'll get to see more of Rick's layout.

https://www.trains.com/mrr/how-to/model-train-layouts/a-busy-engine-shop-a-peaceful-river-crossing-a-river-in-the-steel-city-and-other-model-railroad-photos/

Saturday, 11 September 2021

Maintenance Department Vehicles

 Luc recently gifted me with this really nice customized heavy duty hi-rail truck, doubling the JSSX's fleet of maintenance vehicles. I thought that we'd have a look at them this week.

Parked outside of the maintenance building in this photo, the truck is equipped with a crane, welder, hose or cable reel, tool box, and traffic cones.


The new maintenance truck, rumbling along Hardscrabble Road

A look at the various items aboard the truck


And, Brian Smith gave me this smaller, modified pickup truck quite some time ago. The truck comes equipped with an extendable bucket, and as can be seen in this view, was originally lettered for CP.

I removed that lettering quite easily this week with a Q-Tip that I had dampened with isopropyl alcohol. Doing so took about 10 seconds on each side.
The work truck pulling into the maintenance yard.  I wonder if the DOT would be upset that there is no DOT number on the doors of the trucks.

The two maintenance trucks at the switch to the metal recycler.  Seems kind of funny that there's no workers in sight though...

Saturday, 4 September 2021

RBOX 31856 Re-Decaled and Weathered

 Seems like I've had a bit of a run of Intermoutain model RBOX cars on the workbench over the past couple of weeks, so I thought we'd have a look at one them.  In reality I've only really worked on two of those cars, but I actually weathered the first one twice.  I didn't like the way it looked when I finished the first time, as I had gone too heavy with brown and the boxcar turned out way darker than I intended.  You'll have to take my word for it, as I'm not making any pictures available from that particular effort.

This is the 2nd boxcar, in it's original condition.

I remove the Intermountain factory lettering with Solvaset and a wet Q-tip or two.  That normally seems to take about 20 minutes or so, at least on Intermountain or Athearn models.  

Fading of the paint colour would be next, but the yellow of the actual RBOX cars often seems to darken as it picks up dust and dirt, so I spray them with multiple layers of thinned brown acrylic craft paint.

Decals from PDC's RBOX ghost decal set replace the original graphics.  They are very nicely printed on very thin decal paper.  Lots of cutting/trimming involved, but the work is well worth it as they do fit perfectly among the ribs on the sides of the boxcar.
The patch at the reporting marks is my own creation, as I sprayed a mix of yellow and flesh coloured craft paint onto plain trim film.  The reporting mark and numbers are from a MicroScale RBOX sheet.

For this side, I free-handed some graffiti.  The few black patches are flat black trim film, and the old loaders' stickers at the door are trim film that I had sprayed off-white as well.  The roof is Rust Texture from Vallejo, which I've then painted with grey craft paint to simulate added waterproofing.

After all that is done, I spray again with more of the light brown craft paint, just to flatten everything down and bring it all together.

I've had the PDC decals that I used ion this boxcar for some time, but a week ago I ordered another complete set of six from them.  Bill at PDC is really nice, and had them shipped this past Monday.  I received them yesterday (Friday).  Here's a shot of all 6 sets...
These decals are made for use on the Intermountain boxcars, but with a bit of care, they can be used on those from other manufacturers as well.  I figure that doing that sort of thing is what makes us modelers.