Sunday, 26 January 2025

Wood Floors for Two Freight Cars

I ordered on-line two different laser cut wooden decks from Imagine That Laser Art, and received them last weekend.  These things are only 7/10ths of a mm thick, so you would have to look pretty closely at their thickness to even notice it.  Really nice.

One is for the floor of an ExactRail Thrall gondola, and the 2nd one is for a the deck of a Walthers PS 60 foot bulkhead flat car. They fit the two freight cars perfectly and they look great right out of the package.

So here's a look at these...The bulkhead flat deck on the left, and the gondola floor on the right.

These simple little kits are certainly easy enough to use... even I can do it.  Just gently cut or pop them out, and do a little bit of very light sanding or filing of the tiny tabs that hold them into the wooden frame.
The two railcars about to receive their new deck and floor.  That floor that's in the gondola now is a removable one that I previously made from styrene.  And just a quick note about the length of that Walthers 60 foot bulkhead flat, between the bulkheads length is only 48 feet.
 
The Imagine That instructions said to use the gel type of CA glue to attach the parts to the models, so that's just what I did.  Maybe some weathering will be done later, but for now I'm going to leave them as-is.
One thing that does bother me about this little project is that Imagine That did not include boards to run down the centre of the bulkhead flatcar as part of the kit, and I wonder why not.  

I haven't yet added the wooden bulkheads, as I was wanting to put some graffiti on at least one of them, but I haven't quite gotten to that yet.
This is my "drone" view of the Thrall gondola with the wooden floor installed - it just drops right into place - as it sits alongside another same type of ExactRail gondola with one of my styrene floors.  I'll have to try to figure out what loads might be used on this wooden floor.  I don't think the railroad would want a backhoe or something digging scrap off of the wooden floor.

That'll be all for now.  Happy modelling.

Friday, 17 January 2025

Ex-ROCK Boxcar Weathering Project

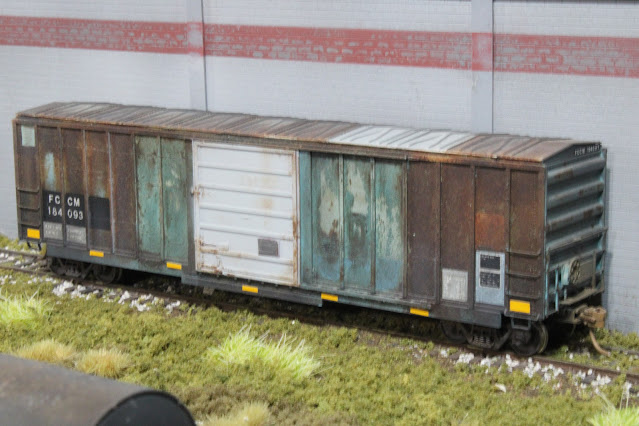
Thought I'd feature my most recent freight car project, another ExactRail Evans boxcar, that came rolling down the track here in the last couple of weeks.  I've just finished up the weathering on this boxcar.  I'd estimate I've put about 16 hours actual working time into weathering this one.  That time includes masking, patching, gloss coating, decaling, flat coating, rust pitting and streaking, and flat coating again.

On to my boxcar in just a minute, but let's start with the inspiration for my model.

I had stumbled across this photo by Ray Lewis somewhere on the internet.  At first, I thought it was an actual boxcar, but when I looked closer, the coupler trip pin gave the model away.  I printed the photo, and pinned it up at my workbench for reference as I began work on my model.

So, special thanks to Ray Lewis for this...

Here's my boxcar.
This is/was the starting point for my project

All taped up and ready to paint patch.  The other side used just as much masking tape.

The grey patch areas are a grey craft paint sprayed through the airbrush.  The blue patches are Microscale decal trim film that I cut and applied after the grey was well dried.


With the new reporting mark and data decals added.  And the roof is done with 3 coats of Rust Texture hand brushed on.  That stuff clogs the airbrush up (believe me), so I do that step by hand.  Next step was to add the scratches and rust streaking.

Here's my completed car, rolling down the track on the JSSX.  Notice the reporting marks on the ends of the car on a patch of white trim film.  Those numbers sure are tiny, and took a lot of fussing to get them straight.
I say completed, but I haven't decided whether to add some graffiti or not.  I'm happy with the way it is, so I think I'll leave it this way at least for now.  The yellow reflective stripes from Smokebox Graphics help modernize the boxcar. 

Here's a few more pictures of the boxcar all finished up, away from the workbench and in service on the railroad...
Beneath the Gratiot Avenue overpass

At one of my favourite railfan locations

And showing the other side of the car


So, this is what I accomplished over 16 hours or so.  I'm really pleased with the result.

In the real world, I'm not sure what the weather's like in your area, but this is how it was here in Sarnia one winter's day sometime back in the 1990's when I took this photo.  The view is looking toward the east.  I've always liked this picture, and I just learned how to scan my old print photos to the new laptop, so here it is...

That's a westbound CN train heading for the tunnel to Michigan. Quite a few cars in the station parking lot that day.  Now, we're not supposed to park or even enter that area, as it's been cordoned off with concrete Jersey barriers for a couple of years or so.  My guess is that the railroad figures if they block the area off, they don't have to maintain it.

That dark vertical sort of thing that is seen near the centre of the photo is actually an end view of one of the iron cast tunnel liners from the original St.Clair tunnel.  There is also one of the concrete liners beside this one from the new tunnel as part of the display there as well. 


That's it for now. But if anybody knows Ray Lewis, I'd like to message with him.

Wednesday, 8 January 2025

A Couple of Mis-Matched Things

I don't think I've posted this picture before, but maybe.  It was taken quite a long while ago.  We're seeing GTW SD38 6256 rolling slowly through the simple 3 tracks GTW yard with what looks to be 7 loaded gondolas, 3 boxcars, and a plastic pellet hopper.  The JSSX engine maintenance area and office is seen in the upper portion of the photo as well.  And the 3 track JSSX yard to the right, with the short interchange track connecting to the GTW.


And nothing to do with the above photo, I've probably shown this boxcar here before, but I recently pulled it from the cabinet. The real story is that I had suffered not one, but two failed efforts at weathering this freight car a few years ago, gave up on it, and seriously thought about just throwing it away after the 2nd time  But then, I decided to try to make lemonade from that lemon, and this is what it turned out to be.

This had started out as a really nice looking (ExactRail) Rock Island boxcar, and as I remember, things spiraled wildly downward from there.  This is the result of not knowing what I was doing weathering-wise, trying to fix it and making things worse.  The white door tries to look like a replacement.  All of those brown rusty looking areas is really a lot of burnt umber trying to cover up where I had unintentionally removed areas of the original paint while trying to clean up earlier mistakes.


I actually kind of like it in this angle of view

Rusty roof too, but a couple of panels looking like they've been replaced.

Here's the Evans boxcar sitting at the Tri-State Paper dock awaiting loading.It actually does fit in kind of nicely on the railroad, so I'll be leaving it out on the layout for a little while.


One more view at Tri-State.

And just so you know what we're looking at, here's an image of what the boxcar originally looked like before I messed it up the first time, although not likely the same car number.
I have another of the same boxcar that I've only recently been working on.  Maybe I can show that one here soon.  It looks a lot better.  At least I think it does.

I hope you'll check in here next time.  Have a good week.

Wednesday, 1 January 2025

Southern Parts Car

How do you like the Tangent model 86 footer at the top of the blog?  I finished weathering that one up several weeks back, and I'm fairly pleased with how it turned out.

In the photo above, Southern 42525 is passing by in a train on the GTW line in front of the Tri-State Paper plant.

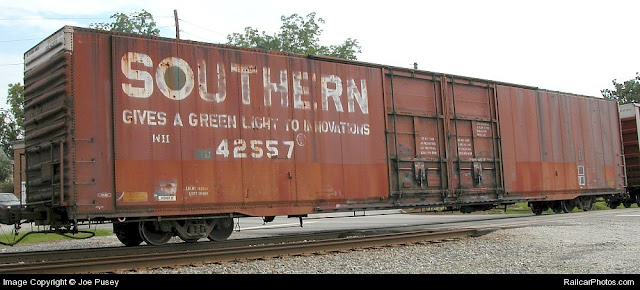
I weathered this one by referring to the prototype photo below of a similar car taken by Joe Pusey.  The model turned out a bit darker than I thought it should have, and I should have worn down some of the lettering a bit more, but over all it's pretty good.

What got my attention with this particular 86er was that wide rusty-orange band across the lower portion of almost the entire length of car

The Tangent model, brand new and just out of the box.


Masking was reasonably straightforward on the model.  I use painters tape, and stick it down to my cutting mat and then peel it off again a couple of times to reduce the stickiness a bit before I actually apply it to the model.

When I take a sort of portrait photo like this one of a model, I set it on a sheet of black construction paper that I picked up for a couple of dollars at the local Michael's craft store.  For some reason, the black paper always appears grey in the photo.  The lighting is just from my daylight  balanced led work light.

Another view from out on the layout

And a look at 42525 coupled with another Southern auto parts car


That's all for now, so thanks for looking in again, and have a good week everyone.  And a really Happy New Year too.