Saturday, 29 February 2020

Passing Track Replaced

Along the GTW line, I recently lifted out this left-hand Peco switch and the just over 6 feet of track beyond it that make up the rest of this passing/runaround siding.  The switch and the track beyond it was Code 100, which has now been replaced with Code 83.
This passing/runaround siding is long enough to hold 7 86 foot cars, plus one 6 axle locomotive.

The entire layout was all Code 100 at one time, but a few years ago I began something of a program of replacing everything with Code 83.  I saved most of the straight track, and all of the switches, and managed to sell it all off to help offset the cost of the replacements.

The view from the opposite end of the siding,  after replacement of the track, ballast, and scenery.

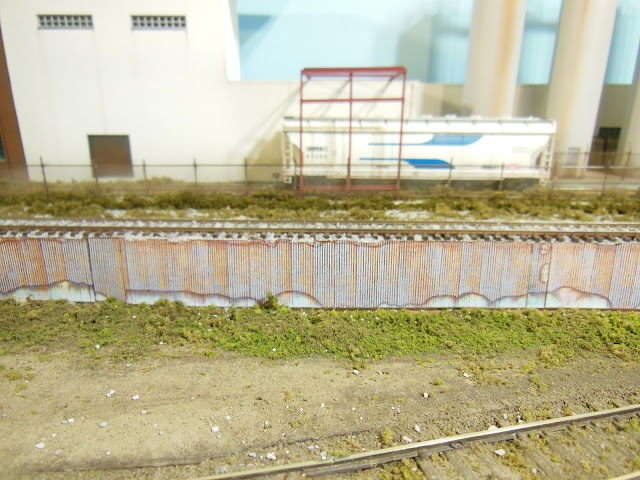
To make it easier to lift the old track out, I first sprayed it with water to loosen the glue.  However, doing that led to an unforeseen small problem at the scrap yard. Most of the "steel" fencing there is made of paper glued onto styrene sheet.  The bit of water that I sprayed managed to come into contact with some of the paper and stained the paper fencing. Here is a look at the result of that little mis-step. I should have known better. Lesson learned.

Back to the track replacement:  There is now only one piece of Code 100 remaining on the layout, which is this 19 degree diamond. The leads into the Midwest Plastics plant and another place-holder type industrial building cross each other at this diamond.  I'm not really too crazy about this track arrangement, but it's a model railroad, and space is limited, so it's the best I could come up with.
I painted the diamond with the same Rail Brown that I used on the surrounding tracks. If you look closely, you can kind of see the .017" difference in the rail height from the diamond to the adjoining tracks.  And yes, the cars and locomotives that run across it are noticeably jolted by the height difference, just as they had been at the switch in the first photo.

I'm going to hold off on ballasting any more here for a little while.  There's a train show coming up in Woodstock sometime in April, and you never know, I might be lucky and find a 19 degree diamond in Code 83 to replace this one.




Saturday, 22 February 2020

A Couple of Evans Boxcars

A couple of weeks ago, I posted photos of a few freight cars that I've weathered and then sold off for varying reasons.  Here's a look at a couple of Evans boxcars that I struggled with, but decided to keep.  These are both from the much earlier days of my weathering efforts.  These two freight cars are made by ExactRail.


The two boxcars spotted at one of the local warehouses.

I liked the idea of having a different looking GTW freight car on the layout, but I was never really overly thrilled with the way the weathering on the first of these fifty-footers turned out. I've even put it out for sale on my table at a train show.  It didn't draw much interest though, and I was actually kind of happy about that because there's something about it that makes me want to keep it for myself.

Painted and lettered originally for Rock Island, I painted out the herald and logo, and patched it for GTW.  I sort of went by a prototype photo that I'd found on-line as far as the large white patching goes, but putting the reporting marks and numbers in black over the white band was my idea.  If I remember correctly, the prototype had white numbers over the light blue, and they didn't show very well.
Back when I worked on this car, I didn't know anything about fading the original paint. The light blue might not have faded much, but when I look at it now I wish that I had at least done a little bit.


A closer view of the other side of the boxcar.  I don't know...maybe this one should be in line for a little bit of re-work at the bench some day.  I think I could do a little better.  Maybe it could become a future re-post subject.

Now, this next one is truly a bit of a lucky survivor.  I honestly don't remember just what I was trying to accomplish when I weathered it, but I clearly remember that it just wasn't working out for me at the time. 

In fact, I was so frustrated with it, that it very nearly flew across the room and into the wall at one point.  However, my cooler head prevailed and I put it away on a shelf for a couple of months.

When I brought it back to the workbench, I was stripping off whatever I had done to it, and then just experimented with rust tones on the panels.  I figured I'd alreay pretty much ruined it, so what more could go wrong? Quite the opposite happened, and I somehow developed a nice oxidized texture all over the boxcar's surface, so I just kept going with it.

You can kind of see the surface texture of the rust on this car.  A couple of repainted/replacement doors and patched reporting marks later, and this car became an unexpected win for me.

The other side of this weather-beaten Evans boxcar.  Despite the odds, this one turned into a keeper for me, and makes semi-regular appearances out and about on the JSSX.

Saturday, 15 February 2020

New Old Structure Completed

The new dilapidated looking building for the JSSX (actually, it's located on the GTW line) is pretty much finished up, and installed.  Only just a couple of little things to do with it, like some rooftop details, maybe a bit of fencing.  Here's a look...

I'll pick up with this same photo that I left off with last time...


I streaked rust and grime downward from random points along the building's facade.  I used Burnt Umber artist acrylics to do this. Just a small dab of paint, and then a water-dampened flat brush pulled straight downward to create the streaking.

In this closer view (below) of the right-hand end of the facade, you can see I also made use of the burnt umber to highlight minor imperfections in the spackle that I used to represent the concrete.  I did this to further the impression that the concrete is aged and worn.

When concrete starts to break up and fall apart, I believe the term is "spalling".  This occurs when water finds it's way into the concrete and then causes the surface to begin to break up.
The concrete stairs and railing received a heavy weathering as well.  There was a building in a YouTube video that was the inspiration for my model. It had horizontal pieces on the lower row of wall panels.  I don't know what they were there for, or even what they were made of.  I wanted to include them as a feature on my building, so I glued .040 square styrene rod to the dried wall spackle.

Getting closer to the finish line now, I've added gravel and sifted dirt along the MDF base, as well as planted a little bit of ground foam and a few small bushes from "Super Trees".

Below is a closer view of the single panel that I left open.  I made a false floor and dropped a bit of gravel onto it, along with an old board, a steel bar, and a drum.  The back wall is only about 1.5 inches from the front, so the colour difference between the floor and the back wall is more obvious than I might have like it to be. 


Space in the foreground is limited, but there's a weathered and tagged dumpster that's been dropped off below that open panel now as well.  I have to get together some scrap to layer in there.

Set into it's place on the layout, I think that this building is fitting right in.  That's one end of the scrap yard in the foreground, and then the Midwest Plastics plant further at the far end.

And from the opposite direction, a final view for the time being.  I've quite enjoyed working away at this whole project.  As I mentioned, I'll be adding some rooftop details in the future, and soon work on ballasting the tracks in the area as well.

Saturday, 8 February 2020

Half a Dozen Rail Cars That I Don't Have Anymore

Straightening out some pictures files this week, I came across a number of photos of freight cars that I had weathered quite some time ago.  There were quite a few that had been sold off for one reason or another.  Some that I'd forgotten about, some that I wish I'd kept. 

Here's a selection of cars that I don't have anymore.

I weathered this Landmark covered hopper a few years ago.  It turned out quite well, but I really didn't have a use for it on the JSSX at the time, so I sold it off at a train show.  I still wouldn't really have a destination for it anywhere on the railway, but I do like it and kind of wish I'd kept it anyway.


This GT autorack from Walthers is one of my earlier efforts in weathering.  I masked off each of the panels and rusted them individually with my airbrush, and then hand-brushed on the rust streaks afterward.  This one had no real purpose on the layout, so I sold it at a train show.

I had allowed the weathering get a little out of hand on this one.  Things went well enough with the herald and reporting mark patches, but I didn't fade the blue down very well and the rust is painted on too thick.  This one just didn't turn out right.

Another covered hopper here, I have no destination for a grain hopper to go to on the JSSX.  I did like the way this one turned out though. It was a bit of a challenge for me to streak the white down from the lettering as I hadn't done that before.  The white is maybe just a bit too heavy beneath the numbers.

I had trouble patching over the herald on the left end of this boxcar.  I used light blue decal trim film to do so, and it just would not settle down properly, leaving a bunch of wrinkles.  Part of my learning process, I went too heavy with the airbrush for my own liking on this one, applying a bit too much of the grimy black as I tried to mute the colours down.  I do like the way that the door turned out however.

EDIT: I first wrote that Peter Mumby had bought this caboose (below) right back from me after I had weathered it. Apparently I was wrong about that, and I've since edited my description.

I've found white cars quite difficult to weather, but I bought this Soo caboose at a train show in Woodstock (Ontario) from Peter Mumby of Peters Trains. After I weathered it, it was sold to Brian Smith.  I like the windows that have been plated over, and I thought the rust and streaking turned out very well.


Saturday, 1 February 2020

Kitbash Progress

First off, last week, sharp-eyed reader Geof noticed and left a comment that maybe I should knock down a cobweb in a photo that I had posted. Right you are Geof, and I thank you.  The cobweb was strung from the Jimbo's Bar-B-Q sign over to the building.  Anyway, it's gone and the photo is replaced (again) up top at the header and also in last week's entry itself.


Progress on my new kitbash structure which will go up against the backdrop has been moving forward nicely. Here are just a couple of quick takes from the workbench.
I put the clear window glazing from the kits across the back of the window openings and then spread drywall spackle overtop of them to simulate the openings having been closed in and then cemented over. I masked over the "concrete" framework of the building to prevent the spackle from smearing all over the plastic.  I couldn't fill in all of the windows at one time because the filler is really easily damaged before it's fully dried.  Don't ask me how I know this.  

All of, well actually almost all of, the window openings have been filled with the wall spackle.  I'm leaving that one space open just to break things up a bit.  Call it modelers choice.  If I end up not liking it this way, I'll be able to fill it in later.  I just smoothed the spackle well with the spatula/trowel and left it alone. I didn't sand any of it all, as I think that a tiny defect here or there will just add to the look in the end.

I first painted a few of the filled in windows with Concrete Gray, but it was a more brownish colour than I wanted, so I removed the filler and then did those spaces over again.  I ended up using thinned grey acrylic paint, giving some areas two coats and just one coat in others.  Looking closely, you can see some of that colour variation below.
Still at the bench here of course, the brickwork is painted craft paint acrylic "Brick Red", followed by thinned "Espresso" brown, and then a bit of thinned dark grey to really darken the red down.

Next up for the project will be to give the structure some weathering while I still have it laying flat on the workbench, and then attach the short ends pieces that will bring the building a couple of inches out from the wall.  Hopefully I'll have more done on this shortly.

I posted this next photo (below) at trainorders.com this week and received some pretty nice comments about it, so I thought I'd put it up on here as well.  The engine is an Atlas GP38-2, that I modeled after seeing a picture on-line of NREX 3885.  Ron Creasor added the ditch lights for me. 
NREX 3885 setting up for switching on the South Industrial Blvd. job on the JSSX