Friday 26 January 2024

Pollock Hot Metal Car

Have you ever bought a model that you really probably shouldn't have ?  I did that - once again - a few weeks back when I went to my local hobby shop (Broughdale Hobby in London), which is about 60 or so miles away.

This just caught my eye as something different and I thought that it might be interesting to put together.  I haven't started to do that just yet, but I soon will.

This is a Pollock Hot Metal Car.  The model is made by State Tool & Die in Ohio.  Since buying this model, I've looked for and seen quite a number of photos of such cars online. I'll have lots of reference material as I go about painting and assembly.

One photo of similar model had the finished car as a load atop a flat car, so maybe I can go that route with mine.  Or maybe I can find someone modelling a steel mill that might like to have it.  I thought I was going to model a steel mill at one time, but sold off all of the models I had that were related to that industry.

The model comes with this exploded diagram assembly sheet, as well as step-by-step instructions too.

Here's a look at the model parts laid out on the workbench.  Fingers crossed, but it doesn't look terribly complicated.  That said, it'll either be fun or frustrating.
Not crazy about the plastic wheels, but Kadee #58 couplers do come with it.  There are metal steps or grab irons, a length of chain, and a plastic sprue of 4 small hooks.  The orange piece in the car comes right out, so I could leave it in to look like the tank is full of molten metal, or very simply remove it to show the car as empty.


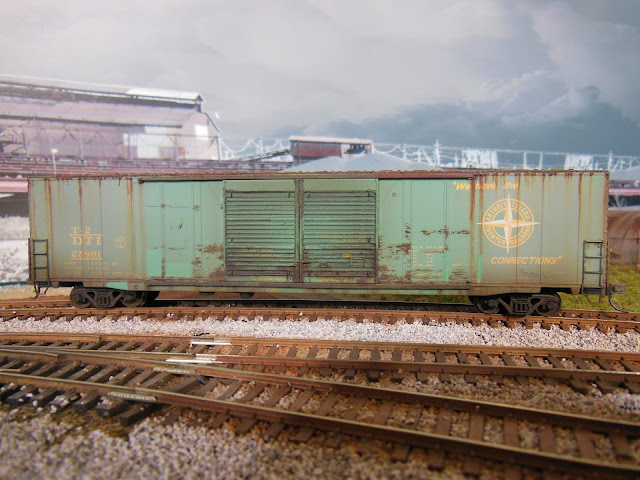
And below, as I went looking for a bit of modeling inspiration for another model one day last week, I googled "weathered boxcar photos" and found this example of my own weathering on the internet.  I always find it surprising to find my own work posted on some other random website.
This boxcar belongs to and was weathered for Brian Smith.  Pretty nice looking boxcar I think.

One more thing...Does anybody know what happened to the "Michigan Interstate" blog ?  I used to check that blog quite often, but there hasn't been a new post on there since October 2018.  Did the blogger just quit blogging, maybe quit the hobby, maybe suffer some personal health issue?  Anybody know ?

Friday 19 January 2024

Weathering my JBOX car

Some readers will remember this boxcar that I painted years ago, that I've now realized falls under the category of hypo-typical. That's a term I've only just recently heard used, a combination of the words hypothetical and prototypical.

And you probably know that I like my 86 foot boxcars. I've shown this one on here a few times over the years, and I bring it out for a run on the layout occasionally.

An old Athearn blue-box car, with a couple of upgrades to help it operate a little better on the layout, I had always wanted to see what such a car would look like in the Railbox scheme.

I'll be keeping the JBOX reporting marks, because I like it and it's my boxcar and my idea. They already have RBOX, TBOX, and FBOX.  I went with JBOX mostly because J is my initial, but also given the large dimensions of the car, the J can stand for Jumbo boxcar.

It's just so clean and new looking, that it doesn't really fit well among my other auto parts cars.  And I'm finally getting around to doing something about that.

I removed all of the decals, and doing that kind of made it necessary to repaint most of the car, which I really didn't want to have to do.  Here's a look at how far along I've gotten so far, with most of my weathering completed.
The faded RBOX decals are made by PDC www.pdc.ca . I hand painted, with a very fine brush, some small areas with weathered black onto the yellow lettering in an effort to make them look like a bit of the black lettering had not yet peeled away.

I air brushed over the black doors with the weathered black to age them a bit as well.  The scratches and rust are water mixable Burnt Sienna and Burnt Umber artist oils.

Disregard the road name of this decal set that I've ordered.  I need the 86 foot boxcar data stencils done in black, and these ones fit the bill.  I'm waiting for them to arrive from CMR Products www.cmrproducts.com located in Pennsylvania.   
Maybe I'll use the old bar code labels included in this set too, but probably not.

I'll post more about this once I get it finished up and out on the layout. Meantime it's cold outside, so stay inside, stay warm, and if you can, do some modeling.

Friday 12 January 2024

Whalebelly Tank Car

 Things were looking unusually quiet today along South Industrial Blvd. on the JSSX...

No boxcars at the warehouse, and nothing happening on the street either.  So, with not much going on there, I went to the storage cupboard and found myself a quick railcar upgrade project to do.

This Atlas tank car made it's first appearance on the JSSX in quite some time this week.
This dual-diameter, or whalebelly, tank car certainly looks like it's been out in the weather.  These tank cars were removed from the prototype railways some years ago, but it is a nice model to have.

I had trouble coupling this tank car into a train that was on the layout, so I brought it over to the bench to have a closer look. It appeared that the Accumate brand couplers that were on it didn't match up well with the smaller and closer-to-scale Kadee #158's that I have on that particular boxcar, as well as having them on a great many more freight cars.

So, I decided it was time to change from the Accumate couplers...
Here we have the 2-piece Accumate couplers on the left, and the replacements I decided to go with, Kadee's "shelf" style couplers on the right.  I don't know the part number of the shelf couplers.  These were given to me by Brian Smith.

I don't think that the process of replacement could have gone much smoother. I had it done in about 5 minutes, and very remarkably didn't break any of the more delicate parts on the tank car in the process.

With the shelf coupler on the tank car, we can see the piece that sticks up above the coupler that is designed to prevent couplers from riding up overtop of each other and possibly piercing the actual tank in an accident. I still need to paint the couplers, and I'll probably snip off that bottom trip-pin as well.

Another look at ACFX 17440.  Here, it's coupled between a plastics pellet hopper and a kitbashed extended height boxcar.

 
In other news, check this out when you might have a few minutes.  I found that YouTube has a new railcam set up at the very busy Blue Island in Chicago. Here's the link to that railcam:

Friday 5 January 2024

CN Gondola Finished Up

ICRX 570428, my version of it anyway, is an ordinary plastic pellet hopper and is at the top of the blog for January.  I like this picture.

I explained last week that I created the dents in the walls of the gondola by going out to the street in front of my house and running a wallpaper roller over the styrene.  Brian Smith called me the next day, to say that he was wondering just what the neighbors might have thought I was doing out there. I can't say for sure, but he may have had a point.  The guy down the street runs a local newspaper, so I'm kind of glad and maybe a bit lucky that there wasn't a photographer out there at the time.

Here's a look at my  newest CN gondola, as it finished up...

The dents made with the wallpaper roller show up very nicely in the view. I think that they stand out quite well

Graffiti added to the other side is mostly, but not all, decals

Looking down at the floor of the gondola where I used a variety of washes and powders.

Off the bench and out on the rails.  The pipe load is one that I made to fit another gondola of this same size gondola a long time ago

And another look at the "clean" side.  A fun project completed.

If you've ever considered the idea of including a helix on your layout (I haven't), here's a link to a little inspiration for you...

 https://www.facebook.com/100032496845283/videos/783808420245814?idorvanity=

Have a great week