Saturday 30 March 2019

MidWest Plastics

Running along the far side of the scrap recycler is the GT main track and a passing siding. One of the industries that GT serves along this section is MidWest Plastics, a plastics molding plant, whose rail spur seems to typically receive 2 covered hoppers of plastic pellets and either a box car (usually a high cube 60 footer) or occasionally a tank car of resin. I kit-bashed this building from the Walthers paper mill plant, and added the brown building on the left.  I've forgotten the name of that kit.

This industry is in a fairly prominent location on the layout, as it's directly opposite the doorway into the room. It could be one of the first things seen by anyone entering.

I've been thinking for some time that the siding at MidWest Plastics is much closer to the GT main than I really would like it to be, so some improvements in this area should be forthcoming.  I can't change the location of the GT main and passing siding, so I think I'm going to be making some changes to the industry building itself, which would then allow me to move the siding further away.

I do like the total length of this industry, which is about 46 inches altogether. That converts to something like 333 feet in HO scale. The white steel sided building where the cars would be unloaded measures about 5.25 inches deep, but I think I'll be able to reduce that by 2 inches or so. Doing so will then let me move the siding 2 inches away from the GT main. Then I could finally add in the much needed track ballast, scenic ground cover, etc.
Photo taken from the room entrance, there's MidWest Plastics across the back wall of the layout.  On GT tracks in the foreground are 2 cylindrical hoppers I've weathered for Sean Steele

In the photo below, I could possibly slide the entire industry further to the right to allow the siding to run the entire length of the buildings.
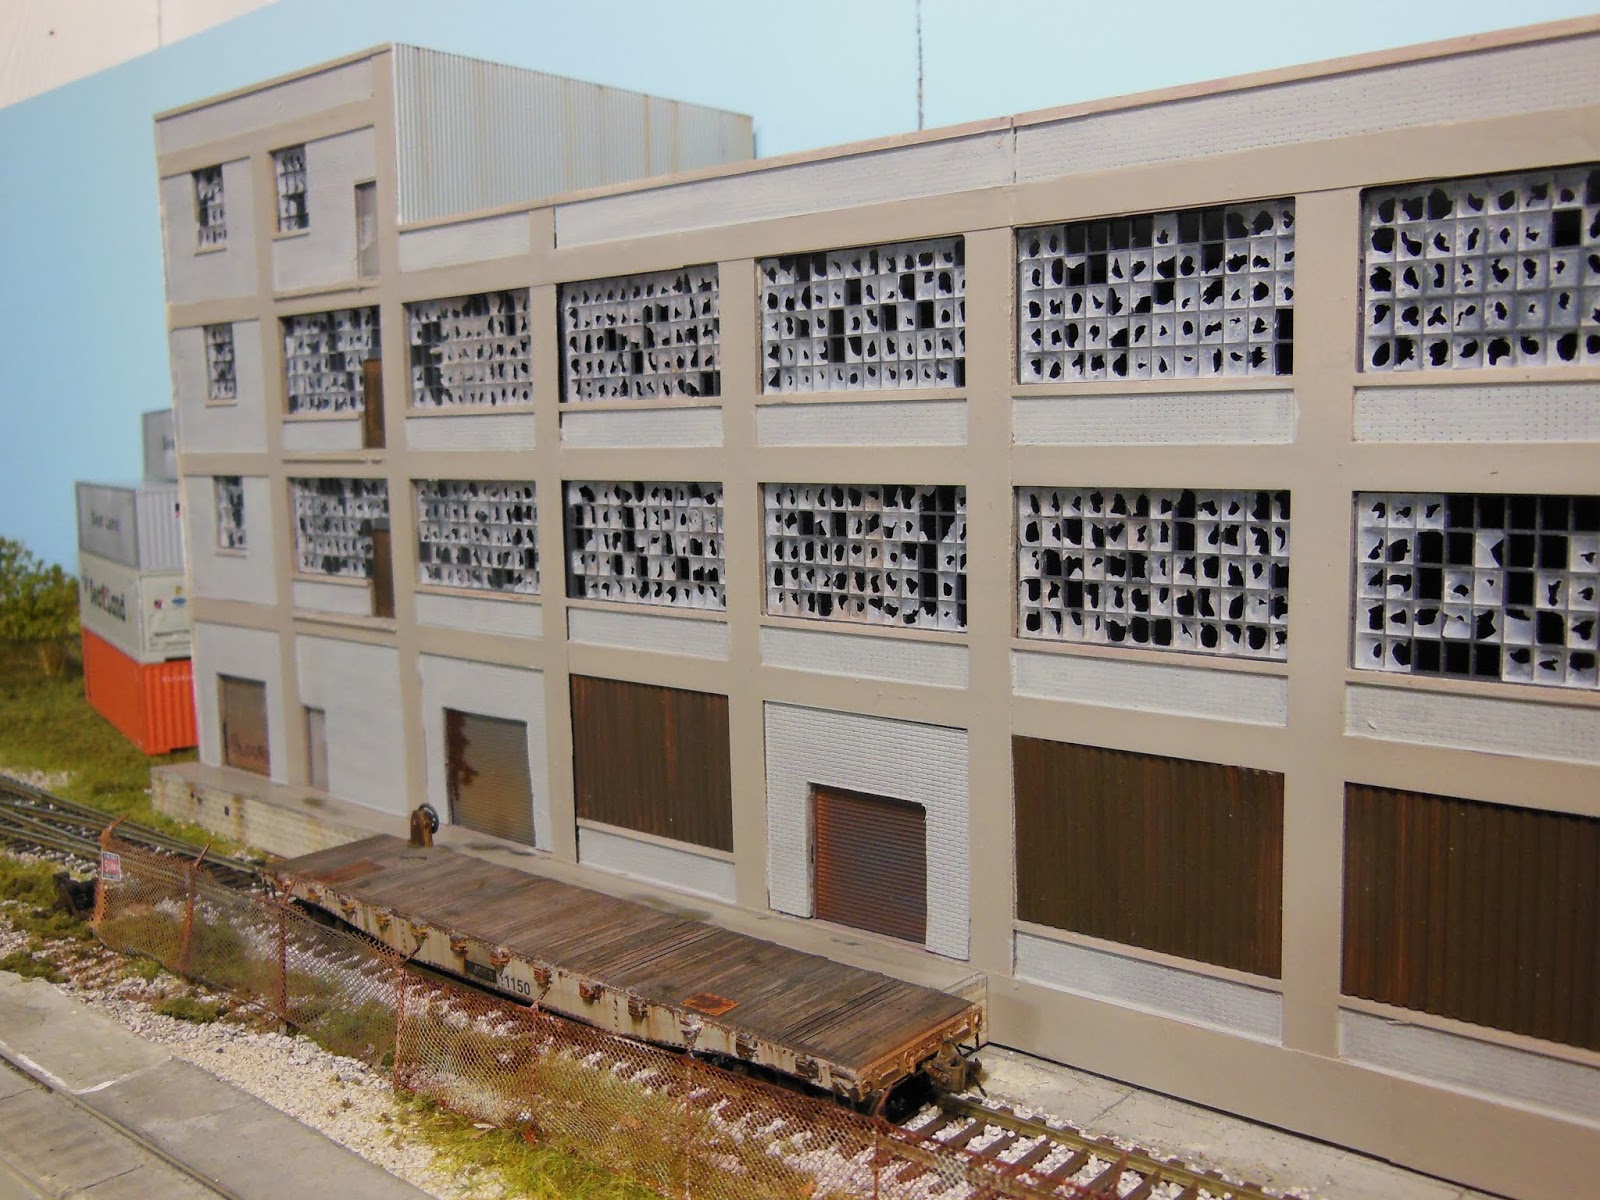
Midwest Plastics, including the brown brick structure at the far end totals about 46 inches in length, and provides spots for 3 or 4 railcars.


Saturday 23 March 2019

Dressing Up Some Empty Gondolas

Having concentrated so much on the scrap metal yard over the last several posts, I thought I'd better get busy working on some gondolas that will serve that business.  I've been thinking all along that the scrap yard will operate as empties cars in, loaded cars out.

I should mention that I found inspiration for weathering these gondola floors by looking on-line at a scrap yard in Dayton, well, technically Springfield, Ohio.  The place is called Franklin Iron and Metal, and on the Google Maps overhead view, there are 3 or 4 tracks on the north side of the business and just to the west that are occupied by strings of gondolas.  Some of the gondolas are loaded, but many are empty, and the Google view shows the interior floors of those really well. Top notch reference material!


3 of these 50 foot gondolas are mine, the 4th one belongs to another local modeler that has asked me to weather it for him.  I figured I'd make a removable floor piece that would simulate debris left inside from previous loads.  I've also done this in the past for a couple of gondolas that I worked on for Ron McCormick. These will be visible as the railroad brings the empty cars in for loading.  I figured that I might as well do them all 4 at one time.


I have a couple of load inserts made by Chooch Enterprises (I think it's them) that are perfect fits for the inside of these gondolas, so I began this little project by tracing their outline onto a fresh sheet of .040 styrene and then cut them out.

The 4 gondolas and 4 pieces of styrene that are perfect fits for the insides of the gons. On the left are the Chooch inserts I used as templates for my styrene floors.

After painting the 4 pieces of styrene flat black, I threw just about every weathering item I've got on hand at them.  I used a little bit of diluted white glue to attach a small amount of sifted dirt on two of the new styrene floors, and used some fine ballast on the other 2.  When the glue dried, I brushed on various colours of rust powders, glued in a couple of boards and even added a tiny scrap of rusty chain link fence to one of the pieces. I have a few weathering washes too, so I used a small amount of those too.

Two of the floor inserts waiting for the glue to dry,  and the other 2 are test-fitted into the gondolas

These are  50 foot gondolas, but I also have 60 and 65 footers that would certainly look better if I made similar inserts for them as well.  I only have just the two loads for my gondolas, and I really should try to make some more. But, now at least the insides of the gons will look good on their way in to the scrap yard.
Still on the workbench are the 4 gondolas, with their removable floors dropped in.  The floors will lift right out easily anytime should I want to take them out. While they are all somewhat similar to each other, each one is different.  This was a fun little project, done over a couple of evenings.

Saturday 16 March 2019

Entrance Gate, and a High Cube Waffle Boxcar

I made up this chain-link gate for the street entrance to the scrap yard. It doesn't look perfect, as the two halves don't line up perfectly. But it fits in very nicely with the general beaten-up look I'm going for with this industry...well the whole layout for that matter.

I had wanted to make this a sliding gate, but that idea didn't quite work out for me. When open, a sliding gate wouldn't take up as much space in the scrap yard as a swinging gate like this. I just think that would make more sense for the business...if the business was real of course. 
The street entrance gate, taken as the GT switches out the scrap yard.  I'm thinking a couple of signs here would add a little more interest.


In last week's post, one of my photos of the scrap yard rail entrance gate also showed an NW waffle boxcar lurking on the mainline behind the scrap metal yard.  I thought I'd show a little more of that car.
I had often looked at these black Norfolk-Western boxcars on the ExactRail website, but had never purchased one.  That changed when I received their email back in December pointing out that they only had 3 of them remaining in stock.  I figured that if I was ever going to get one, I had to do it then, so I opened up my wallet and ordered myself one.

At the same time I ordered Exactrail's bulkhead flatcar, which I added the gondola sides to and featured here back on February 9th.

Continuing on now with the waffle box, I ran masking tape around the right-hand door, and sprayed it with ModelFlex Dark Tuscan Oxide, which to me looks close to ordinary primer red. So now, this boxcar has one door that looks to have been replaced or re-painted. While I had that colour loaded in the airbrush bottle, I also sprayed a piece of blank decal paper with it.  I sealed that with DullCote. Now I've got a Tuscan Oxide decal that I can cut to size and use to make paint patches.

For the road grime that the car has picked up over the years, I sprayed Craftsmart (acrylic) Espresso colour, mostly along the bottom of the sides.  I hand painted the lower door tracks with the Tuscan Oxide so they look like they've received some maintenance, and added in one small paint patch from my newly created decal as well. There are also 3 or 4 waffles at the right-hand end that I did the same thing with a flat black decal I'd sprayed previously.


Notice here too that some ground cover has been added at the rail entrance and along the fence.  Looks much better than last week. 

I think this NW waffle box came out looking pretty good.  However, see this next photo for a problem that has cropped up on the car's other side.


Here's the waffle car over at South Industrial Blvd., where the lighting is better.

One of the vertical door opening post thingys has inexplicably gone missing from this side of the car. It's frustrating. And notice that you can see the shadow that was created when I had sprayed the grimy brown colour.

I've spent considerable time looking for this piece around the layout, on the floor, on the workbench, in the trash basket, but haven't managed to find it yet.  I didn't have any masking tape on that side of the car at all, so I don' know how or why or where it came off.  If I have to, I can make a stand-in from some steel wire that looks to be just about the right diameter.  First, I'll look around a little bit more for the missing piece.  Maybe I could offer a reward to anyone that finds it. Any reward offered wouldn't be much though...

Saturday 9 March 2019

More on the Scrap Metal Yard

Last week I wrote that I had 2 scrap dumpsters, and that they were in need of some weathering in order to fit in properly with the look of a scrap metal yard.  Well, it turns out that I have 4 of them, and I weathered 3 this week, as well sprucing up the small office that I'm using for now in the scrap metal yard. I painted the window and door trim, as well as the electrical box detail on the front.  And it's got glass in the windows now too.
For the weathering on the 3 dumpsters, I used a product that I picked up recently, and had tried only onetime before now.  MIG Jimenez "Chipping Fluid" is a pretty cool product, and I think that the dumpsters are a perfect place to gain a little more experience with it. The idea with this is to give the impression that the paint on the dumpsters is peeling and the steel is rusting.

Paint a base colour on the item (dumpster, boxcar, building, whatever). Seal the base colour with a lacquer - I used Testor's Dullcote - and allow to dry thoroughly.  Then I painted the chipping fluid over top of the lacquer and allowed that to dry. Then I painted a 2nd colour (using a rust coloured acrylic paint) over top of it.

As soon as that was dry, I dampened a small brush, and using light pressure, worked it back and forth over that top coat of acrylic paint.  With very little effort, the 2nd layer of paint soon began to peel and lift off, leaving areas of the 1st colour showing through.

Mig Jimenez Chipping Fluid - for Heavy Chipping Effects

Also, this week I've made a gate for the rail entrance to the scrap yard, using .025 steel wire and bridal veil tulle. I'm also thinking through an idea I've had for a chain link style gate for the street entrance to the industry as well.  It didn't have to be perfect, as the look I'm going for is a fence gate that's been around and used for a while.
The Grand Trunk has been called in to pull a couple of loaded gondolas from the scrap yard, but they'll have to unlock (well, not really) and open the gate before entering.  The gate pivots from one side.
With the entrance gate opened, the GP38's are about to enter the scrap yard while a waffle sided boxcar sits out on the mainline.  It occurs to me as I look at this photo, that I really should have painted the web of the rails a rust colour before I put down the scenery dirt. Oh well, maybe I can still paint it now anyway.

Now, here is my cropped photo of a painted and a little bit rusty corrugated steel wall on a building here in town.  I've printed this on paper and used it for a section of the fence that surrounds my scrap industry.  If anyone would have a use for this image (siding, roofing, fencing, etc.) on their layout, please go ahead and use it. Using Corel Paintshop, I printed this out at 24 mm high (close to 8 feet in HO scale), which automatically gave a length of something like 134 mm (5.25 inches). 

Saturday 2 March 2019

The JSSX This Week (3/02/19)

Well, this week I got that styrofoam mound painted in rust and brown tones as the base for a pile of rusty metal in the scrap yard. The pile is about 2 feet long, so approximately 175 HO scale feet. (As a side note, when I painted 2 smaller pieces grey (as a base for piles of scrap aluminum) with enamel spray paint, the styrofoam reacted with the paint and off-gassed, bubbling away outside for about 35 minutes afterward. Lesson learned.

I also spread a bunch of ground cover dirt (the real stuff that Brian gave me, sifted) around the scrap facility too, so the area is starting to look a little more like I think it should.
The mound on the far side of the gondolas is the base for a pile of rusty scrap metal. I brush painted it with rust coloured acrylic craft paint, and then added a few passes of brown and grimy black with the air brush to vary the colour a bit. I don't know what I'm going to use to cover the whole thing with individual pieces of steel.  At 2 feet long, that's going to be a lot of little bits and pieces to cover it all.

I have 2 of these scrap dumpsters, which are far too new looking for a scrap yard, so they'll have to receive some weathering, and the little shed serving as the yard office as well.


I ran across some loading dock doors in a box pf spare parts that I could use for that building with all those broken windows over at South Industrial Blvd. My plan had been to find some photos of dock doors on-line, but I never really did see what I was after, which was beaten up and graffitied doors. I was going to edit and print such pictures out on paper, mount them to styrene and install those in the doorways. Our home printer has broken down anyway, with some phantom "carriage jam" readout on the display. We can't find any evidence at all of the darn thing being jammed.  Planned obsolescence by the manufacturer, I'm sure.

Also for that building, I've finally gotten around to adding the missing wall to the upper level at the one end.  That took me about 10 minutes, or 3 months, depending on how you want to look at it. It looks a lot better now anyway.  I still need to find a fire escape for this end of the building, and some roof-top details, like ductwork, etc. as well.
There's an old JSSX flatcar temporarily spotted in front of the loading dock where I've finally installed 3 roll-up style doors.  At the top of the structure is the wall that I made from a piece of styrene siding.  It's painted to more or less match the grey brick colour of the building and I've added a bit of rust and grime streaking.