Saturday 28 September 2019

New GP35, and a DT&I 86 Footer

For quite a long while, I've had a self-imposed moratorium on the purchase of any new locomotives.  There's lots of them that I'd like to have, but my layout's not really that big, and I just simply don't need any more. The last time I bought a new engine was over two years ago, when I got an Athearn SD38 in DT&I orange.  That one doesn't even run now, as I used the motor from it to replace one in a GT SD38 that I prefer.

Well anyway, the moratorium idea sort of started to unravel a few weeks ago, when I saw a photo of a Watco GP35, that was in Union Pacific paint.  I thought something like that would fit in real nicely on the JSSX as a leaser. So, I had a quick look on ebay, and sure enough there was one on there that should make for a really good starting point. So just this once (right?) the moratorium was lifted.

And the Kato model arrived a couple of weeks ago.

I had been concerned that maybe it was one of the older versions, with that bronze strip along the sill that unreliably tried to carry the current from the wheels to the motor. I thought maybe I was going to have to do some work to replace the strip with wires, but that turned out not to be the case.  The wires have been factory installed, so all I had to do was plug in a DCC decoder. I robbed it from that same SD38 that I took the motor from.
This little guy runs real nice.  But, everything is not as rosy as it could have been with this engine. 

The previous owner, for some reason, saw fit to glue every single handrail stanchion to the body.  And from the looks of things, he must have bought the glue at a deep discount price because he certainly used lots of it.  There's even a drop of glue in the middle of one of the doors on one side.  This is all going to make weathering much more difficult for me as I won't be able to remove the handrails.

Oh well, onward and upward...I'll post more about this locomotive at later dates as things progress.  But I'm basically looking at it as a fall or winter project.

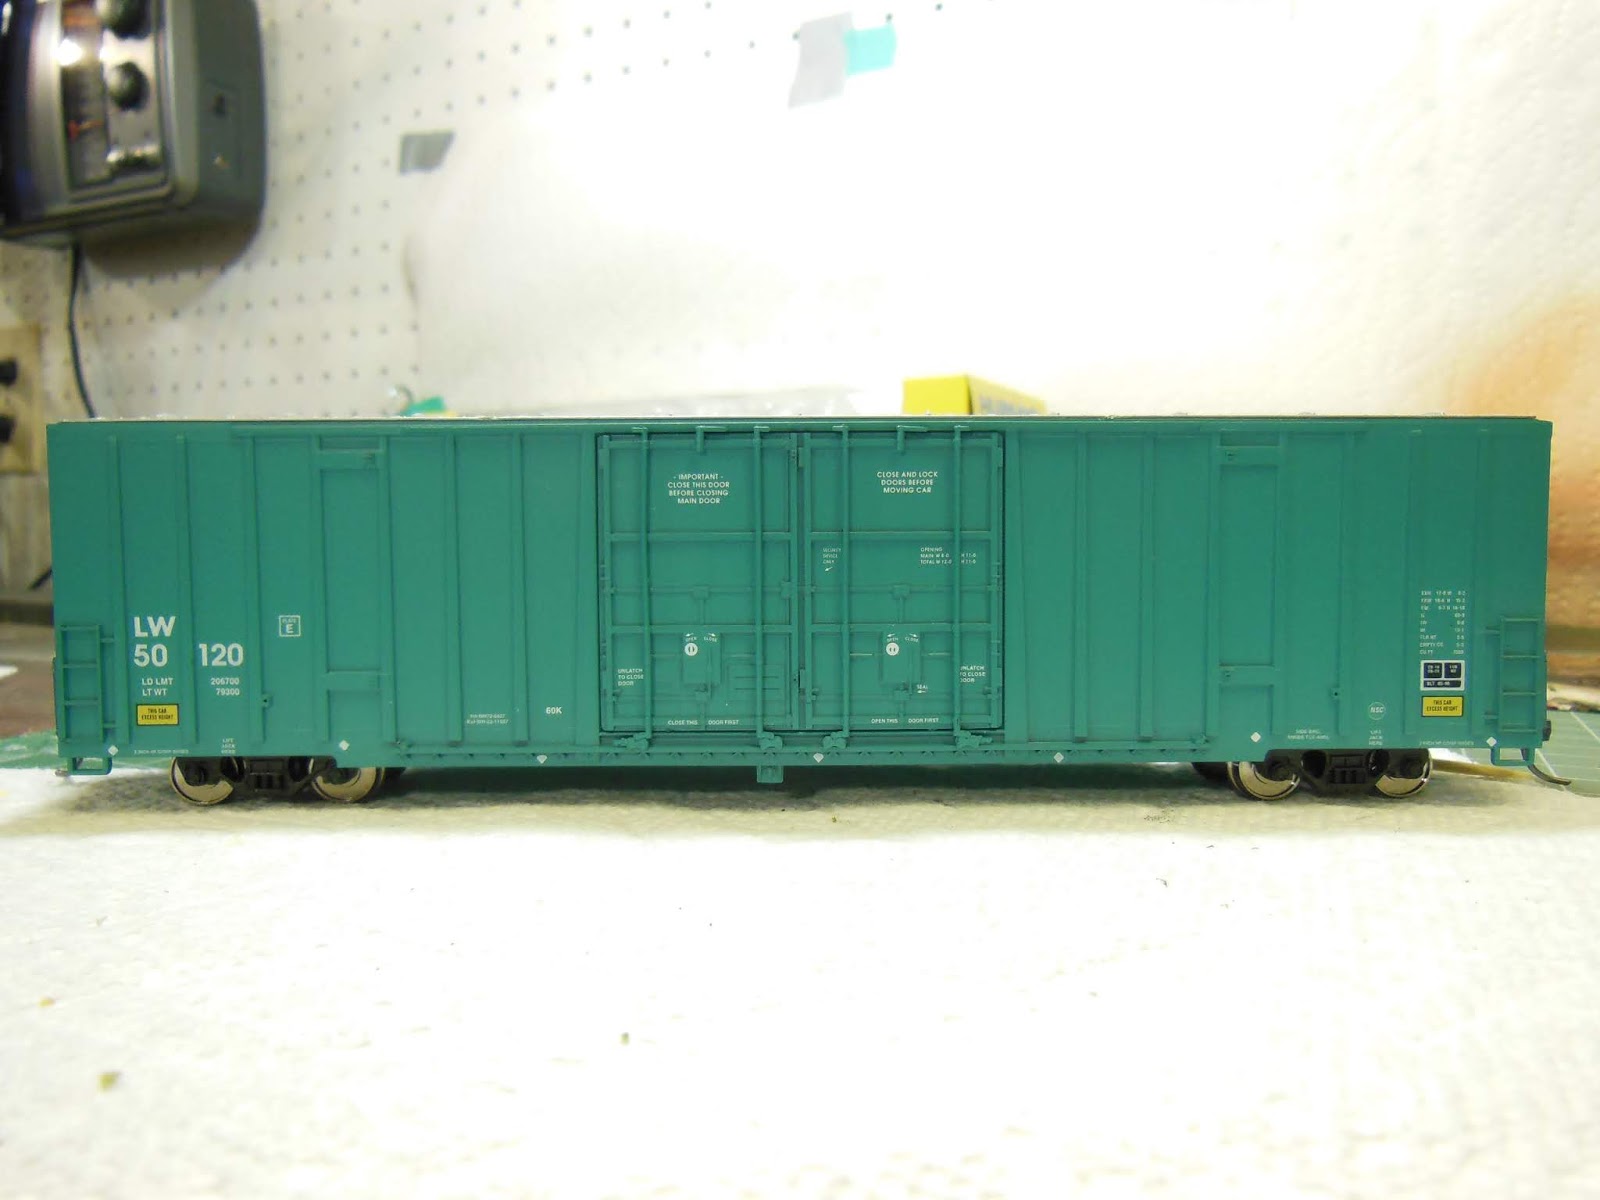
I also busied myself this week working on a DT&I 86 foot boxcar. I replaced the wheels with metal ones, and added the coupler conversion kit made by Walthers.  I don't think that aftermarket kit is available any more, but if you can find one it sure is a lot better for these boxcars than the original Athearn coupler/drawbar system

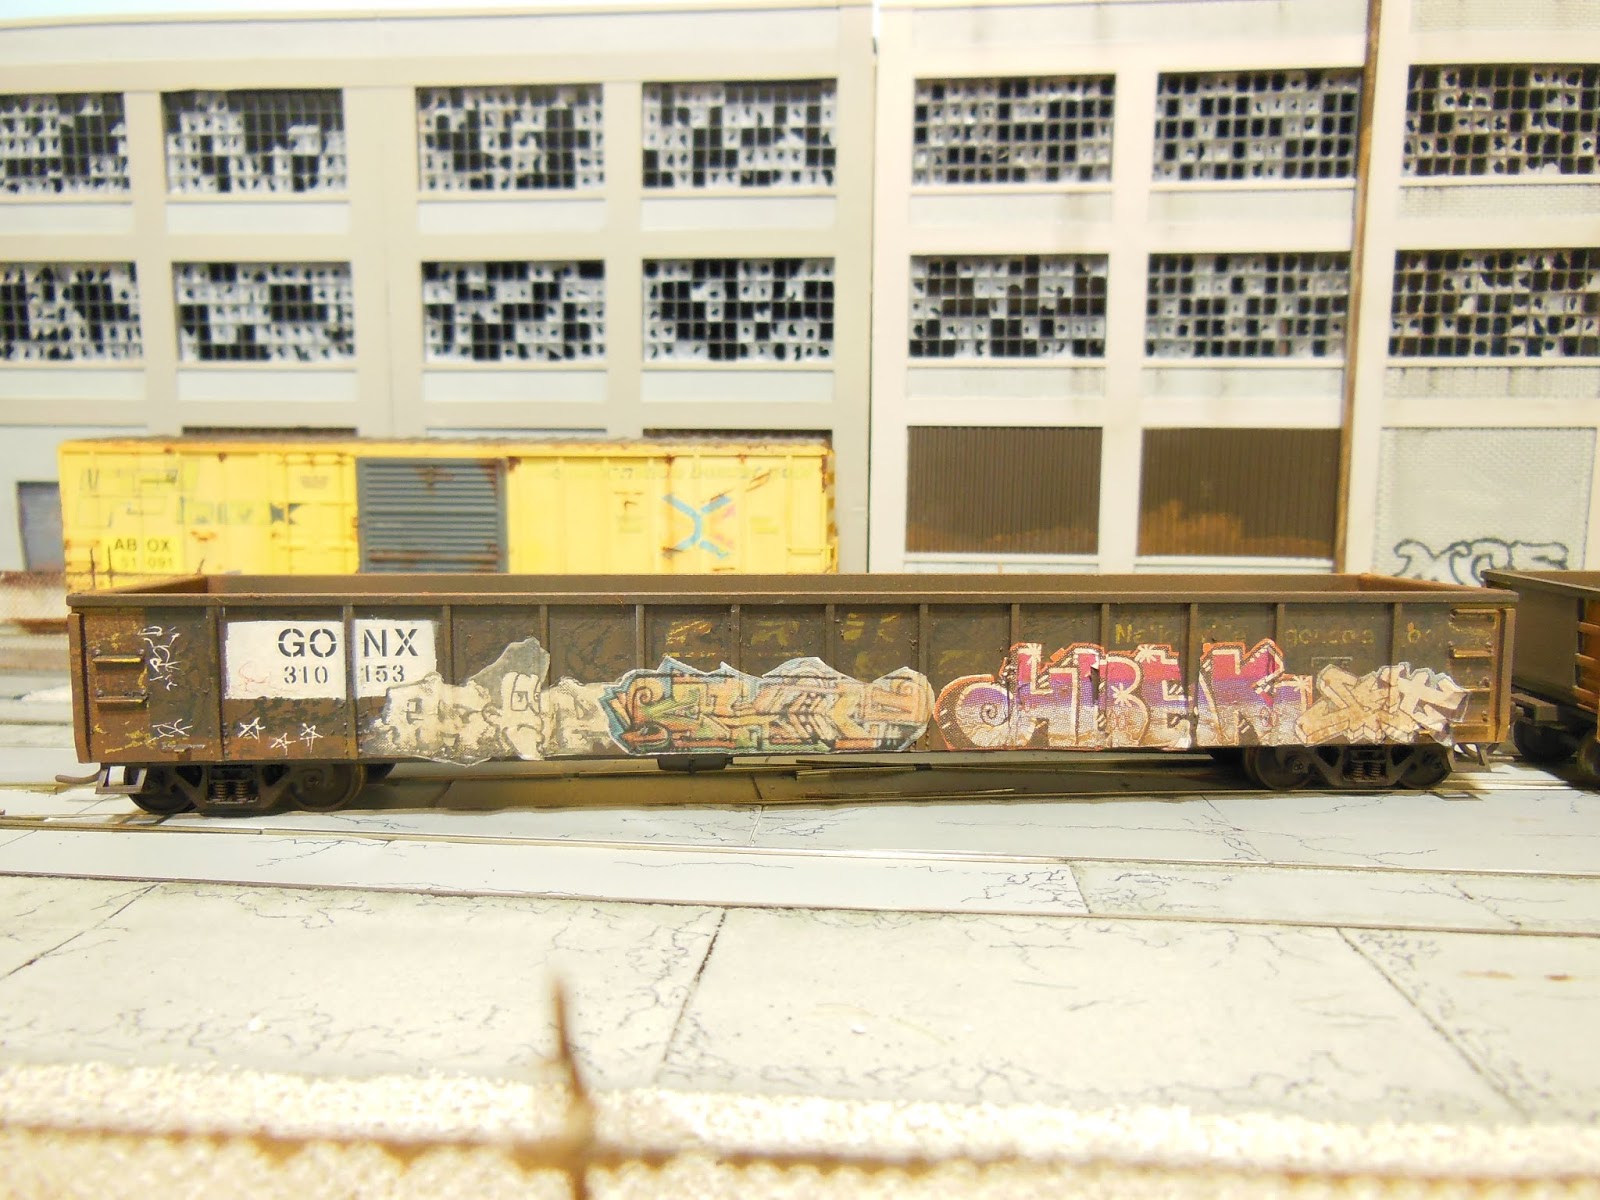
Then I got busy with the weathering.  Here's a look at the results after fading, rusting, scratching and patching...
DT&I 26020 looks ready to be spotted at the parts plant.  Fortunate that there was no trailer parked at the loading dock in the foreground to block the view.


A look from behind the fence over on South Industrial Blvd. shows the other side of this 86 foot car waiting for the train crew to pick up a RailBox before heading over to the parts plant.

And a view from rooftop of the warehouse across the street.


Saturday 21 September 2019

Two More Weathered Gondolas

I was asked to weather a group of freight cars for another modeler, so here are the results I came up with on a couple of 50 foot gondolas. I sprayed them with chipping fluid and then a couple of different shades of brown, which I promptly "chipped off" with a small damp brush, leaving a well-worn appearance to their side panels. I masked around the reporting marks and then patched and re-stenciled them.

I was asked to put some graffiti on some of the models, so these photos will show how that turned out on these gondolas. The larger graffiti on these is from an assortment of decals given to me by Luc Sabourin some years ago. To make the decals look less decal-like, after they've dried, I brushed on a couple of light layers of acrylic craft paint. I used soft yellow, blue and green shades, which help tone down the brighter original colours of the decals just a little bit. 

The smaller, whitish scribbles toward the ends is my own chicken-scratch, done with a white paint pen. As a final step, the cars were given very light overall sprays of browns and greys which serve to tone down the colours even more.

And the photos below show the other side of the same two gondolas.


This is an interesting scene outside of the LDS shop (former CN Roundhouse) at Sarnia on Friday.  Ex-CP, this GP9 looks to be marked for Cando Contracting as CCGX 4024. The long hood looks to be on a flatcar just beyond the geep, but that's another long hood in grey primer sitting on the ground. I think that it may belong to another geep being worked on inside the shop, but I'm not entirely sure of that.


 The faded paint, spray painted reporting marks, covers on the exhaust stacks, and notice the brake wheel still standing in front of the engine would all make for an interesting modeling project.

Don't get to see too many of these around here any more, but on Tuesday I was able to snap this nice picture of SW 1200 #7304.


Going by information on rrpicturearchives.net, 7304 was originally built in 1960, and rebuilt in 1987. Looks pretty good for a machine that has spent nearly 60 years outside.


Saturday 14 September 2019

How I Tried to Beat Up a Scrap Gondola

Here's an older (Roundhouse car I think) 50 foot gondola that I re-painted and lettered early this summer. As something of an experiment, I wanted to see if I could make the panels between ribs appear dented and banged up.

I started by cutting a couple of strips of .005 thickness styrene to fit in between the ribs. Then, I took the styrene strips outside and dropped them onto my concrete driveway (yes, the driveway) and rolled an old wallpaper seam roller over them a few times. Doing this embossed the styrene with little bumps from the irregularities of the concrete.

Back at the workbench, I cut the styrene strips to the required length, and glued the pieces right overtop of the original gondola panels. I then painted the gondola dark tuscan oxide, and decaled it as a Herzog (HZGX) car.

I got a bit more creative, and sprayed the gondola with chipping fluid. I then sprayed another coat of the dark tuscan, which I promptly chipped off with a damp brush, to give the appearance of the lettering being aged and worn away.


Certainly not the greatest looking model on the layout, but it was a fun experiment to try making the panels appear banged up. I think I could get a better result if I try this again at some point.

Speaking of scrap gondolas, the local scrap recycler on the layout has become quite the busy place for me to switch out. Things didn't quite turn out exactly as I would have liked at that industry, but it's pretty good. The main issue that I have with it is that the rail entrance that I would have liked to have there just didn't have enough real estate available, so a couple of compromises had to be made.

I really wanted the rail entrance to be at the front of the fence line so that:
a) the JSSX shortline would have handled the switching duties, and
b) the spur into the property would cut across the roadway at an angle, which I thought      would have been interesting visually. In my mind, this was to be something like a rail entrance to a scrap yard that I'd taken a (bad) photo of somewhere in Detroit a few years ago

But there just wasn't enough room for the entrance to do that. 

So, the rail entrance is at the back and the GT switches the cars in and out. Oh well, it's still fun anyway.
The spur into this scrap recycler in Detroit crosses over from the opposite side of the street that we were stopped on.  I would have like to have somewhat replicated the crossing on my layout.

My scrap recycler industry takes only about 10 minutes for me to switch out - an hour on the fast clock - depending on which spots the incoming cars are going to, and the order they're in on the train. I've collected quite a number of different types of gondolas that can be spotted in there. And, as I've shown some time ago, I've made removable loads for most of them so the cars can go in empty and easily be loaded to be switched out.
I've shown some of these loads for various gondolas before. The pipe, flat steel, and steel coils are loads that get sent in to a fabrication shop down the street from my recycler.  Also, 4th from the right is one of the removable false bottoms I've made for most of my fleet of gondolas.


Saturday 7 September 2019

Louisville and Wadley Boxcars

My freight car roster increased by a pair of 60 foot high-cube Louisville and Wadley Railway boxcars that have found their way out of the storage cabinet. Following a couple of days on  the workbench for a light weathering, they've made it onto the layout.  These two cars were manufactured by Hubert's, which is now owned by Intermountain.

I purposefully kept the weathering to a near minimum on these two, which is kind of a challenge of it's own, as there always seems to be a temptation to add more rust or dirt or grime.
Just one of the LW boxcars, fresh out of the box.


I masked off parts of the lower areas of both boxcars.  With the masks in place, I airbrushed the exposed areas with light layers of ModelFlex Concrete Grey to fade the blue-green colour.  This Concrete Grey is the same paint that I used previously on a blue GT boxcar that I featured three weeks ago.  These cars are more of a turquoise colour, but I figured it worked well once, so why not try it again?
Here are the two boxcars after the paint fade is finished.  You can clearly see the difference in the shades of colour where I had done the masking before spraying the concrete grey.

I added just a light rusting at the door hardware and a couple of faint streaks of grime on a couple of the panels.  The roofs of both boxcars were left largely untouched, as that's the way they appeared in most of the photos I saw online.


My two 60 foot Louisville & Wadley boxcars spotted together.

And, just for the heck of it, here's the 76 year old tug Manitou passing northbound under the Blue Water Bridges this past Tuesday. It doesn't really look like it to me, but Manitou is listed as being 110 feet in length.  Not sure, but my guess is that the tug was headed back to it's home port of Bay City, Michigan.
The flags look nice flying in Tuesday's strong breeze from the south.