Saturday 29 June 2019

Industry Repair Progress & Track Replacement

Back on June 8th, I posted this photo of an industry building that had been in need of repairs that I'd been wanting to get around to working on.  The building itself is repaired, but while the code 100 track spur was functional, I did want to upgrade it to code 83.
This industry building is situated in a corner of the layout, which makes working on it difficult. So, the whole thing, spur included, is mounted onto a 6 inch wide piece of MDF. so that I can (hopefully) lift it up and move it more easily from the layout to the workbench when needed. So far, that idea has worked out fine. I've got replacement code 83 flextrack for the track in the foreground, but I still need to get a code 83 switch to replace the one in the foreground here.

The building is over 49 inches in length, and about 3.5 inches deep, except for the bit at the far end which is 5 inches deep.It's made up of 3 or 4 of the Walthers Armstrong Electric Motors kits. The code 83 track for the spur is in place, ballasted and weathered. There's a bit of greenery and even some cardboard that I've littered along the track as well.
The building still on the workbench.  There sure are lots of windows.  Four 60 foot or three 86 foot boxcars can be spotted at this plant.

I've purchased this Walthers kit of rooftop detail parts to add more interest to the structure.


The kit is made up of 37 detail parts, some of which have to be cemented together.  I don't know if they'll all end up on the roof of this building, but we'll soon find out.

Lastly, Monday will be Canada Day up here.  Scruffy, the Deputy of Security, keeps watch as I photograph some of the Canadian flag decorations that I made up for family and friends this week.
Happy Canada Day!

Saturday 22 June 2019

Fibre-Optic Markers, Plus a Couple of Covered Hoppers

You've probably seen those white marker plastic or vinyl stick-type things with the orange coloured tops alongside a roadway or ditch and never gave them a second's thought, and just continued on with your day. I have too, but one time I saw some and wondered what they are.  Well, come to find out that they're markers for fibre-optic cable lines.  Hmmm...that's an idea...

So, I decided to make a up few and put them on the layout,  I cut some .005 thick styrene into a strip about 3 scale inches wide.  That was just a best guess.  I cut the strip up into pieces about an inch long or so, allowing for roughly half of that to be stuck down into the the "ground", leaving more or less a scale 4 feet visible.  This all seemed about right. 

I quickly painted the top end of the pieces with some orange craft paint and pushed the other end down into suitably sized holes I drilled into the tabletop. I've spaced my markers about 150 scale feet apart, which also seemed a reasonable guess - at least to me anyway.
I know they're very difficult to see in this photo, one is way down there by the brown boxcar on the left and another beyond the fire hydrant. Sorry, but that's the limitations of the depth of field of my camera.

Here you can see one of my fibre-optic markers much better.

I also busied myself this week with some freight car weathering

Above are a couple of cylindrical covered hoppers that I've weathered this past week for Jamie Barron. Wheels, trucks and couplers are painted, faded paint, some vertical grime and rust streaking, wear on the discharge bays, and a light layer of rust from the walkways onto the car bodies. 


Tuesday 18 June 2019

Around the Goderich and Exeter Locomotive Shop

My former neighbor, Ian Cryer sent me these photos, which he took a couple of weeks ago near his new home in Goderich, Ontario.  Thanks Ian !

I haven't been to Goderich in several years, but back then this GEXR maintenance shop is where I got the idea for the steel sided engine shed, instead of using a Walthers kit brick 2 stall engine house on my JSSX. I notice the random red safety striping beside the large door as well as the many other details leaning against the wall.


GEXR GP38 with Operation Lifesaver and Zero Injuries Is Our Goal decal.  Some real heavy grime streaking down the sides of this loco.

Southern Ontario Railway (reporting marks RLHH) has similar stickers/decals as the GEXR above.  I wonder what's in the pails at the left in the foreground.
I prefer the red,white and blue of the previous RailAmerica scheme on this GP40 to the orange and yellow used on Genesee and Wyoming subsidiaries.


This is the scene outside of the engine shed on the JSSX. Workhorse GP 38 #815 is to the left and ex-Conrail Dash 8-40B #5068 in the doorway.  I'm going to see if I can add those red safety stripes similar to those that the GEXR has by the door, 


Saturday 8 June 2019

GTW 86 Foot Boxcar 1:1 and 1/87

I've got a shoebox full of photo prints that I took a number of years ago, before  I ever had a digital camera.  With a new printer here, and the scan feature set up on it (finally), I've scanned a couple of prints to show here.  I used these to help weather an 8-door 86' boxcar of the GTW persuasion.

These two pictures are not of the same car, but I used them for reference for one side each on the model.  I think the 2 pictures would be a good 20 years old now. I'm not good about keeping track of the dates.


The Athearn blue-box model.


The two sides of the model.  Next time this boxcar goes past the workbench, I think I should add the black patch at the reporting marks, as well as the barcode and a couple of other paint patches that I missed.


Last week I showed the kit-bashed building that had pretty much come apart on me when I had moved it. I got it put back together this week, with better glue joints.  Also, since it's in the corner of the layout, it's much more difficult to reach to work on.  I've got it mounted now onto a piece of MDF so it can be lifted out and taken to the workbench without damaging things again.
This industry can hold 3 86 foot boxcars on the spur, but I normally just have 2 in there. I have a couple of pieces of code 83 track that I'll put here, which should look a lot better than the code 100 that's placed there temporarily.


Saturday 1 June 2019

Rusted Boxcar Doors

A couple of weeks ago, I posted about trying out a product called Rust Effects made by Modern Masters on the roof of one of my GT boxcars.  I described the results as being not exactly a home run.  Well, after having that boxcar out on the layout for a couple of weeks, that roof has kind of grown on me.  At least a little bit anyway.

Also since then, I had the idea of trying it out on another freight car as well.  But this time, I thought I'd put it to use on the doors.  I pulled a pair of Southern boxcars from the storage cabinet, and ran masking tape all around one door on each car before I began.

Here's my results...and I think these are looking pretty good.


It was about time that these two waffle-sided boxcars made another appearance out on the railway, so I kept them on the workbench for an extra day while I gave the doors the rust treatment.  The results do seem to be a bit random, but with some practice, I think it could be controlled at least somewhat.

Close up view of one of the doors.  The product is very thick, and I think it shows a bit when viewed up close, but I like the colouration.  The speckled appearance on the tack board is from the rust activator component, which is spritzed on from a spray bottle.  The white specks will clean off easily with a dampened Q-Tip, but I kind of like it, so I might leave it as is


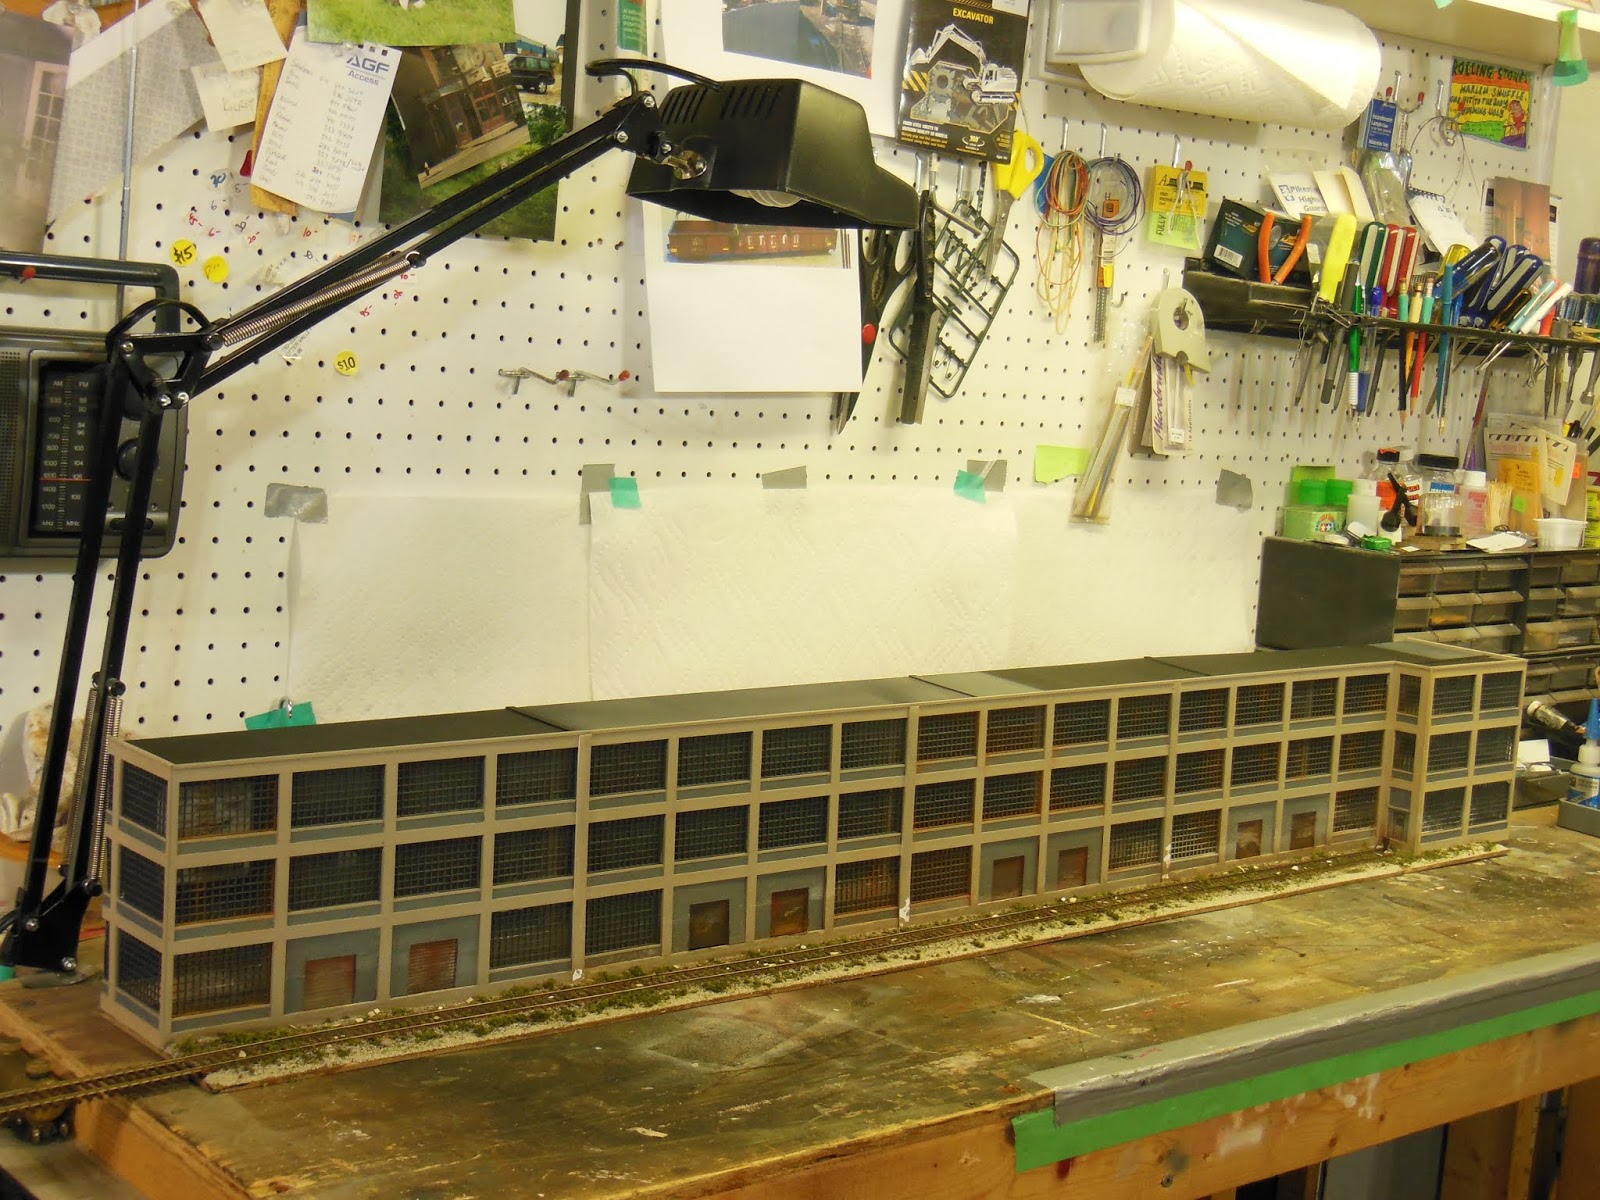
And lastly, I'll spare you all the details, but this industry on the layout has certainly seen better days.  It's been used as a destination for 60' and 86' high-cube auto parts boxcars, but I haven't been able to actually spot any cars in there for some time. This building is about to go through a little bit of workbench re-habilitation.
This industry is been made up of 4 Armstrong Electric Motors kits that I had kitbashed into one large building. I like the style of the building, with all the windows and concrete columns. I also have another section from it that's missing from the photo. And at one time, it really did look a lot better than this. Hopefully I'll be able post progress updates on it soon.