Saturday 28 December 2019

Painted Rails

First up, I've just added a new link to a new blog on my "Blogs I Follow list" this week.  

Consolidated Motive Power Services is the name of the site. Dave has commented on here several times, and from what I see, it certainly looks like he is a really talented modeler with a keen eye for detail. Click on the CMPS name at my list, or you can just click on this link  https://cmps2013.blogspot.com/ and check it out !

I got a bit of a start on assembling my Walthers Pellet Transfer kit which I want to add to the MidWest Plastics plant, replacing the temporary silos that I have there. Here's a promotional picture of the kit from Walthers.

I opened up the box, and the first thought that came to mind was..."Yikes!".  There are a lot of really fine molded parts in this kit, particularly the piping, and the base is the only thing not molded in shiny white plastic.  The kit includes 4 silos, but I think I only want to use 3 of them.  The instruction sheet mentions that it can be kitbashed using fewer silos, but gives no real help or advice on doing so. It looks to me like assembling this is going to take me some time, lots of care, and quite a bit of painting.

I should also mention that I'm going to have to modify the recessed area of my MidWest Plastics plant itself, no matter how many silos I use.  Too bad I didn't have this kit first so that then I could have built the plant around it.  Oh well.

As the post title suggests, the only actual progress made on the layout was that I managed to paint a total of about 12 feet or so of track that I showed here back on December 14th. 
The view before I painted the track this week.

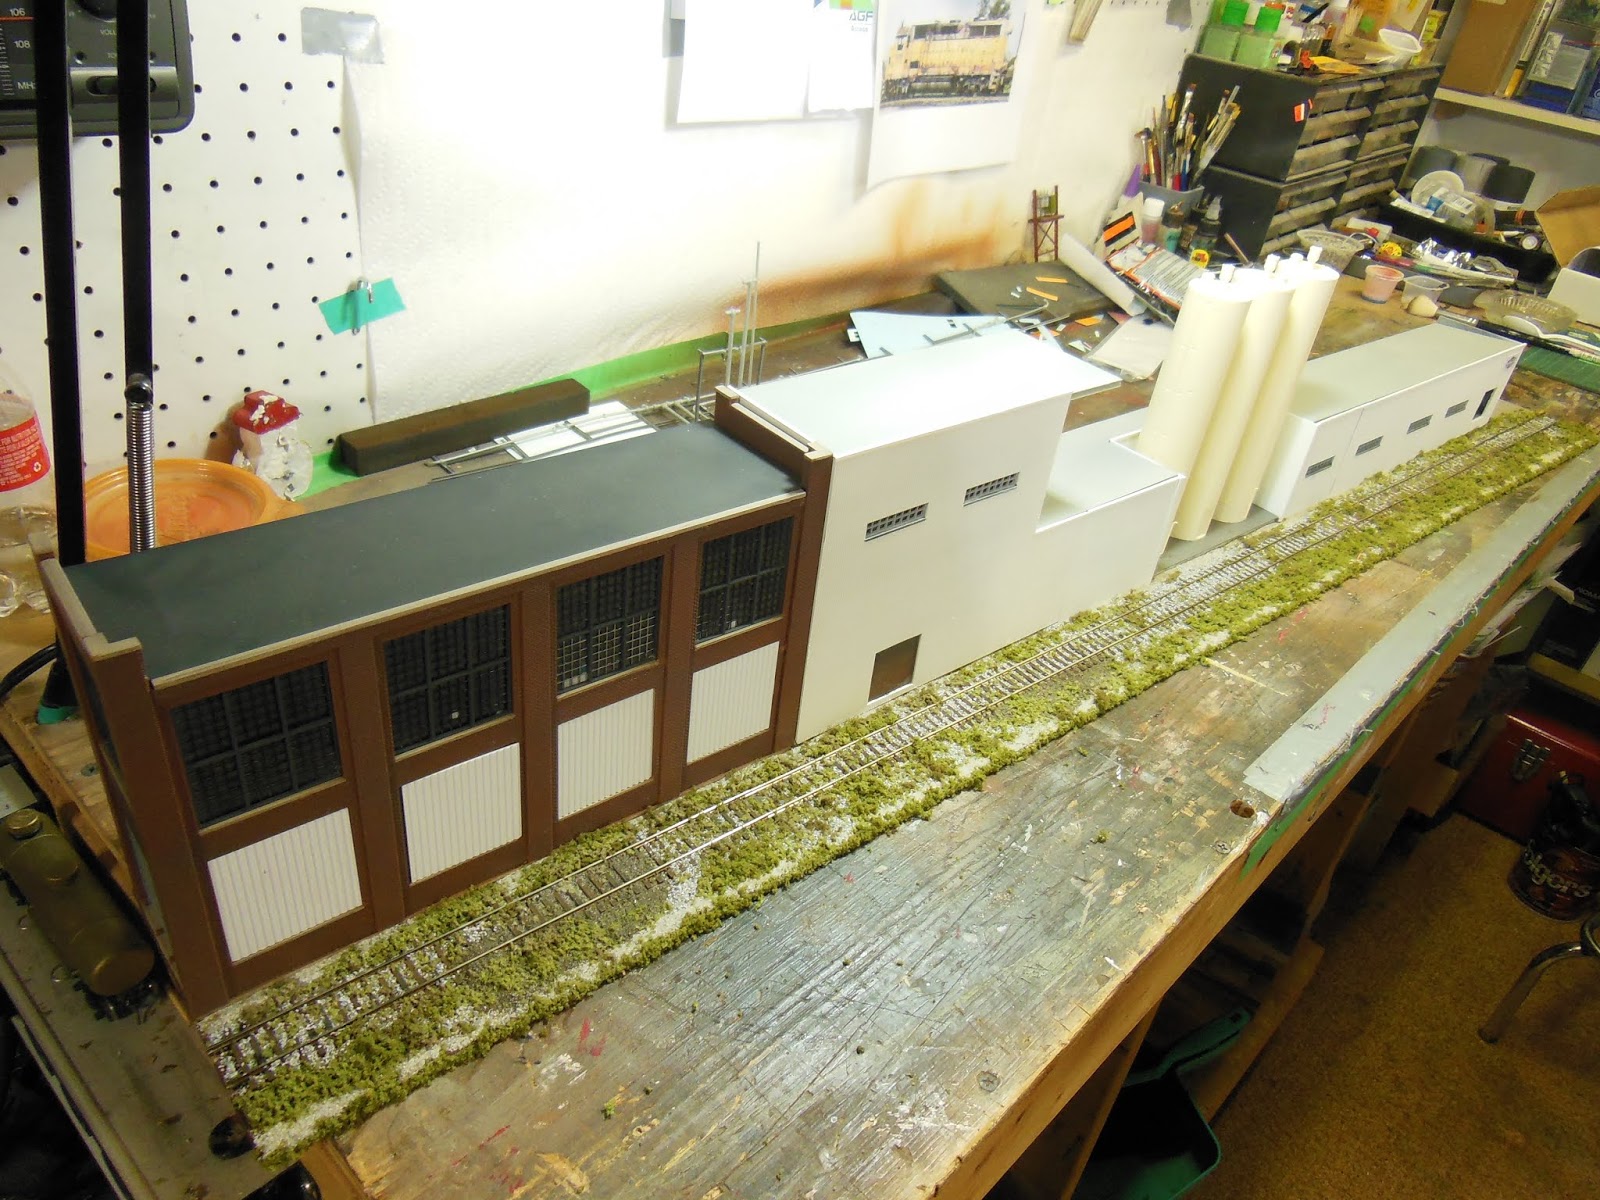
I masked off the points on 4 track switches, and also lifted out 2 of my large industrial buildings and the highway overpass altogether to prevent getting paint overspray all over them.  Here's a look at how the area looked with the buildings removed before spraying.
You can see the spur leads for the two industrial buildings that I lifted out before airbrushing.

I sprayed the rails with ModelFlex Rail Brown (the colour name makes sense) through the airbrush.  The tracks that were painted include a main, a run-around siding, and the leads into three industry spurs.  As soon as the painting was finished, I cleaned the rail heads off with a Peco track cleaner, and then replaced the buildings.  Ran an engine around on a test run and everything worked well, so I guess that project is done and over with.  The whole process took under 2 hours.

And below is that same location again as I showed two weeks ago, but with the rails painted.  Looks a lot better now.
Have a great week everybody...and a very Happy New Year to you all.

Saturday 21 December 2019

MidWest Plastics Update

Made myself busy this week with some work on the MidWest Plastics plant that's located along my GTW line. This plant takes in loads of plastic pellets as raw material, and ships out boxcar loads of finished product.

I've been planning to making some more changes/improvements to this industry for some time, and I've given quite a bit of thought to the way I want it to look if I ever manage get it finished up.

Here's the way things looked at MidWest Plastics this back in March.

And then in October I had the industry over on the workbench, while I changed the spur entrance from the right-hand end to the left.  At that time I mounted the whole thing onto a piece of 1/4" MDF, ballasted the track, and added some scenery.

I figured that a plant such as this would and should have a fence around it to at least discourage any ne'er-do-wells from causing trouble, so I made up a chain link fence to run the full 49 inch length of the MidWest property.

So, it was back over to the workbench this week for the whole industry to get the fence installed. I attached "No Trespassing" signs to the fence, and also painted the rails with "rail brown" using my airbrush.  That made a big improvement in the appearance of the MidWest spur.  I do still have to make a gate for the rail entrance, but here's a view looking down the spur
The rail joiners in this photo above can be slid back (toward the camera) enabling me to lift out the entire industry assembly and take it over to the workbench to work on it. More on that another time.

I had blanked out the lower windows of the brick building with siding previously, but I thought that I would rather see them as having been bricked in with concrete blocks. It was a simple matter to cut some block patterned plastic sheet to size, and press-fit them into the window areas. I put the concrete block into just two of the windows, and blanked out some of the individual panes on the other two. I also put the concrete block in the upper window on the end of the building as well.  The steel siding is moved to the top row of windows.
The primer coloured steel frameworks that I've scratch-built are intended to carry piping up and over the rail cars to the building.  The three silos are slated for replacement soon.  I've just this week purchased a new Pellet Transfer kit from Walthers, so that MidWest Plastics can have the railings, ladders, and piping details added.

That'll be all for this week, except to wish a Merry Christmas and Happy Holidays to all.


Saturday 14 December 2019

Former MPA Boxcar

Just to expand on my reference last week to the ACI labels that I had applied to a couple of boxcars, I found this rather interesting article about that identification system.

https://tedium.co/2017/09/05/kartrak-railroad-barcode-history/

I had thought that I'd put those ACI codes on some more of my railcars, where appropriate, but I've misplaced my small sheet of them.  I know I've got some, made by Herald King I think, but I've combed through my decals box 3 times and I can't find them.

I mentioned last week that I wanted to get ballast onto the two tracks where the photo of the 86 foot DT&I boxcar was taken.  Here's that photo (again).

I really don't like doing the ballast, and I don't think I'm very good at scenery type work in general.  And, as I've done before, I forgot to paint the rails first, so there's still room for improvement there too. Here's the same area today.
After the ballast and ground foam was glued down, and I had cleaned up the tops of the rails, at least it all worked electrically. It all seems a little too clean and vibrant right now for my liking, but it's a process.  I've got some brown coloured ground foam that I'll add to help tone things down.

I like that Berwick boxcar in the photo above.  Luc got it for me from ebay earlier this year.  I remember loading a couple of Maryland and Pennsylvania boxcars a very long time ago.  The star graphic on the right-hand end was very distinctive.  I searched pictures of these former MPA boxcars on the interwebs before I weathered this one, and used them as sort of a guide. Waterloo Railway seemed to have a few of them.

I like that the black has taken on a brown tone over the years, so I sprayed the boxcar with light coats of rail brown until the black turned to the colour I wanted. The white door with the rust streaking looks good, although I think that the picture I saw showed a Superior door.

Luc has since given me another model of the same car, so here's sort of a before and after photo.  I'll weather the 2nd one eventually too.

I left the circle/star graphic barely visible, although on the photos I saw it was patched over.  And the black band on the upper left is where the prototype cars had ''Maryland and Pennsylvania" printed.  The model didn't actually have that printed on it, but I added the black band patch anyway.  Here's a closer picture of my finished boxcar.
Weathered, replacement door, patched, re-lettered  and re-numbered, and with an added ACI label too, I think that this older 50 footer turned out very nicely.


Saturday 7 December 2019

Access Gate, Consolidated Stencils

Last week I made mention of needing to install a gate at the rail entrance to the warehouse along my South Industrial Blvd.  Well, during the course of the week it took me a couple of tries, but I made one that will suit the purpose.  I may have overdone it a bit with too much of the dark rust.  
This frame of this access gate is .025 steel wire, bent to shape.  One end of the wire is stuck into the "ground", allowing the gate is to be swung open and closed by a gentle push with the skewer picks that I use for un-coupling freight cars. The fence mesh is bridal veil material (called tulle).

I've been a member at Trainorders.com (a membership pay site) for several years, and like to occasionally post on the model railroading board there.  A week ago, I posted my photos of my DT&I 86 foot boxcar and received a bunch of positive feedback from other modelers.  One guy on there observed that I had not added the consolidated stencil to the side of the car, and that I probably should have since I had blanked out the original "capy" stencil. 
Lesson learned.

So, I spent some time scavenging consolidated lube stencil decals from various decal sets, and ACI (Automatic Car Identification) barcodes as well. I gave them all a bit of airbrush weathering before putting them on the boxcar. Here's a close-up view of the decals after I'd applied them.
I applied this 3-panel style of the consolidated stencil on 3 separate DT&I cars.  These are small details indeed, but they do make the boxcars look a little bit better.

 Here we see GTW 6210 moving DT&I 26035, with it's new decals in place, to the nearby parts factory spur.  The plan for the upcoming week is to (try) to get ballast onto the two sets of tracks visible here.  We'll see how that goes.

And, out in the  1:1 world yesterday, CN train 491 was westbound toward the St.Clair River tunnel being led by this set of Union Pacific locomotives (quite uncommon around here).  


Saturday 30 November 2019

A Couple of Industry Tweaks Along South Industrial Blvd.

I've added the short length of chain link fence (right hand side of the foreground) at the edge of a warehouse property along South Industrial Blvd. I still have to make up an access gate for the JSSX crew to open and close when switching the warehouse.
A rental daycab passes by as JSSX 813 is working on the South Industrial Blvd. street trackage. Still need to install a gate for for access to this warehouse spur in the foreground.


On the other side of the street, this building on South Industrial Blvd. always seems to be an attention getter, With it's run down appearance (2200 plus broken window panes will do that) and at 40 inches long, the size is fairly significant too.  There's one thing about it that has always kind of bothered me though...
The building was kitbashed in two separate sections, and as seen here, the seam between the two is just a little uneven, and too wide for my liking.

I've decided to hide the seam by making up a double-width concrete column to cover it.  I think that it turned out alright.

As long as I had the styrene out, I decided to try out my new NWSL Chopper 2 on it, and started making up some ductwork for the rooftop.  I'll spare the gory details, but you can take my word for it that the blade on that thing is sharp.
My scratch-built rooftop duct work, just set loosely in place.  I've found some other roof details that I can add also, and a few weeds growing along the ground here would help make things look a little bit worse as well.

Saturday 23 November 2019

DT&I Boxcar Weathered, Plus Trying Some Speed Matching

You may have noticed the change to the header photo at the top of the blog.  I've updated it again, this time with a photo I took last week.  The JSSX's GP38 #815 is seen beneath the highway overpass as it begins it's return run to the freight yard after completing switching duties.  I really liked the picture, so I thought I'd feature it in the header for a few weeks.  Here it is again...
I also wanted to mention that I'm using the 815 as the standard or "control" engine as I've spent time recently working on slow speed matching of my GP38's. I want to get them all to run similarly and really, really, reliably at slow speeds because the nature of the layout mainly involves short trains and lots of industrial switching.

So far I've only set the low speed voltage, using CV2. I may try CV5 and CV6 for the high and medium speeds some other time.  My understanding is that the Atlas dual-mode decoders, still in some of these engines, only use CV2. Not sure if that is correct, but this seems to be working well so far. I've got them running so that they crawl along 1 meter in about 105 seconds in speed step 2 of 128. That's slow. I wouldn't say it was a particularly difficult exercise to do, but it did take a bit of time to get the speeds matched between the 815 and the others.  I think I'll speed match my SD40's and other engines as they make their way onto the layout


I was about to buy another boxcar at the Ancaster Train Show two weeks ago, when I asked the seller to include this one in to the deal for an extra $5 and he agreed.  I figured that, when coupled with another similar DT&I 86 footer, this one could soon make for one half of a nice looking pair.

And the "after" shot of the same car with the weathering completed.
Here's my finished 86 footer, after about 8 hours total work time at the workbench.

In addition to weathering, I've also replaced the plastic wheels with metal ones, and replaced the stock Athearn swing couplers with the Walthers Swinging Coupler Adapter Kit.  I've used that adapter kit many times on other long boxcars, but now I've run out of them and they've been out of stock at Walthers for a long time.  I hope I can "track down" some more, as I still have other 86 foot cars to be worked on.
The weather-beaten DTI 26035 on it's first revenue trip along the GTW.

And coupled with DT&I 26020, which was already on the roster, the two 86 footers will soon be spotted at the local auto parts plant.


Saturday 16 November 2019

One Project Leads to Another

One thing leads to another.

A few weeks ago, I relocated the track switch for the spur to the Midwest Plastics industry and mounted the spur and industry onto a piece of MDF.  I wanted that spur to be oriented in the same direction as the spur for my auto parts plant. In order to smooth out the short curve onto the spur I shifted the entire plastic plant about 6 inches to the right.  That little project turned out to be just the beginning.
Hey, that looks like those three SCLAIR cars at Midwest Plastics.

The 2nd step became apparent when I realized that shifting the industry over just that little bit meant that the highway overpass that runs beside it also had to be moved over.  Shouldn't be a big deal though, as the overpass has never been glued down to the layout, so I just edged it over also about 6 inches or so to where it looked about right.

However, when I moved the highway overpass, it ended up directly over top of the street crossing. If a driver crossed the tracks , they would run right smack into the overpass support pillars. Can't have that.
As can be seen here, with the overpass moved, the level crossing led straight into the overpass support pillars.

Moving the crossing to the right would have opened up a whole new set of problems with a track switch and ground throw, so I moved the crossing about 6 inches to the left instead.
Some fresh ballast and a little ground cover added. I'll still have to install some signs and a few detail pieces.  Luc gave me some ideas for fixing up that little unscenicked area to the left here.

Below, JSSX 815 is passing under the highway as it begins the run back to the yard  But see that 3rd support pillar on the left?  There's another little issue as I never even noticed it was out of line until after this picture was taken 2 days ago.


Saturday 9 November 2019

Car Ferry Apron Project

One of the best things, for me anyway, about having a model railway is occasionally putting together buildings and structures. Whether it's a straight forward follow-the-instructions type assembly or kit-bashing (or trying to) or scratch-building something, I really, really like building a building. 

Brian Smith has a new layout underway at his house, and is including a car ferry as part of the operations there.  He has the Walthers car ferry already, as I gave him one that I had put together for myself years ago.  It's a nice model, but too big for me to use in my layout space.

I volunteered to put together the matching Walthers car float bridge kit for Brian.  I've had that kit in my cupboard for years and never got around to using it either.

Here's a photo of the box cover for the Walthers Car Float Apron.

The apron kit went together well enough, no big concerns there.  Although I didn't much care for the colour that much of the parts were molded in.
A view of most of the sub-assemblies of the Ferry Apron. I hand painted many of the individual boards on the apron deck, and then went over them with a thin black paint wash to highlight the seams between them. I also painted the molded in ties and the recessed grooves where the rails will go.


Some of the sub-assemblies include 2 steel breakwalls and the steel framework, which were all molded in the same bright orange colour as the pulley seen hanging from the cables. I suppose Walthers was trying to make these parts appear to be sort of a rusty colour, but they certainly came up short in that way of thinking.  I painted the framework and the steel girders with grey primer, and sprayed the steel walls with camouflage brown.


Notice the concrete weights inside the two support structures to keep the cables taught. Brian will have to lay the rails (code 83 recommended) on the apron.  The model comes with plastic rails included, but using them would mean having to use at least a couple of idler cars to be able to reach onto the ferry for loading and unloading.

Everything's together here.  The model's apron actually pivots from the loading/unloading end, and can be adjusted for height by easily removing the top structure (which I did not glue to the supporting structure) and tightening or loosening the cables.


This is the view of the completed and weathered apron that would be seen from the deck of the ferry as it approaches. I'm certainly hopeful that this will add a lot of enjoyable operation to Brian's new layout.


Saturday 2 November 2019

Switch Replaced, and a Berwick Boxcar

Well, that messed up track switch at my Wright Bridge and Tank fab shop has been replaced...didn't really take all that long for the track crew (me) to do either.  Maybe a little over an hour. With the new Peco replacement being shorter than the Atlas switch was, I had to splice in two short pieces of rail, about 1 1/4 inches long.  I also added in an extra electrical feeder.

After a few test runs with a couple of different gondolas and an engine there were no problems running there at all. Things were good so I also ballasted the switch and even added in a little bit of greenery. With that done, the area runs better and looks better than it did before.  So I'm calling that a "win". I did neglect to paint the sides of the rails though, so I'll have to try to get to that sometime soon.

The Peco switch in place, but I really should have painted the rails first. Oh well.

Also last week I posted a photo of my new purchases from the train show in Woodstock. Among those items was a 50 foot Berwick boxcar from Branchline, painted for the Wisconsin Central with the SSAM reporting marks.

Still shiny and new from the box just won't do for me, so before it goes on the layout I feel a little weathering is in order.  I try to refer to interweb photos of similar cars, hopefully from the same number series at least, for reference as far as wear and weathering patterns go.

With this boxcar, to start I flattened down the burgundy with a few light airbrush passes of Concrete Grey.  I've used that colour a few times now to tone down original factory paint jobs, and have had very good results so far.  Using white for this step can quickly lead to a frosted appearance to the paint, so I think the grey-beige of the Concrete really helps me to avoid that situation.

Following the airbrush, I just use an old worn out brush to dab burnt sienna, burnt umber, and a tiny bit of black along the roof sills and door tracks, and then blend it together with a little drop of water on the brush.

I've dirtied up the lower areas of the doors with a darker mix of the same colours. Scratches and rust blisters on the panels and posts are burnt sienna and burnt umber applied with a fine tipped (005) brush.
Some rusty colour has been sprayed on the coupler by the previous owner of the boxcar, but I couldn't say exactly what was used. I'm thinking that it's a bit too orange though, so I think I should go over it with a quick spray of Rail Brown or something similar.

The silver of the roof is first toned down a bit with Grimy Black mixed with Rust and then the rust spots are actually 3 colours, applied separately in layers. Raw Sienna, then Burnt Sienna, and finally Burnt Umber for the darkest portion. 
The rust patterns on the roof are more or less taken from a photo of another boxcar I saw online


The other side of the Berwick car.  I'm really pleased with the way this addition to the fleet has turned out.


Saturday 26 October 2019

Woodstock Show Finds, and Work for the Track Crew

The first train show of the season was in Woodstock, Ontario this past Sunday, and I always look forward to it.  There is usually another one in Woodstock in January and again in April, but weather can be a problem for traveling then, so this is the one that I try to make sure to attend.  I only went as a customer this time, and of course I forgot to take my camera. But I can show you what I purchased though.
I've got vague plans for the 86 foot 8 door boxcar, the Branchline WC boxcar was a nice find, as was the Reimer tractor-trailer.  The NWSL Chopper will be useful for future projects. The one hobby shop here in Sarnia closed down at the end of September, so I picked up the Xacto blades and Microbrushes, and the couplers and Flat Haze will go into my supplies.

I started to do a little bit of switching on the JSSX on Thursday, but I didn't actually get any done as I ran into a bit of a problem when the train arrived inside the gate at Wright Bridge & Tank.
The view from just outside the gate to Wright Bridge and Tank.  Wright was my mother's family name, so I chose to use it here.

A little bit nicer view of the Wright fab shop.

And here is the problem, of course.  There's been trouble here in the past, with gondolas and flat cars derailing on their way out of the facility, but the reason certainly was never this obvious.

The broken Atlas switch will be replaced with this Peco model that I fortunately happen to have on hand. Although the Peco switch is not exactly the same dimensionally, it will be an upgrade, so the layout will be better off for it. I guess the track crew (me) will be spending some time working here this week.

Saturday 19 October 2019

Some Layout Work From This Week

Took time away from my SCLAIR covered hopper and other weathering projects to do a bit of actual work on the layout that I'd been putting off for a while. I've been wanting to move the Midwest Plastic industry a bit further along, but doing so was going to mean re-arranging a bit of track work. And this week I finally forced myself to do it.  Took a little over 3 hours to get everything in place and at least operational. The only real complication was that I had to move an electrical feeder as well.
Above, these two switches and the diamond had been located about 6 feet to the right.  I moved them this week so that the switch on the left will become the lead to the Midwest Plastics spur. I did this so that the lead will be in the same direction as the one to my Parts Plant, which is next to it.  The switch on the right will lead to an industry to be named later.

Anyway, here's the Midwest Plastics industry (two separate buildings, plus the silos are separate as well), sitting on my workbench (again), this time to be permanently set onto a piece of MDF so that I can move it to and from the layout easily to work on it.


The buildings have been epoxied down onto the MDF, and the spur is complete with ballast and weeds.

 And here is Midwest Plastics in place and at least operational on the layout.

Oh, and speaking of that parts plant, I'd like to come up with a name for it sometime, so if you've got any ideas...that's it in the background of the photo below.