First off, does anybody know what's happened to Krylon spray paint? I ran out of their Ultra Flat Camouflage Brown, which is what I use for weathering freight car trucks and wheels, and now I can't find any anywhere. I've been to Home Hardware, WalMart, Home Depot, Lowes, and none of those places have any in stock.
I've gotten a little further along with my SP X-Post boxcar project...the decaling on one side is pretty well completed now, with I think just one more little touch-up to finish that up. And, I've got a real nice start on the decals for the 2nd side now. I still have to put on the vertical posts in the middle of the car, but this is looking really good so far...here's the one side, number SP 615222.
The thing that set this particular car apart for me when I first saw the photo was the 24 transverse reinforcing bars across the roof. I've used .020 x .030 styrene strips to mimic those. You can see them in the picture above the models. I painted the darker areas in the middle of the bars with flat black on the model, but that looks just a bit too shiny for my liking, so I'll try to dull it down a little using weathered black instead. I got the roof colour pretty darn close though.
Back on December 18th, on George Dutka's White River Division blog, he showed a photo he had taken of a neglected area that had been modeled on a modular layout he had seen at Trainfest. Here's the link to Georges blog post. http://whiteriverdivision.blogspot.com/2018/12/trackside-detailing.html
I have had a very similar looking building - made by Design Preservation I'm pretty sure - just sitting unused underneath the JSSX for a while, and felt inspired to try to do something similar to the one in George's photo. I had already somewhat weathered the brick walls, so that made for a good start.
I used rusty steel siding to close in the ground level streetside windows and front door. The other windows and side doors have been all boarded up with plywood made from cardboard from a cereal box. I painted some of the "plywood" with light gray and barn wood colour craft paints and then went over that with Vallejo's dark grey wash.
Now, I have to find a place on the JSSX to situate the building. I'd like to find a suitable sign for the front and maybe the side of the building, perhaps as a closed down bar or restaurant business. With some graffiti and other signs of neglect it should fit right in on the JSSX.
Thanks for the inspiration George, and whoever the modeler was at Trainfest.
With some home renovations going on in the basement this week, much of the happenings around the JSSX involved cleaning and vacuuming. Boring, I know, but necessary, right?
However, I did get started working on this undecorated 8 door auto-parts boxcar that I picked up last spring. Taped to the wall above my workbench is a picture of the prototype car, with a few notes scribbled down.
I'm more or less following an article written by Mike Budde in September 2000 Model Railroading magazine again to create an X-Post boxcar. This basically involves using Evergreen Styrene strips to add exterior posts to the sides and for this particular model adding braces to the roof. Note the 14 pieces of styrene (enough to do both sides) in front of the car are for the center space between the doors. They'll go on much later, after painting and decaling of those areas is completed.

I expect that this car could take a while for me to complete, as a similar one did a couple of years ago. Decaling those long stripes on the sides is something of a nightmare. With all of those vertical posts and horizontal bars, trying to get the decal to settle properly takes time and patience. The grey stripe decal sets seem to tear very easily, which further complicates matters. I'll only do a little bit at a time and then leave it for a day or so before doing any more. I had no interest whatsoever in trying to mask off the areas in order to paint the stripes.
Here's that previous similar car I did a couple of years ago (on the bottom), the current project as of last night after painting has the decaling underway, and the prototype picture as well.
That big white SP ball decal in the middle of the car went on just as smoothly as I could have hoped. The decal set from Microscale did not include the word "Hydra", as in Hydra-Cushion" for the right hand pair of doors. I had to create it by re-arranging the letters from another copy of the same decal sheet. The trick there was to create the letter "D", which I fashioned by cutting up a "B" and "C". I like to think of doing that sort of thing as modeling. So, things are moving along nicely on this boxcar. I'll show more on this project next week.
This BC Rail C40-8M trailed CN's SD70 #5692 as they passed the Sarnia station, to begin the switch moves necessary to pick up a dozen or so CSX covered hoppers. Those cars included a former RF&P car.
My GMRC boxcar from last week is finished up, and can now be found in service out on the JSSX. I really kept the weathering (rusting) in check on this one, mostly following what I could see on the prototype photo I had. There are just a few small rust blisters and streaks on the sides, but it's had plenty of paint patching done, which I think implies that the boxcar has had it's share of scratches and hard knocks.
I did rust the roof, using roof brown and an orangey rust coloured paint. Over top of that I put a couple of applications of thinned black Vallejo Wash to bring out the relief of the roof panels. The reporting marks on the ends of the car are patched too. That was 20 separate little decals to do the two ends. I thought I got them a little bit straighter than I did, but I'll be able to live with them like this.
The JSSX had a couple of pretty talented modelers visit on Wednesday, as Don Janes and his friend Bill Moore came by on Wednesday. I've been acquainted with Don for a few years, but he's never been here before, and it was my pleasure to meet Bill.
They both gave the JSSX a pretty thorough looking over, and made a number of observations about various aspects of my railway. They looked pretty closely at such things as the rust and weathering on the freight cars and structures, the chain link fences, the oil storage industry and tanks, and the JSSX engine facility.
Don remarked to me that he noticed that there were a number of high-cube boxcars, but not so many that they dominate the layout. That was something that I have actually limited on purpose, and it was very nice to have him recognize such a subtle thing.
Their comments were quite validating to me, as they picked out such things on their own that I've done purposefully to try to create the look and feel of my layout.
Here's Don and Bill during their visit as they had been checking out the street trackage and warehouse area.
Also this week, I've added these 2 loading docks to the rail side of that building with all those windows. Just a few scraps of styrene is all it took to make them, and only an hour or so. Then I painted and weathered them with grime streaks, rust streaks, and oil stains at the workbench before attaching them to the building.
A couple of loading dock roll-up style doors were also added. They are photos of doors from Lance Mindheim's website. He encourages us modelers to copy and use certain photos from his site, so Lance, if you ever happen to read this, thanks very much.
Here's a picture of one of the loading docks in place, and the two doors from Lance's site installed. I changed the colour of the door on the left from red to grey using Corel's Paintshop. I actually mistakenly installed both doors upside down. There are still 3 more doors to do, so I'll correct the first two then.
I took a break from the building with all the broken windows this week, and instead put together an Athearn blue box kit. It's a Pullman Standard 4344 boxcar that I had picked up at a show sometime in the past.
I say kit because I had to put the supplied end ladders, stirrup steps, brake wheel and chain, and wire grab irons on the car. There are also the air hoses, and a package of end walkways was in the box too, but those will be the very last things to be installed. The previous kit owner had already put the air system parts on the underside. I also changed the plastic wheels to new metal ones, and replaced the easily broken and good-for-next-to-nothing-anyway plastic couplers.
Once all of that was together, the weathering bug bit, so that's where I put most of my effort this week. I had saved a a picture from the internet, taken by Thomas Stebley, of this nicely patched car of the same type. I thought I'd try to see if I could come up with something similar.
I like the patched paint and the stencil font of the lettering, and the numbers themselves are two different fonts. That patched "Plate C" label is a little different too. It's those little types of things that kind of separate some freight cars from the rest.
Here's my GMRC boxcar, not quite finished yet though. I mixed a beige and yellow craft paint for the large patches (though the colour came out lighter than I'd hoped).
I blended white and light tuscan red model paint for the primer coloured patches. I sprayed that onto white decal paper and clear coated over top, then cut my primer patches from that and applied them like any other decal. The graffiti to the right of the door isn't quite the same, but it's fairly similar. I'll still have to weather the ends and roof.
I also opened up my package of SmokeBox Graphics reflective stripes to put on this boxcar. The yellow on yellow is a little hard to see, but I followed the same pattern with them as on the prototype.
I didn't find a picture of the "B" side of the boxcar until it was too late. Truthfully, I didn't think to go looking for one before I had already painted and patched this side in a best guess effort as to how the prototype might look. My guess was wrong, but I'm not likely to strip the paint and re-do it. Here's what I came up with for the other side. More weathering is pending. I'll update this little project as it finishes.
And down at the local freight yard this week, CN has this GP 40R from the Illinois Central working. Here it's returning from "A-Yard" with GP 38 #4717 after transferring a couple of dozen tank and covered hopper cars. Besides the peeling paint on the GP 38, I thought the number board was kind of interesting too.
Hey, in spite of the Canada Post mail strike, my order of paints arrived from MegaHobby in New Jersey 8 days after I placed my order. That seems like it would be about normal, so I don't think the strike had any effect on delivery time at all.
Among the items I ordered was a bottle each of AK Worn Effects fluid and MIG Heavy Chipping fluid. I hope to be trying those out shortly.
On the layout, I got the re-painting of the concrete pillars and the bricks done on my industry building during the week. I sprayed the pillars with the new Concrete Grey that I received, and the brick sections are thinned Craftsmart Grey, painted with a flat brush. And the broken windows are installed too, so things are coming along well.
Here are some of the windows, broken out but still on the sprue, with the pile of broken white glue "glass" beside them.
Below is my re-painted building with those smashed and broken windows installed. There is a difference in the colour of the concrete columns between the original section on the right and the newer rebuilt part on the left. I suppose I'll have top re-paint them on the original building, but maybe a downspout or ductwork or something like that would be enough to distract the eye from the colour difference.
I also cut some foam board to use for a base, the main roof, and a back wall. The base and back wall are painted flat black, which really helps the windows to stand out visually.
The ground level windows have been covered over with rusty steel siding, probably to try to keep those vandals out. I still have to make a short side wall and roof for the upper area at the left-hand end of the structure, and I haven't put the loading doors in yet either. I've got a couple of ideas for those, I just haven't figured out how to carry out those ideas yet.
Also through the week, when I wasn't busy breaking windows, I put together a set of 4 steel drums (Grandt Line), which I painted with Vallejo Rust Texture. And then, while I had that paint out, I used it on some Caboose Industry ground throws. Here's a before and after look at the drums and ground throws while they're still on the workbench. I just couldn't stand that shiny black plastic on the layout any longer.
I'm not saying that the Rust Texture is the perfect answer for the ground throws, but it's a lot better than that original shiny plastic. You have to watch how much paint you use on them though. If you put on too much paint, when it dries the ground throw might be seized up.
That about wraps it up for now. Have a good week.
When I use my airbrush, I almost always spray ModelFlex acrylic type paints. I don't have a spray booth, and there's no fumes from the acrylic paint. I was wanting to re-build one of my layout buildings and it's going to need repainting as part of the project, but I didn't have enough of one colour - Concrete Gray - for it.
I looked up on the website of the supplier here in Canada that I've used in the past, but they had that item listed as out-of-stock. I sent off an email to them, explained what I wanted, and that I would also order some other items at the same time. I received an email right back saying that they didn't know if they were going to re-stock ModelFlex. Not what I wanted to hear at all.
So, back to the internet and found a place in New Jersey that had what I wanted. It would cost me more and of course delivery takes longer from the US to Canada. But at least I could get what I was after, so I placed my order at www.megahobby.com . Check them out. They shipped the very next day, which was just about the same time that I remembered that Canada Post is striking. And then on the news, they said that Canada Post is asking the USA and other foreign nations to stop sending parcels to Canada because the backlog of packages awaiting delivery is so great.
If it isn't one thing, it's another...
The structure that I want to re-build is made up of parts from Walther's Roberts Printing kits, and will be used to make this building, which I've featured before, even longer.
I often receive comments (positive ones) about this building from anyone that sees it, and the frequently asked question is "how did you do the broken windows?". The answer is white glue. Since I'll be making and breaking some more, here's a photo below that I hope will help illustrate the process. The process is fairly time consuming, but I just do a bit at a time so it doesn't seem so bad. The individual panes are filled in with white glue that has been allowed to set up for a few minutes and then brushed in with a small, flat artist brush.
You can see the windows on the parts sprue that haven't been touched. In the middle-right are 3 small windows that have been filled with white glue which is still wet. Above them are 4 larger windows in which the glue has dried overnight. And to the left of those are 3 that when installed into the building will appear to have been smashed out by groups of rock throwing vandals. Technically it will have been me doing the smashing by use of my Xacto knife, and no vandalism charges will have been laid.
Here's how the structure is looking at the moment. It'll get better. The overall length of the whole building is just over 44 inches.
Down at the Sarnia freight yard, this nice looking blue and white GATX GP38 has been working for a couple of weeks or so. GP38's are favourites of mine and so are leaser engines, so for me this is a real nice combination I'll try to get a better picture of it and post another time. The little black thing at the corner of the station is a rat trap. Anybody ever model one of those as a detail on a layout?
With development of the new oil storage industry for the layout proceeding, I remembered this unassembled Walthers kit that had been waiting in my storage cabinet for years. And by years, I mean it's been at least 20 years since I bought it. Anyway, I finally dug the kit out of the cabinet and spent part of an afternoon putting it together. It's really an LPG car, so maybe not correct for use here, but I don't have many tank cars, so I'll use it at least as a placeholder for the time being.

For the most part, the kit went together well enough, but the railings and stanchions around the loading hatch weren't easy. The car came with plastic wheels, after all it is 20 years or more old, which I changed over to metal ones. To simulate re-painted areas, I masked off a couple of places on the body of the tank and then gave whole thing a couple of light over-sprays with flat black. I should see about getting a set of the newer style DOT decals though for my tank car fleet to bring them up to a more present-day appearance.
Here's my "new" tank car spotted at the storage tanks, coincidentally along with another Walthers tank car of the same type and era. I would have liked this industry to have been able to take in up to 3 cars at a time, but the real estate available limits it to only 2 available car spots. Oh well.
Back on October 27th, a misty rainy day, "C Yard" here in Sarnia happened to be significantly less full than usual, which made available this rare look at these storage and scale sheds. They are located out in the middle of the yard, and I'd pretty well bet that it's been 10 years since the last time I saw them, as multiple tracks of tank cars and pellet hoppers are always blocking the view from the station platform. A couple of simple structures like these would make for interesting additions to a layout's freight yard.
And I was asked to heavily weather a pair of 2-bay covered hoppers for cement service, so here's one before and then both of them after.
I know the one car is derailed, but I did that on purpose because they kept rolling away before I could get the picture snapped.
Well, on the JSSX this week, a little bit was accomplished.
I got some fencing made to surround the property where the oil storage tanks are located.
Here's a picture of the fence jig that Brian Smith made for me. I gave Brian the dimensions I'd been using for the height of the fences (6 ft.) and the distance spacing between the vertical posts and he whipped this up. There's two long horizontal grooves cut into the board and then holes and vertical grooves are evenly spaced 10 scale feet apart. The holes allow for soldering or gluing the posts and chords together.
There is a short section of partly completed fence in the top left of the board and on the right there are 3 gates that I just made by eye. One is for the rail entrance and the other two are for the truck entrance.
On the JSSX, here's a "drone view" of the entrances to the storage tank property, with the fence and gates installed. Looks good so far. Next up was to start work at the grade crossing to the truck entrance over that curved track switch. I'll trim and fit .010 thick styrene sheet between the rails for that. The .010 thickness will sit low enough that it won't interfere with the wheel flanges to cause derailments.
To fill in the area between the two sets of tracks I decided, rightly or wrongly, to use wall spackling rather than try to cut and trim styrene there. I masked the rails, especially that curved switch beforehand. I let the spackle dry overnight and then skimmed a 2nd coat over top the next day. Some very light sanding followed.
In much the same photo below, that's the .010 styrene in between the rails of the switch, sprayed with Rustoleum grey and Modelflex grey. Added in a Caboose Industries ground throw - it's an N-scale one which I think looks better - that I painted with Vallejo Rust Texture paint to get rid of the shine of the Delrin plastic.
Just have to fill in the area of the switch points - I'll use more .010 styrene for that - and then some thicker styrene where those long ties are at the switch rod too.

In the 1:1 world, on Friday the season's first snowfall also brought this UP SD90 8510 and SD70 4223 that were turned at the wye. They're seen here rolling past the station on the way back to their departure track at the east end of Sarnia. Kind of rare to see these around here.
And to finish out the week with something a little different, when out railfanning I guess it can pay to look up every once in a while too...
Here's a picture I took on October 24/18 of a pair of storage tanks at the Imperial Oil site along Christina Street here in Sarnia. Imperial has been tearing down part of their operation this year. I went by there again on Thursday, and the tank on the left is gone. I suspect the other tank won't be far behind.
I like the fencing too. Maybe some white plastic from a shopping bag and some scale lumber on some fencing around the tanks on the layout would give the look of this.
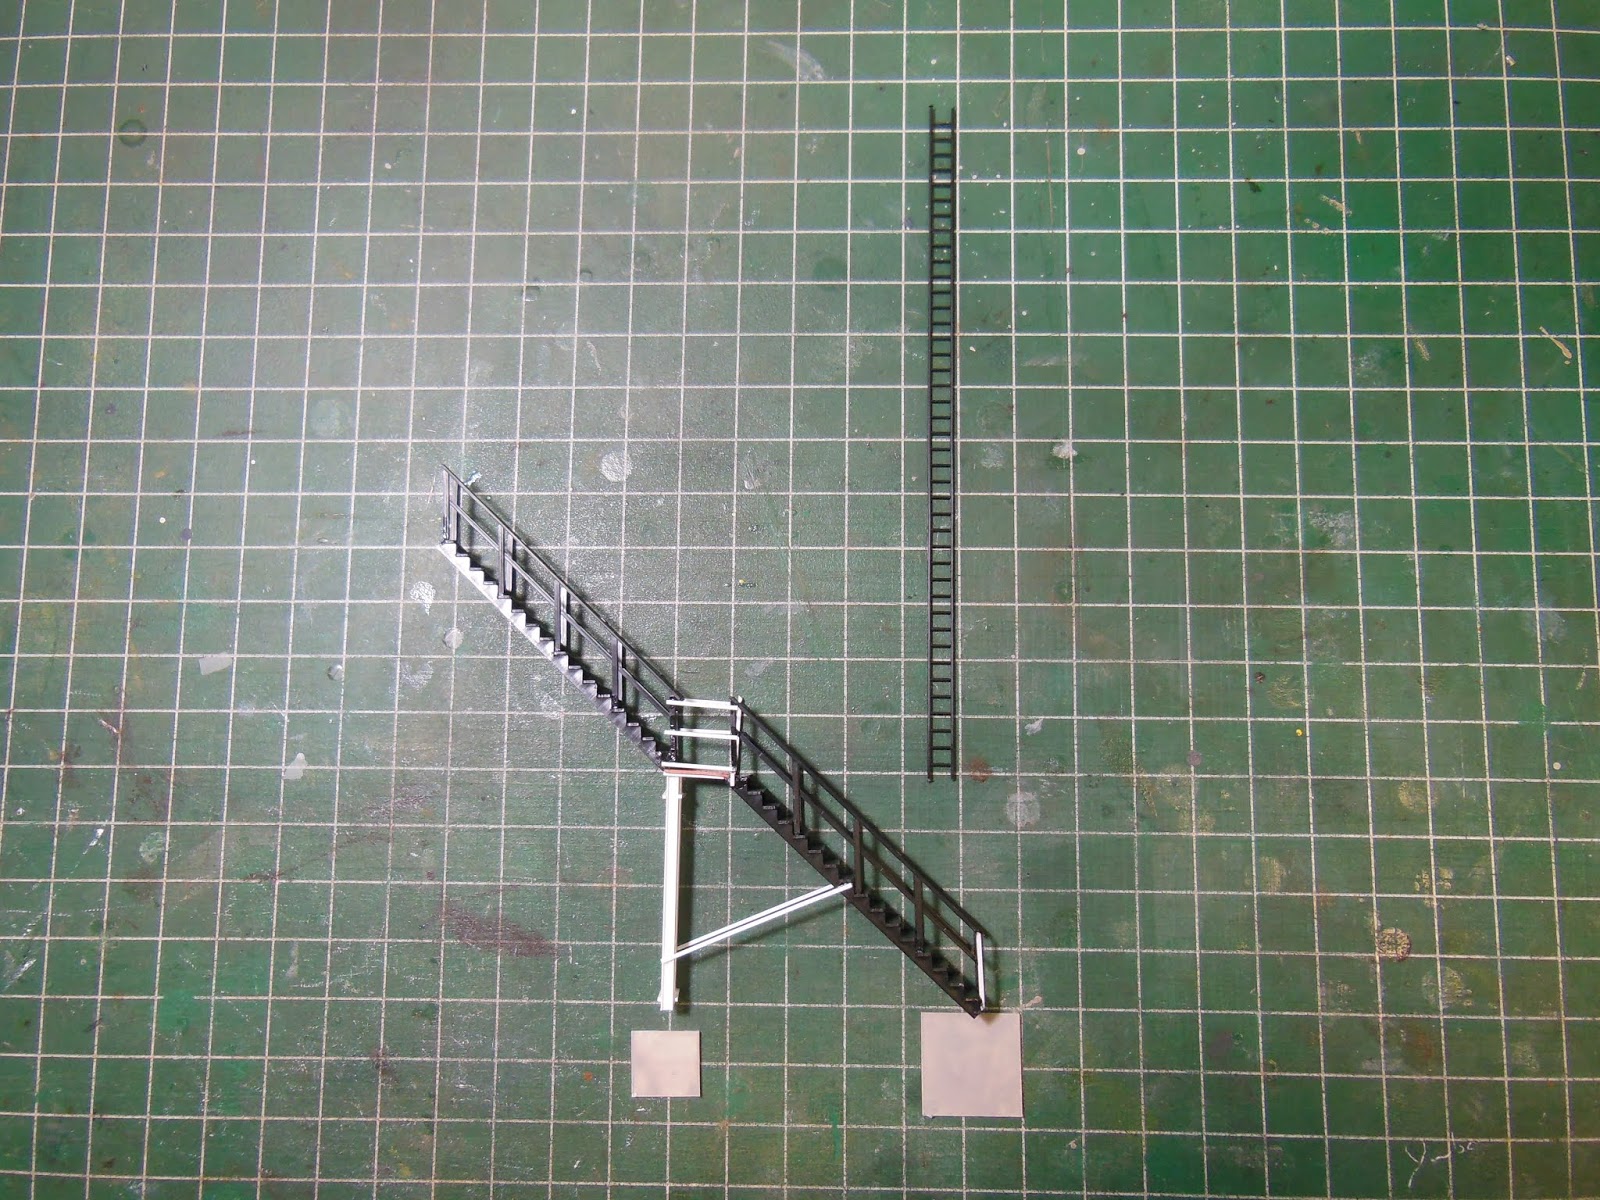
I put together this access stairway, which I rusted with Vallejo Rust Texture, up to the one tank. The stairs and ladder are Central Valley parts, but the white support and railing sections are scratched from a bit of Evergreen styrene.
I think my storage tanks were Rix kits. I took them outside to spray them with Rustoleum Flat White, which I followed with weathering with burnt sienna oil colours. Once that had dried for a couple of days, I added some Vallejo Rust wash. The stairs were primed and then painted with Vallejo Rust Texture. Here's the tanks set up on a concrete pad (foam board) on the workbench.
With piping added, and everything set in place on the layout. I'll have to figure out how to make some curved safety railing for the tops of the tanks, and make fencing to go around the area too.
Over in the 1:1 world, my neighbor Ian Cryer, sent me this nice photo that he took of Lake State Railway's MP15 #1502 as it switched the Dunn Paper plant in Port Huron, Mi. To my eye, this blue and silver scheme with the white pin stripe is really sharp looking. The white chevrons on the ends don't hurt the appearance of the locomotive either. Thanks Ian!
Until this past summer, switching in Port Huron was done by GT/CN. My friend Luc Sabourin sent me these next two photos of LSR 1502, also in Port Huron, the week that LRS took over operations. These were taken outside the Domtar Paper plant. Thanks Luc!