Saturday 23 February 2019

Progress on the Scrap Metal Yard

Earlier in the week, Brian Smith sent along a link to the February video update of Thomas Klimoski's excellent Georgia Northeastern Railroad. This model railroad is a favourite of mine, and Mr. Klimoski does a great job with his videos.  If I could ever get my JSSX up to this level of modeling, I'd be thrilled.

Here's the link: https://www.youtube.com/watch?v=_bs68-LgoVU&feature=youtu.be

I've been asked to weather a trio of RBOX boxcars for another local modeler, so I stayed busy doing some of that through the week.  He wants them to have the logo "ghosted", where the black lettering has worn off, leaving the the ghost of the logo to appear in the yellow of the boxcar.

As for any progress on my JSSX, that has been a bit lacking as I'm still involved in weathering a number of railcars and such.  However, I did get just a little bit done on the area of my scrap metal yard.

The corrugated steel fencing that surrounds the scrap yard is complete. The fencing scales out to approximately 8 feet high, which seems to me like it would be about right for this type of business. I still need to build a couple of chain link entrance gates to the property - one for the rail entrance and one for the street entrance as well. For the corrugted fencing, I've actually used a paper steel roofing made by a company called Paper Creek.  I was given several sheets of this product several years ago and have finally found a use for it.  I bonded the paper to .020 styrene with 3M 777 spray adhesive.

To break up the look of the steel fence, I also cropped and printed part of a photo I'd taken of the corrugated steel siding on the wall of a business here in town.  That steel siding had been painted white, and some of the paint has begun peeling off.  I thought that the change of colour would be a nice visual change and suggest that part of the fence had been replaced at some time.

I've started to create the scrap piles from scraps of 2 inch thick blue styrofoam insulation. I have yet to even paint the one to the right of the gondolas.  It's 24 inches long and I'll likely make it a or rusty colour as a base for a pile of scrap steel.  The grey coloured piles will be for scrap aluminum. I'm not sure yet just what I'll cover them with to simulate loose metal pieces.  I'll have to come up with something though...

 I need to build a gate for the rail entrance to the property and for the vehicle entrance from the roadway on the left.

The lighter coloured portion of the fence has been cropped and printed from a photo of corrugated siding found locally.  It looks like Luc's backhoe is finished clearing out one gondola and getting ready to start on the 2nd one.

I cropped the roof and parking lot out of this picture, then printed and mounted it to .020 thick styrene to make part of the fence. 

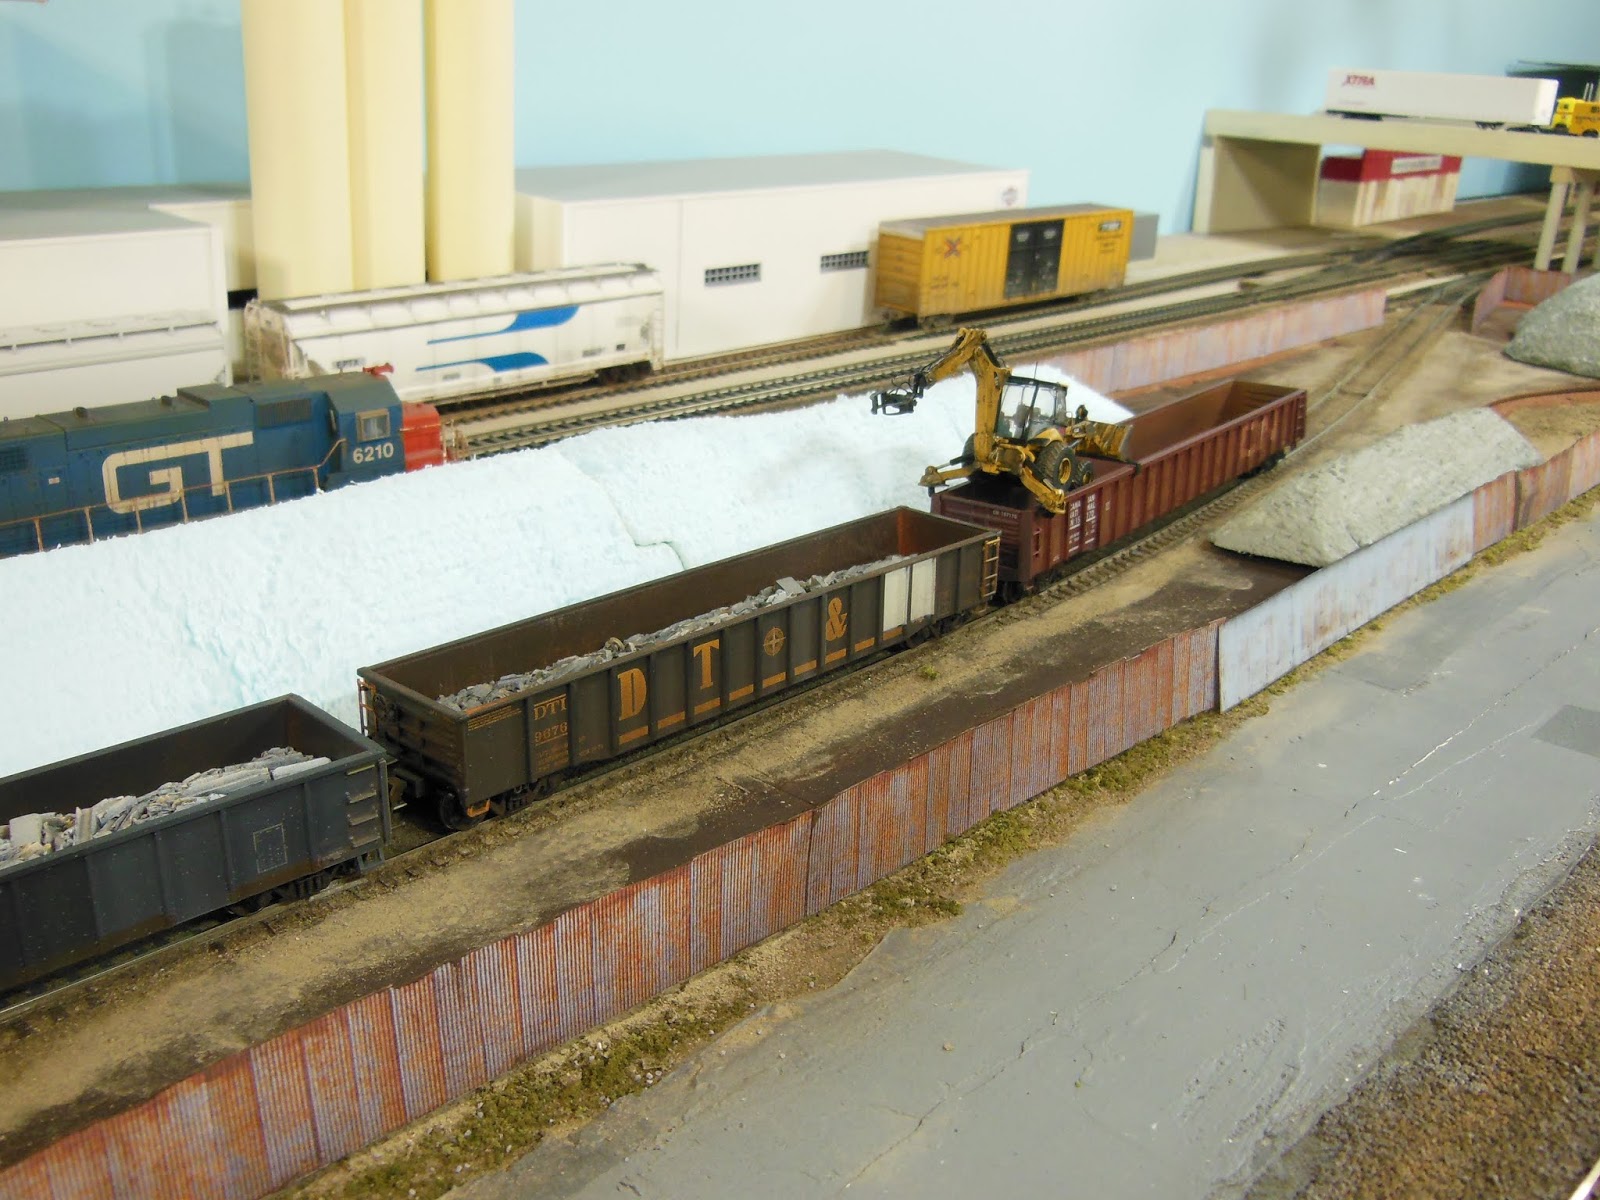
The blue and grey mounds will become the scrap metal piles. Their 2" height would be about scale 14.5 feet, which seems like it would be high enough.  Besides, any higher would begin to block too much of the view of the train that's running behind the scrap yard, and we can't have that!


Saturday 16 February 2019

Weathering Week

I'd like to start off by apologizing for the size of the font on this blog for the past couple of weeks.  I don't know why it's been doing that, and what's worse is I have not been able to fix it. And believe me, I've been trying.  I've followed the instructions I found when I googled the problem, but so far, no results.  The text looks just fine as I type it, but when it's published something goes wrong. So the band-aid solution for now is for you to use your Ctrl-Plus keys to increase the type size to help you with reading the text.


Aside from that, I've been on a bit of a weathering kick lately, so there hasn't been very much going on with the actual layout.  I think it's a bit of a carry-over from kitbashing and weathering the bulkhead flat car into a gondola, which I featured here last week.

Here are a few photos of what's been going on at my weathering / work bench.  Brian asked me to weather three cement cars for him,  requesting that the 2 Penn Central cars have their reporting marks changed to NOKL, so I did a bit of paint patching first, then the re-lettering and finally the heavy weathering style that he likes.  Besides the cement powder having run down the sides of the first 2 cars, there's just a little bit of rust in a few spots. I weathered a couple of other cement cars for Brian last year, so I'm hopeful that these will fit in nicely with those cars.


The newer CNW car is showing significantly less weathering.


And Luc brought over a piece of custom Maintenance of Way equipment for his BRAR, and asked me if I'd be able to weather it for him. I worked on the the black areas first, brushing on light coats of flat black. Some light grey on the tire treads was followed by dry-brushing a soft earth colour over top of the grey. Light washes of thinned black are applied over the body colour. I painted the bucket with dark rust colours, and then dark steel grey powders to finish it off. Here's before and after photos from the workbench.  This little project was a lot of fun for me to work on.


Luc's backhoe has climbed up from the ramp to the top of the RailGon.  The claw at the rear of the machine will begin cleaning out the scrap metal from the gondola.


Saturday 9 February 2019

Flat car Turned Gondola

On Thursday of last week, over at George Dutka's White River Division blog,  new friend Don Janes posted a really nice series of photos and a very complimentary write-up of my layout.  Don has visited 3 or 4 times now, and wrote in his post about my overall concept for the layout, and how things seem to "fit" together. He has quite an eye for the "art" of the layout, so when he comments on something, I listen.

Here is the link to that post at George's blog: http://whiteriverdivision.blogspot.com/2019/01/revisiting-jim-sloans-jssx-shortline.html  

My thanks go out to George and Don.


As for this week, I spent my time modeling a bulkhead flatcar that's been converted to a gondola.  I first saw this photo, taken by David Andersen, on Railcarphotos.com about 3 years ago or so, and saved it in my files for reference.

ExactRail released their GSI bulkhead flatcar last year, and I ordered one with this project in mind. Now, I don't know for sure if this is the exact correct bulkhead flat that I should be using for this, but if it's not, it's close enough for me.  The Exactrail car comes with a wooden floor and bulkheads, and this prototype has steel plate ends, and I'm guessing it's got a steel deck too. And maybe those differences account for the difference in the number series.

This the ExactRail car as it came out if the box. Really nice, but you can see the big white glue spot on the right-hand side.  I wrote to ExactRail about this, and 5 days later they got back to me saying that this is where the lube plate was. They apologized and said that if I couldn't find the pieces in the box they would replace the car, or send me the replacement parts.  I replied that if they wanted to just send me the parts, that would be fine with me.  That was 5 weeks ago, and the replacements aren't here yet, so I don't expect to receive them now. Oh well, not the end of the world, and I moved forward with my project without them anyway.

I doubt that I'll be changing the number of my car, and I'm not sure if I'll be putting on the reflective stripes either.

Here I have cut the styrene parts necessary.  The gondola section and the 2 end pieces (painted green) are .020 styrene, while the 5 sub-floor pieces are .030 thick.  There are 32 posts cut from .040 x .040 square styrene strip.  They fit exactly into the stake pockets on the sides of the car.

The paint on the green flatcar itself is faded by spraying with ProtoPaint Flat Haze, and then light green craft paint.
Things have really come together nicely.  I'll point out that the sub-floor pieces are not glued in, they're just press fitted into place. And actually, the gondola isn't glued in either. The bulkhead end plates are glued to the car though, and the 32 posts are glued to the gondola section, but the gondola and stakes fit into place so well that they can't possibly come loose.

I painted the gondola and the posts with Vallejo's Rust Texture paint, and then went over that lightly with washes of thinned Modelflex flat black.  With all of that dry, I stippled on a little bit of Modelflex Rail Brown to get some additional variation in colour and tone.


Here's the completed car, ready for service.  The rust streaks below the stake pockets and on the bulkhead ends are burnt sienna oil paints.  I've scraped off the glue spots on both sides and put decal lube plates in place, and added a little bit of brown powders on the outside of the ends. The inside of the gondola is painted with the Vallejo Rust Texture, and then I went over that with some black and burnt sienna  powders as well.  The wheels and trucks are painted with Krylon Ultra Flat Camouflage Brown, and the burnt sienna powders.

I'm really pleased with how this unique freight car has turned out. Now I guess I'll have to make up a couple of loads to go with it.


Saturday 2 February 2019

The JSSX This Week (02/02/19)

After my "retrospective" of the blog's first 99 posts a couple of weeks ago, I got to thinking that maybe I should try to come up with some sort of plan for what to accomplish this year along the layout.  There's lots of things that really should be done to improve it, and a bunch that would be nice to have.

I started to make a sort of list of things that I think should get done, but I gave up on that when the list about 20 items or so.  But generally speaking, and probably just like nearly every other model railroad out there,  have buildings, trackwork, scenery, and electrical that all need repairs improvements, and maybe even completion.  And there's also a ton of weathering for me to get to on freight cars, engines, and buildings.

So, without a set plan, it lookslike I'll continue to do things in no particular order (again), but either as necessary or just whenever I feel like working on them.  I typically have 2 or 3 things on the go at any given time anyway.

The first one that I've really set out to do improvement-wise this year, is to re-align some track.  My Grand Trunk line runs in a continuous loop, but it hasn't really had anything to do operationally other than to interchange freight cars to and from my JSSX. By doing some fairly simple track re-alignment, which I accomplished over two days, I've given the Grand Trunk 4 industries to switch out. Of course it still interchanges with the JSSX and can still run continuously. I like that part because sometimes it's nice just to turn the power on to the layout and watch a train run.

Anyway, this track arrangement leaves the short line JSSX with 4 industries to serve, plus it can spot cars temporarily into the spur at that big building with all those broken windows.  Given the amount of layout space available in that area, doing that can really complicate matters when the oil storage site requires switching.

In the photo below, the 2 tracks on the right and the spur with the TBOX are now part of the Grand Trunk.  The 2 tracks on the left belong to the JSSX.  The Grand Trunk tracks used to run where that far-too-shiny looking roadway is now.


In the middle of the picture is going to be my new scrap metal recycler industry.  That spur is going to be buried in dirt, and will be able to hold 3 gondolas, but I think that 2 will probably work out better for this size of layout.
This new track arrangement also meant that I could remove about 7 feet of the GT line that had become redundant.  I've turned that into a paved roadway that runs past a metal recycler industry that I've been wanting to get going on.  Gotta have somewhere for my gondolas to go.

The view from the opposite end of the new scrap metal place.  Work continues on this industry, as I've been putting together more fencing to close it in.  I will also try to rough-in a couple of scrap piles.  The ramp was given to me by Don Janes.

I've relocated a diamond crossing from the opposite end of the layout to this location behind the closed down warehouse.  This is where the GT loop returns to it's 3-track yard.  The JSSX continues on from here to the South In dustrial  Ave. switching district Don't worry, these two trains didn't collide.  I just staged them close together like that for the picture.


And changing gears a bit now, kind of new is this highway tractor and low-boy flat bed trailer that I picked up at the Woodstock show last month.  I gave the trailer a quick spray with some flat black.  The planks on the trailer had been a bright, really glossy orangeish-brown colour.  I re-painted them with "barn wood" craft paint and then a wash of flat black over top of that.  I tried some mud colour on the tires, but I don't like how it turned out so that's got to come off.  That's it for this week. Thanks for looking in, and Happy Groundhog Day.